Mt Woodson Foggy Milky Way
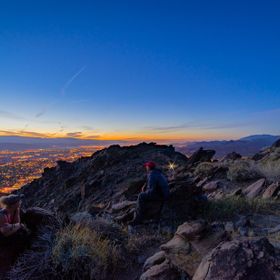
Looking down at the marine layer coming in and the Milky Way from the top of Mt Woodson in San Diego.
Looking down at the marine layer coming in and the Milky Way from the top of Mt Woodson in San Diego.
Read less
Read less
Views
571
Likes
Top Choice
Superb Composition
Absolute Masterpiece
Outstanding Creativity
Peer Award
Magnificent Capture
All Star
Superior Skill
Top Ranks
Categories

bojanacehovin
June 29, 2016
Wonderful! Like it! Wellcome on VB! Can't wait to see more photos like this :)

GinaSierra
June 30, 2016
What is the marine layer? This is beautiful! I'm curious as to the reason for the 2 different ambient colors... great capture of the milky way, it's so hard with all that light polution but you did an amazing job!
Same photographer See allBehind The Lens


Discover more photos See all


Behind The Lens
Location
One of my favorite hiking spots. Mt Woodson in San Diego. I've used this mountain as a training tool for getting ready for harder hikes such as Mt Whitney in the Sierras or Cactus to Clouds ( from the desert floor in Palm Springs to the top of San Jacinto at 10,834 feet and 22 miles of hiking). I love hiking this mountain at all times of the day ( depending on how hot it is), but especially at sunset.Time
I decided to hit the trail at 12pm and got to the top of the mountain around 1am. I was taking this shot around 2am. I got back to my car just as dawn was approaching around 4:30am. Its a little weird ending a hike as dawn approach's.Lighting
The city light usually blows out the milky way. I decided to take advantage of a deep marine layer that had moved in that night to help dampen the city light. I was actually nervous heading out there that the marine layer would be to deep and might swallow the spot that I wanted to shoot at. I was pleasantly surprised as I approached the trail head.Equipment
I used my Sony A7ii. Manfrotto backpacker tripod ( I don't want to haul around a heavy tripod on a long hike). Rokinon 14mm F2.8 lens. Used wide open at F2.8, ISO 3200, and exposure at 30 seconds.Inspiration
I have taken other milky way photos here but felt like they didn't measure up to what I wanted from the photo, so I feel the need to go back until I get something close to what I envision.Editing
Yes. I start in Lightroom with lens corrections, a slight bump in vibrance, temp, and tint. Then I open up the photo in photoshop. Create two different layers, one for the foreground and one for the sky. Apply a curves layer for each and adjust until I get what I am looking for. Go through a high pass filter to sharpen and then use NIX define 2 for noise reduction ( I want to start learning how to take multiple shots for stacking to reduce noise, this seems like a more productive but exhaustive process).In my camera bag
Usually my Sony A7ii, my Rokinon 14mm F2.8 lens. A Sony 50mm F1.8 lens, and either a 28-70mm lens or sometimes my 55-210mm lens. Depends on where I am going. If I'm hiking up something like Mt Whitney I want to minimize just how many lens I am taking with me. If I am driving around to someplace close by I'll bring my camera bag with most of my lens in case I want to use something different. Slowly working on expanding my goodie bag of camera's and lens.Feedback
Learn how to use your camera and lens, adjusting your iso, exposure, and focus manually. Try to find the darkest area around you, if you live in the city you may need to look a little harder : ) Get out and explore during the day, find some land mark that interest you and base your milky way photo around that. It is certainly a learning experience. I have gone out before, driving several hours to get a shot only to realize in post as I am playing around in Lightroom and Photoshop that I forgot to change some crucial setting and the whole thing is crap. Take your time, make a check list, written or mental to go through until it starts becoming more engrained. Shooting Milky Way photos takes a lot of Patience and Persistence. Your at the mercy of the elements and it may not always go your way, but when it does it feels great.