Yosemite Valley Morning
Views
613
Likes
Awards
Featured
Judge Favorite
Peer Award
Superb Composition
Top Choice
Absolute Masterpiece
Outstanding Creativity
Jaw Dropping
Superior Skill
Magnificent Capture
Top Ranks
 Platinum
Silverdarkness
April 04, 2014
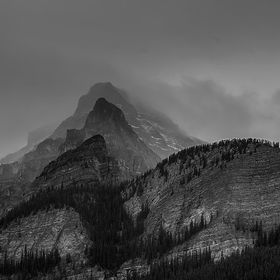
This image was taken in August, 1993 from the Tunnel Viewpoint just before the Wawona Tunnel on Highway 140 which leads to Glacier Point. Yosemite Valley is obviously a special place.

Same photographer See allBehind The Lens


Behind The Lens
Location
The image was taken from a Yosemite Valley viewpoint known as "Tunnel View" on Highway 140 as it leads out of the Park on southwest. The viewpoint has a parking lot so accessibility is not an issue - except for the hundreds of tourists and photographers that flock there. Fortunately, the number of people was dramatically reduced to just a few at the time of day (sunrise) that the image was taken. I'm sure there would be plenty more photographers there if I took the image today.Time
Other than remembering that I got up way before sunrise to drive from the valley floor to the viewpoint before the sun rose, I do not know exactly the time the image was taken - because it was taken in 1993 before digital cameras recorded metadata like time, exposure, etc.Lighting
The lighting was dramatic as pre-dawn light began to creep into the valley floor from behind the famous peak, Half Dome. I took many exposures to try to capture the mood but the best lighting was gone within about a 30 minute period of time.Equipment
At the time I was using a Contax 137 camera and Zeiss lenses. I'm guessing I used a 35mm lens. Of course a tripod was absolutely necessary.Inspiration
I had seen images taken from Tunnel View in publications. I was attending a multi-day, Ansel Adams photography workshop on the valley floor so, one morning before the workshop began I drove up to Tunnel View to capture the valley fog and pre-dawn light on Half Dome.Editing
In 2005 or so when I scanned the color slide, it had faded just a bit so in Lightroom Classic, I did some color restoration and Clarity adjustments. I also added a layer to darken the sky to match how I remembered it in 1993.In my camera bag
Over the 50-years of being an amateur photographer, I have gone through a lot of equipment: Minolta, then Contax, then Nikon, and now Sony camera systems. I converted to Sony mirrorless cameras about 4 years ago to reduce the weight carried on trips. So currently I carry: a Sony a6600 and a 6500 body and a range of lens which I select for use prior to a photo outing or trip. I use Sony G-Master or Zeiss lenses. The lens range from 30mm, 16-70mm, 18-200mm, 85mm, 70-300mm and a 10-15mm macro. The f/stops vary per lens but they range from 1.4 (for the 30mm) to 6.3 (for the 18-200mm). I plan on also adding a full-frame Sony camera body like the a7RIV and I may get a more stealthy camera like the Sony RX1RIV for candid street photography. I carry at least two back-up batteries for a long trip and a battery charger. Of course, the usual lens cleaning fluids/tissues, sensor cleaning wands & cleaning fluid, etc). Also, a remote control for taking photos on the tripod without touching the shutter button. Also, the best manual air blaster for lens and the sensor is a Giotto Rocket (I do not use compressed air cans). An old-fashioned, elk-hair shaving brush works well for cleaning the exterior of the camera prior to taking the lens off and cleaning the sensor. I always carry 2 to 3, 64GB SD cards in a pouch that is tethered to my camera bag (After first switching to digital in 2004, I twice lost cards since they were not tethered and fell out. Also the usual cabling associated with digital gear. For foreign trips voltage converters are a must. For serious landscape photos I always bring my Gitzo GT15141T carbon fiber tripod with Markins Q3 ball head. For urban or other photography I may use a caron fiber monopod or my lightweight Benro carbon fiber tripod with Sinnofoto M1 ball head. All three ball heads are Arca-Swiss clamp with a monoball type. Depending on the length and type of photo outing/trip, I use one of the following camera bags: LowePro Slingshot Edge 250, ThinkTank Speed Demon V2.0, or LowePro Flipside 500 AWIIFeedback
(For landscape photography) the day before an outing use the app: The Photographer's Ephemeris (www.photoephemeris.com) to predict where the sun or moon will rise/set at the location you plan to shoot at. Get up early (or be in place before the "golden hour" begins in the late afternoon). For early morning photography, use a red, LED-head light and be all set up prior to dawn. Start shooting in the pre-dawn. Use a tripod, take multiple shots quickly before the light changes. Use the lowest ISO you can but if the wind is blowing then you will have to use a higher ISO. I start out using ISO 50 and then adjust depending on the conditions. If it is raining have an umbrella to put over the camera/tripod.