Glissading
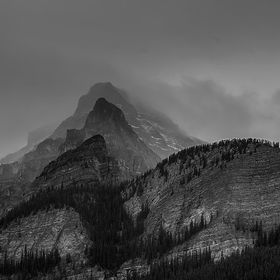
A very long glissade on a Mt. Rainier snow field ending in a shear drop off that necessitated climbing back up and transversing the ridge to safety....
Read more
A very long glissade on a Mt. Rainier snow field ending in a shear drop off that necessitated climbing back up and transversing the ridge to safety.
Read less
Read less
Views
713
Likes
Awards
Contest Finalist in Thrill Seekers Photo Contest
Superb Composition
Peer Award
Outstanding Creativity
Top Ranks
Same photographer See allBehind The Lens


Behind The Lens
Location
Southeast side of Mt. Rainier. My son and I hiked up to a ridge line near the 6,000 feet level. There was a a snowfield below that I thought we could use to quickly get back to camp. I glissaded down before my 8 year old son did (shown in the image). When I got near to the end of my glissade, I realized that there was a cliff about 50 feet further down. I stopped abruptly and cautioned my son to not go further than where I was. I then lay on the snowfield with my elbows as a makeshift tripod to capture his descent. When we were all done glissading, we had to hike back up to the ridge line to get back to camp.Time
Afternoon.Lighting
The lighting was rather flat due to the time of day, but there was enough of an angle of the Sun to the east-facing snowfield to cause shadows on the ripples in the snow.Equipment
Contax 137. I probably used a Vivitar medium zoom lens at it's widest zoom limit but since this photo was taken in 1978, I can not be sure. Fuji 50 film. Not sure of ISO. Based on the close up foot or so of snow, I am guessing that the aperture was at least f/7. No flash, no tripod.Inspiration
It was my son's first snow camp and hike as well as glissade. I wanted him (and I) to capture this for the future. He is now 52.Editing
No post processing other than scanning in the color slide.In my camera bag
Over my 50+ year love affair with photography, I have gone from a black & white Polaroid camera (briefly), to a Minolta system, to a Contax system, to a Nikon system, and now a Sony mirrorless full-frame system. Of course I do not take all my current equipment on every hike, walk, fishing trip; but the full list is as follows: Sony a7c mirrorless camera Sony GM 14mm, f/1.4 lens Sony GM 24-70mm, f/2.8 lens Sony 55mm, f/1.8 lens Zeiss Batis 85mm, f/1.8 lens Sony G 90mm Macro, f/2.8 lens Tamron 28-200mm, f/2.8-5.6 lens Sony G 70-300mmm f/4.5-5.6 lens Sony wireless remote shutter release Gitzo, GT1541T Carbon Fiber tripod with Markins ball head Manfrotto carbon fiber, monopod with small ball head Really Right Stuff macro focusing rail system L-bracket mount for the tripod and focusing rail system (2) batteries for the Sony a7c Dual battery charger (2) 256GB SD cards (2) 128GB SD cards (2) 64GB SD cards (2) 32GB SD cards U/V filters for all lens Circular polarizing filters for all lens (5) different sized camera bags ROR cleaner and cleaning paper for lens and filters For cleaning the camera sensor: Giotto air blaster for cleaning sensor Visibledust sensor swabs Aero-Clipse sensor cleanerFeedback
Fundamentally, it is all about available light, composition and applying skills learned on what ISO, shutter speed, and aperture to use. It is not important what camera/lens system you have but you should know how to take advantage of the camera’s features that allow going beyond using the default “Auto” exposure setting if presented with a challenging light situation. If I had been using a digital camera, I would have used ISO 100 (due to having more than enough light); f/7 or smaller to get the maximum depth of field; and a shutter speed faster than the traditional rule of thumb (1/focal length) - because my son was coming fast towards the camera. If the amount of available light allows, use a low ISO setting and sufficiently fast shutter speed so you can improve your chances of getting a sharp image with minimal digital noise*. Depending on the composition, adjust the aperture setting to obtain a desired depth of field. (*modern digital processing applications like Topaz Photo Ai and Luminar NEO can greatly assist in removing excess noise if a high ISO had to be used.) In post-processing, I generally crop images to eliminate distracting elements that I could not avoid while composing in the field. In the case of this photo, there were no distracting elements.