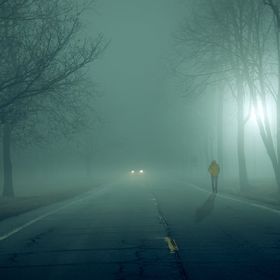
Lay Me Down
Something a little different from me. I wanted to capture the Autumn colors and do some focus stacking. This seemed to kill two birds with one stone :)
Th...
Read more
Something a little different from me. I wanted to capture the Autumn colors and do some focus stacking. This seemed to kill two birds with one stone :)
There will be a post on my website, http:--paulbarson.com soon on how this was shot and processed for anyone that may be interested.
Read less
There will be a post on my website, http:--paulbarson.com soon on how this was shot and processed for anyone that may be interested.
Read less
Views
10194
Likes
Awards
Contest Finalist in Mother Nature Photo Contest 2021
Contest Finalist in The Beauty Of Fall Photo Contest 2018
Contest Finalist in My Best Shot Photo Contest Vol 3
Contest Finalist in Creative Compositions Photo Contest Vol3
Featured
Contest Finalist in Fabulous Foliage Photo Contest
Staff Winter Selection 2015
Peer Award
Superb Composition
Absolute Masterpiece
Top Choice
Outstanding Creativity
Magnificent Capture
All Star
Superior Skill
Genius
Virtuoso
Emotions
Impressed
Top Ranks
Categories
 Ultimate


travlndon
September 17, 2016
Have been challenged to seek abstraction and surreal in my images. Excellent eye and work to put this together. Glad to know I have an artistic eye to see these abstractions.


dgagne
September 19, 2016
Love the picture! Simple but yet so complex at the same time! Awesome job!


 PRO+
PRO+


reytrai02
October 16, 2016
Join the conversation. Add a comment or even better, a critique. Let's get better together!


 Platinum
 Platinum

 Platinum

 PRO+
PRO+


 PRO+
PRO+
Same photographer See allBehind The Lens
-
Share to Facebook

-
Share to X

-
 Share to WhatsApp
-
 Share via Email

-
Share to Facebook
-
Share to X
-
Share to WhatsApp
-
Share via Email

-
Share to Facebook
-
Share to X
-
Share to WhatsApp
-
Share via Email

-
Share to Facebook
-
Share to X
-
Share to WhatsApp
-
Share via Email

-
Share to Facebook
-
Share to X
-
Share to WhatsApp
-
Share via Email

-
Share to Facebook
-
Share to X
-
Share to WhatsApp
-
Share via Email

-
Share to Facebook
-
Share to X
-
Share to WhatsApp
-
Share via Email

-
Share to Facebook
-
Share to X
-
Share to WhatsApp
-
Share via Email

-
Share to Facebook
-
Share to X
-
Share to WhatsApp
-
Share via Email

-
Share to Facebook
-
Share to X
-
Share to WhatsApp
-
Share via Email

-
Share to Facebook
-
Share to X
-
Share to WhatsApp
-
Share via Email

-
Share to Facebook
-
Share to X
-
Share to WhatsApp
-
Share via Email

-
Share to Facebook
-
Share to X
-
Share to WhatsApp
-
Share via Email

-
Share to Facebook
-
Share to X
-
Share to WhatsApp
-
Share via Email

-
Share to Facebook
-
Share to X
-
Share to WhatsApp
-
Share via Email

-
Share to Facebook
-
Share to X
-
Share to WhatsApp
-
Share via Email

-
Share to Facebook
-
Share to X
-
Share to WhatsApp
-
Share via Email

Discover more photos See all
-
Share to Facebook
-
Share to X
-
Share to WhatsApp
-
Share via Email

-
Share to Facebook
-
Share to X
-
Share to WhatsApp
-
Share via Email

-
Share to Facebook
-
Share to X
-
Share to WhatsApp
-
Share via Email

-
Share to Facebook
-
Share to X
-
Share to WhatsApp
-
Share via Email

-
Share to Facebook
-
Share to X
-
Share to WhatsApp
-
Share via Email

-
Share to Facebook
-
Share to X
-
Share to WhatsApp
-
Share via Email

-
Share to Facebook
-
Share to X
-
Share to WhatsApp
-
Share via Email

-
Share to Facebook
-
Share to X
-
Share to WhatsApp
-
Share via Email

-
Share to Facebook
-
Share to X
-
Share to WhatsApp
-
Share via Email

-
Share to Facebook
-
Share to X
-
Share to WhatsApp
-
Share via Email

-
Share to Facebook
-
Share to X
-
Share to WhatsApp
-
Share via Email

-
Share to Facebook
-
Share to X
-
Share to WhatsApp
-
Share via Email

-
Share to Facebook
-
Share to X
-
Share to WhatsApp
-
Share via Email

-
Share to Facebook
-
Share to X
-
Share to WhatsApp
-
Share via Email

-
Share to Facebook
-
Share to X
-
Share to WhatsApp
-
Share via Email

-
Share to Facebook
-
Share to X
-
Share to WhatsApp
-
Share via Email

-
Share to Facebook
-
Share to X
-
Share to WhatsApp
-
Share via Email

-
Share to Facebook
-
Share to X
-
Share to WhatsApp
-
Share via Email

Behind The Lens
Location
This shot was taken at one of my favorite, local places, the LeFurge Woods Nature Preserve in Ypsilanti, MI. I had seen this particular fallen tree in the summer and decided I would go back in the Autumn to see how it looked.Time
This shot was taken later in the day, around 6:30PM on a cloudy day with the sun on it's way towards the horizon.Lighting
The time of the shot along with the clouds and the remaining cover from the trees gave a nice soft diffused light free of any harsh shadows or highlights. Only natural light was used.Equipment
For this shot I used my Canon T3i and the 18-135mm Kit lens with a CPL fitted. This was never intended to be a 'keeper' shot and I was really just playing around and experimenting with focus staking. As I was focus stacking and the light was quite dull I had the camera mounted on a tripod, low to the ground over the very far edge of the fallen tree. The aperture was set to f/8 (because I knew that was around the 'sweet' spot for this lens and gave a reasonable depth of field) ISO 100, which gave a shutter speed of around 1/2 second. I used live view to focus and shift the focus point for each shot of the focus stack. The reason for using live view was that it meant that I didn't have to get into unimaginable positions to look though the viewfinder and it also gave a good visual representation of focus points for making sure that I got good, overlapping focus on the series of shots for the resulting focus stack. I didn't have my remote or cable release with me, so I used the 2 second timer to take the shots and eliminate camera shake from pressing the shutter.Inspiration
I had seen this fallen tree in the summer and always liked the look and form of it half laying on the ground but there wasn't much interest to the overall scene in summer with just grass and weeds growing all around. I had decided the first time that I spotted it to go back in Autumn and take another look.Editing
As mentioned above, the resulting shot was a focus stack, of 7 shots in total and post processing was carried out in LR and PS... Firstly, basic global adjustments in LR were applied, editing one of the 7 shots, increasing the contrast and whites a little and decreasing the blacks some, just to get a good base starting point. 'Remove chromatic aberration' box was also checked. The one edited shot was then synced with the other six shots so that they all had the same global edits applied. The 7 shots were then exported from LR into PS by selecting all 7 shots in LR, right clicking and selecting ‘Edit In >> Open as Layers in Photoshop..’ All the layers were selected and then going to ‘Layer >> Align >> Top Edges’ and then repeating with ‘Layer >> Align >> Left Edges’ ensured all layers were perfectly aligned. You can also use ‘Edit >> Auto Align Layers’. This will align the layers using the content of the images and may work better if your camera moved slightly in between shots. Focus stacking was achieved by selecting all layers and then ‘Edit >> Auto Blend Layers’, ensuring ‘Stack Images’ was selected. PS did a good job of focus stacking, with only one layer mask needing some slight editing. All layers where then merged, which resulted in one image, in focus from foreground through to background. This layer was duplicated and set to soft light with an opacity of 32% just to ‘thicken’ up the whole image a little. A gradient adjustment layer was then added, black to near white. This layer was set to soft light with an opacity of 64% to give a subtle dark to light effect from top to bottom of the image. I wanted the log to keep its exposure so the log was masked out of this adjustment layer. This next technique may or may not be a know ‘trick’, it’s something I stumbled upon playing around and liked the effect that it had on the leaves.... A new solid white color adjustment layer was added. It was then rasterized and then a difference clouds filter was added to this layer. This layer was then set to overlay and opacity 84%. The background around the log was also masked out for this layer so it only effected the foreground and leaves. I felt this added some subtle random patches of light and shade that helped to add some added dimension and depth and seemed to work well on the leaves. The top third, background, was looking a little dark, so another difference cloud layer (this one enlarged) was added and set to screen mode at 6% opacity with the lower third of the image and most of the log masked out to slightly lighten that area but in a ‘patchy’ way so as to look more natural. Thanks to focus stacking doing such a great job of ensuring that all of the scene was in focus, the small trees and bushes in the distant background were a little too distracting, so, some gaussian blur was added to this area. This was achieved by copying the original image layer, moving it to the top of layer stack and then applying the gaussian blur filter to this layer. The opacity of this layer was then adjusted to give the intensity of blur wanted. A mask was then applied to this layer to mask out the foreground, log and trunks of trees in the background. A curves clipping mask was created for this layer and the mid-tones were pulled down a little. Lastly before going back into LR a new saturation adjustment layer was added set to +11 saturation to slightly boost saturation. Back in LR... The only global adjustment was +6 on the WB Temp just to warm up the whole image a little. Next a number of local adjsutments were made. For me, this is where the real fun is! Two graduated filters were added, on either side of the log, perpendicular to the sides of the log and ending at the log with a -.86 exposure adjustment. This had the effect of slightly darkening down the sides as they come in towards the log, leaving more light to draw the eye to the subject, the log and the leaves. Another graduated filter was similarly added at the bottom of the image to help draw the eye up into the image. Radial filters and adjustment brushes were added to add some subtle light to select areas to taste. At this point the background seemed way to dark and I wanted to see what a slight misty feel would look like, so it was back into PS…. Back in PS, the layer was duplicated and the new layer was set to Linear Dodge at 13% opacity. To create the ‘misty’ look a gradient fill adjustment layer was added, using a transparent to white gradient, with the layer set to Normal and 50% opacity. A graduated mask was then added to this layer so that the misty look did not take effect on the foreground and got more intense towards the background. A brightness/contrast adjustment layer was added, boosting the contrast some, to regain some of the lost contrast from adding the previous layer. To make this look a little more realistic and ‘patchy’, a new blank layer was added and a cloud brush was used across the bottom of the background, masking out the log. This layer was then set to overlay at 76% opacity to blend in and give a very subtly and slightly patchy look to the mist. Then back to LR for the finishing touches…. At this point the image was looking too cool and I really wanted to warm it up and draw the eye to the subject. A graduated filter was added with a slight exposure drop to the top and bottom and adding a slight vignette, again to help draw the eye to the main subject. A radial filter with an exposure boost and +59 WB temp was added for the sunlight coming through the trees in the background. Finally some global adjustments to mainly warm up the image, +4 in WB temp, adding a warm tone to the highlights using split toning and a blue matte (which has the effect of bringing out the warm yellow/oranges in the background more and warming up the greens). There is a full step by step with images on how I shot and edited this shot over at my website, http://paulbarson.com/how-it-was-shot/how-it-was-shot-lay-me-down/In my camera bag
I have my Canon EF-100mm f/2.8 Macro USM lens almost permanently attached to my Canon T3i. It's my favorite lens, super sharp and able to give a good narrow DOF with great bokeh. I also carry the 18-135mm kit lens (that I use only for the odd landscape) and the 50mm f/1.8 STM. I need to start using the 50mm more and give it a really good test. From the times I have used it, it seems to be a fantastic lens for the price. I recently started carrying my speedlight and a small softbox, as I am experimenting with different lighting techniques. I also carry a remote cable release, ND filter, CPL filter and a tripod for the landscape shots. I always carry a small spray bottle of water. This is great for adding instant dew or raindrops to add some mood and drama to a shot. Spare batteries and memory cards are also always in my bag. Two additional non photographic related items that I started carrying after being bitten by large Alsatian dog are a knife and MACE!! I'll carry all this in either my Clik Elite Contrejour 40 backpack, which I use for longer hikes and in winter or my Tenba Messenger for shorter walks.Feedback
If you are focus staking then using a good steady tripod and ensuring that you get a good number of overlapped focus shots should make things go smooth when it comes to focus staking your shots. Better to have too many shots and ensure that your focus overlaps enough than to have too few and end up with areas of missing focus. For processing, if you have a finished result in mind then work toward that result, one piece at a time. Anything is possible with PS and if you know what you want to do but don't know how, I'm sure it can be found on Google somewhere! If you don't have a finished result in mind, do as I did with this piece. Play around and you will most likely soon start to get ideas coming to you. Most of all, as always, have fun!