The Unknown
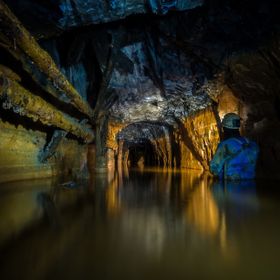
About a hour into the system we dug through a collapse to find this passage leading into the darkness on the other side.
About a hour into the system we dug through a collapse to find this passage leading into the darkness on the other side.
Read less
Read less
Views
1802
Likes
Awards
Featured
Featured
Contest Finalist in Exposure Experimentation Photo Contest
Peer Award
Superb Composition
Top Choice
Absolute Masterpiece
Outstanding Creativity
Superior Skill
Magnificent Capture
All Star
Genius
Exceptional Contrast
Love it
Top Ranks


Same photographer See allBehind The Lens


Behind The Lens
Location
I took this photo deep in an abandoned mine working in Snowdonia, North Wales, UK. I'm a caver and mine explorer who decided to try to capture and share images showing the essence of what lies under our feet. I self taught myself to take photographs in the zero natural light environments of the underworld.Time
In all honesty I can't remember the time of day this was taken. But of course time has little relevance in these 'other worldly' places! Daylight never penetrates underground and caving trips often last many hours (its not unusual to spend a solid 24 hours underground at a time). Every photon of light needs to be taken with you, which in terms of photography is both the challenge and the reward.Lighting
With the camera set to a long exposure on a tripod the scene was carefully 'painted' with light from a hand held CREE LED torch. As with all lighting, ensuring that the source is held 'away' from the lens, ensures more depth in the photo and also ensures that light falling on dust/moisture in the air is not directly reflected back into the lens. Additional lighting was from the 'models' own headlamp who did well to remain perfectly still in the cold water for several seconds during the exposure.Equipment
For all my underground work I use a Nikon D7000 Body which has been used and abused for many years in these sort of underground environments. I have a photo in my Viewbug profile which shows the typical state my camera gets in to when returning from these trips. Amazingly is still functions! To keep the worst of the water and mud away from my camera, i pack it into a Waterproof Pelicase. This photograph was taken using my Sigma 10-20mm 1:4-5.6 EX DC HSM which I use pretty much all the time underground. Tripod is a Manfrotto 785B which i have modified with a specially machined aluminium adapter to allow me to fit a Manfrotto 494RC2 head. This combination seems to be the perfect combination of portability, flexibility and convenience for underground use.Inspiration
I've spent a number of years exploring caves and mines. Often digging into new ground that has in the case of caves never before seen before or in the case of mines not seen for many decades (even centuries). Trying to describe these wonders to people is almost impossible. And of course these passages and chambers could be lost through collapse and decay at any time so photographing them seems to be both important as well as pleasurable. From a personal level, taking the camera to these places adds a certain sense of purpose to the whole adventure.Editing
I always shoot in raw and when using different types of light source my first task is normally to adjust white balance in different zones around the photo to balance the different light sources used. After that its a case of tweaking everything else as you'd do for pretty much any other typical landscape shot. I generally just do quite basic tweaking in lightroom and thats pretty much itIn my camera bag
When Photographing underground I use a combination of light sources, often mixing and matching many lighting techniques in a single exposure. Light sources can include, upto four old fully manual Vivitar 285 flash guns which I have fitted with Yongnuo RF-603N wireless triggers, Old single use Flash bulbs, for example the Philips PF100's (I have built my own wireless triggers for these too) or they can be fired manually by connecting them across a 9v battery. I also use various torches often combining long exposure light painting techniques to light large areas of chambers coupled with flashes to freeze any moving elements in the scene. Sometimes a single flash gun can be used by leaving the camera open in bulb mode while walking around and manually firing the flash in different areas.Feedback
Generally i stick somewhere around f11 underground, this ensures pretty good front to back sharpness when using my 10-20 lens, and making focusing easy - generally I focus manually set to infinity and then back a fraction of a turn from there. More precise focusing if there are particularly close objects can be done in auto using a torch to provide illumination before switching the focus back to manual to 'freeze' this setting. I then adjust my exposure time to suit any light painting to fill in the background and adjusting the power of my flashes manually to suit around that. After a while you get an idea of approximate values which will get you pretty close but generally its a case of trial and error to a certain extent. Keep the light source(s) well away from the lens to prevent reflections off the moisture/dust which also helps to define features and gives more depth to the photo.