Sparked Up
Views
7156
Likes
Awards
Chatter Award
Contest Finalist in Epic Exposures Photo Contest
Zenith Award
Top Shot Award 22
Contest Finalist in Exposures Marketplace Project
Contest Finalist in Summer Road Trip Photo Contest 2019
Contest Finalist in Futuristic Photo Contest
Contest Finalist in Lapse Of Time Photo Contest
Contest Finalist in Spirals And Composition Photo Contest
Contest Finalist in Colorful And Bright Photo Contest
Contest Finalist in Our World At Night Photo Contest
Peer Choice Award
Amateur Winner Science Fiction Photo Contest
Contest Finalist in Artificial Light Photo Contest 2017
Contest Finalist in Science Fiction Photo Contest
Contest Finalist in Experimental Photo Contest
Contest Finalist in Multicolored Photo Contest
Peer Award
Outstanding Creativity
Superb Composition
Absolute Masterpiece
Top Choice
Magnificent Capture
All Star
Genius
Superior Skill
Top Ranks
Categories


Same photographer See allBehind The Lens
-
Share to Facebook

-
Share to X

-
 Share to WhatsApp
-
 Share via Email

-
Share to Facebook
-
Share to X
-
Share to WhatsApp
-
Share via Email

-
Share to Facebook
-
Share to X
-
Share to WhatsApp
-
Share via Email

-
Share to Facebook
-
Share to X
-
Share to WhatsApp
-
Share via Email

-
Share to Facebook
-
Share to X
-
Share to WhatsApp
-
Share via Email

-
Share to Facebook
-
Share to X
-
Share to WhatsApp
-
Share via Email

-
Share to Facebook
-
Share to X
-
Share to WhatsApp
-
Share via Email

-
Share to Facebook
-
Share to X
-
Share to WhatsApp
-
Share via Email

-
Share to Facebook
-
Share to X
-
Share to WhatsApp
-
Share via Email

-
Share to Facebook
-
Share to X
-
Share to WhatsApp
-
Share via Email

-
Share to Facebook
-
Share to X
-
Share to WhatsApp
-
Share via Email

-
Share to Facebook
-
Share to X
-
Share to WhatsApp
-
Share via Email

-
Share to Facebook
-
Share to X
-
Share to WhatsApp
-
Share via Email

-
Share to Facebook
-
Share to X
-
Share to WhatsApp
-
Share via Email

-
Share to Facebook
-
Share to X
-
Share to WhatsApp
-
Share via Email

-
Share to Facebook
-
Share to X
-
Share to WhatsApp
-
Share via Email

-
Share to Facebook
-
Share to X
-
Share to WhatsApp
-
Share via Email

Discover more photos See all
-
Share to Facebook
-
Share to X
-
Share to WhatsApp
-
Share via Email

-
Share to Facebook
-
Share to X
-
Share to WhatsApp
-
Share via Email

-
Share to Facebook
-
Share to X
-
Share to WhatsApp
-
Share via Email

-
Share to Facebook
-
Share to X
-
Share to WhatsApp
-
Share via Email

-
Share to Facebook
-
Share to X
-
Share to WhatsApp
-
Share via Email

-
Share to Facebook
-
Share to X
-
Share to WhatsApp
-
Share via Email

-
Share to Facebook
-
Share to X
-
Share to WhatsApp
-
Share via Email

-
Share to Facebook
-
Share to X
-
Share to WhatsApp
-
Share via Email

-
Share to Facebook
-
Share to X
-
Share to WhatsApp
-
Share via Email

-
Share to Facebook
-
Share to X
-
Share to WhatsApp
-
Share via Email

-
Share to Facebook
-
Share to X
-
Share to WhatsApp
-
Share via Email

-
Share to Facebook
-
Share to X
-
Share to WhatsApp
-
Share via Email

-
Share to Facebook
-
Share to X
-
Share to WhatsApp
-
Share via Email

-
Share to Facebook
-
Share to X
-
Share to WhatsApp
-
Share via Email

-
Share to Facebook
-
Share to X
-
Share to WhatsApp
-
Share via Email

-
Share to Facebook
-
Share to X
-
Share to WhatsApp
-
Share via Email

-
Share to Facebook
-
Share to X
-
Share to WhatsApp
-
Share via Email

-
Share to Facebook
-
Share to X
-
Share to WhatsApp
-
Share via Email

Behind The Lens
Location
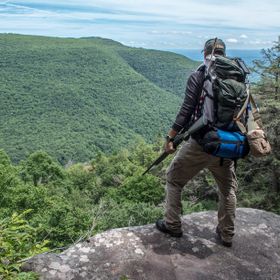
This photo was taken in the Smith Point County Park, Long Island, NY. We come to this Inlet a'lot to spearfish and hangout.I had this shot in my mind for a few days at this point and gathered up a group of friends to help me set it up.Time
I believe we all headed to the outer beach around 6pm. Set up a fire and hung out on the beach until sunset. We then drove another 4 miles down through the dunes to the Moriches inlet. I think it was about 10pm by the time we started breaking out all of the camera gear and positioning the trucks.Lighting
I chose this spot specifically because of the open background. the Jetty didn't immediately make the water behind us noticeable but discreetly having a nautical mile or 2 behind us gave us plenty of opportunity to catch the last dying light in combination with the moonlight through the cloudy sky.Equipment
This was taken with my Pentax K-50 with a 10-55mm Kit lens on an cheap Vivtar tripod using a Vivitar Shutter remote. I hope that proves you DO NOT need fancy gear to take great photos. If you're an aspiring photographer like me that also means you probably don't have a surplus of cash to spend on new equipment and fancy cameras. Remember the camera and gear are just tools at your disposal. After all a hammer does not build a house.. the Carpenter does. I have been pretty loyal to my Pentax K-50. I originally started out with some old point and shoot Olympus which I loved. Without the ability to change alot of settings or lenses and even make many adjustments in JPEG.. it forced me early on to let my eye find the proper lighting and composition to begin with. After awhile my eyes and mind were seeing moments in time my camera couldn't capture so it was time to upgrade. Back then Havasusupai was still one of the best kept secrets in the US. Nobody knew what is was let alone where it was. If you wanted to Journey into the heart of the grand canyons it was a few days hike in and out aside from driving to the proper canyon rim to start.. that was our first big expedition and I needed a camera to keep up with the views. So I did a'lot of research and the Pentax easily won with its features/price and what really sold me were the weather resistant seals. We spent so much time outdoors where nature throws weather and environment you weren't sometimes expecting. The Pentax has always kept up and never left my side. I've had ice accumulated on that K-50 after climbing in a snow storm all day and it was still taking photos. Somewhere along the way I fell in love with Long Exposure photographs and was happy to find out the same wide angle lens I wanted to purchase for landscape photography was also great for Astro-Photograpy. So I purchased a Sigma 10-20mm Wide angle lense (after using regular 10-50mm kit lenses this whole time. Being I haven't won any cameras yet (lol) i intend to keep using my outdated Pentax K-50 with kit and Sigma lenses as they still take remarkable photos and have helped me capture these moments in time.Inspiration
To be honest I'm not sure any particular thing inspired me. I just had gotten into spinning wool for Long Exposure Photos. I was experimenting with it for maybe 2 or 3 nights before I decided I wanted to see what it would look like using larger subjects in a nice landscape.. like our custom trucks at the inlet. This was probably the 20th attempt I had ever taken spinning wool and doing long exposure photography and boy did it pay off.Editing
I did need to clean up the highlights and shadows a bit. I never had any training with Adobe Lightroom so everything I have learned up until this point was self taught by moving the sliders until I liked how it looked. What I have since done after publishing the original copy of this photo was discover the luminous tool to help smooth out some of the noise/grain I had in some of my earlier attempts and have since now retouched and posted those updates here on Viewbug.In my camera bag
I have an awesome Cannon backpack that literally keeps 3 of my lenses, Camera, Filters, Batteries, Cleaning supplies, SD wallet, misc accessories, and Straps/mounts all ready to go. Typically all I have to grab is a tripod and I am good to take just about any kind of photo at a moments notice.Feedback
Well for starters you have to break down the separate techniques used in this photo. 1. Long Exposure Photograph - a steady tripod and remote shutter are practically essential (even though I've have pulled it off without you really shouldn't) I have been self taught my entire life so with self teaching comes experimenting. I typically have to take 3-6 shots just to dial in my settings. I tend to do a lower ISO and very long exposures. Maybe 600 ISO for 2 minutes, early on I figured the less ISO the less noise. But after you have your camera dialed in do as many shots as you like and make small adjustments so that you have options in Post. 2. Is the wool spinning - You're going to want a low grade wool (Grade 0 or lower). you then take that wool and shove it inside a steel whisk (yes like you use to beat eggs). Than duct tape (heat resistant) 2-3 feet of 550 paracord (nylon will work) to the handle of the whisk. When you're ready start the camera or have an assistant begin the exposure. With your back to the camera ignite the wool with either a lighter or a 9V battery ( this will ignite steel wool on contact). Do this with your back to the camera because you do not want to get the light from multiple ignition attempts getting into the photo. Now as soon as it lights you can begin spinning it in any direction you like.. however be aware that molten pieces of steel will be flying in all directions so DO NOT do this in an area with dry vegetation or anything flammable. I would also keep in mind that you do not in the off chance want a piece to hit the camera lens and would suggest putting a simple UV protection filter on that could be replaced for 20$ (ask me how I know). This will only last for a few seconds and as soon as you're done and it's dark you can then move out of frame (or have assistant) stop exposure.