Mountans and Clouds and Night Sky
Views
415
Likes
Awards
Staff Winter Selection 2015
Absolute Masterpiece
Outstanding Creativity
Peer Award
Top Choice
Superb Composition
Superior Skill
Top Ranks
Categories
Same photographer See allBehind The Lens


Discover more photos See all


Behind The Lens
Location
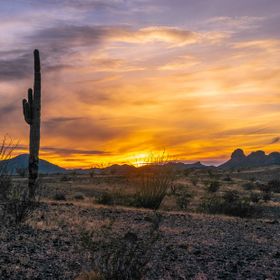
In an attempt to get out of the lights of Las Vegas, my wife and I took our motorhome up to Valley of Fire State Park in hopes of getting some photos of some of the Bighorn Sheep up there. As the sun set, I noticed that the sky was pretty clear and maybe I could get some practice doing night photography. The hills around the campground are red and so there was a good chance to practice some foreground, midground, background composition that I admire in so many landscape photos on Viewbug.Time
Not long after sunset, the clouds began to form to the east of where we were. I could see that they would soon be over us to the north and east which were the darker horizons so I did not have much hope of getting clear, pinpoint stars. I was intrigued about "light painting" and thought maybe I would just try that too since the hills around me were colorful and would make a great foreground. By the time I got a tiny led flash light to use our of the car, the clouds had moved in and were getting thicker and so the scene was set. I had my composition and could light the cliffs too.Lighting
Light painting a foreground is simple enough but it is important that you balance the amount of light you have and how long you "paint" with it with the length of the exposure. The exposure has to be set to get the stars right. In this case I also wanted the clouds to be soft so I used a long (30 sec.) exposure for this one. They were moving just enough to soften them dramatically. I like to get the sky right and then use that exposure while I try a little light on the foreground, more light, and then a lot of light. You don't have to change the camera and you can take a lot of 5 second shots before the scene evaporates. It does not take long to find what might be good. I try for perfect but almost always end up letting lightroom do the fine tuning!Equipment
This image was shot off a so-so tripod with my Nikon 5100 DSLR. I had just bought my first prime lens (Nikon f1.8 35mm) the day before which I was trying out but I wanted a wider field so I popped on the Nikon kit lens and cranked it wide to 18mm, opened the aperture as much as it would go (f4.5) and started exposing. The results were underexposed because the ISO was set at 200 but the sky did not look right after I changed it to 1600 and 3200. At 3 stops underexposed, lightroom was my savior because the clouds were just not right in the later attempts.Inspiration
I was inspired by the amazing photographs of others that I saw on Viewbug, especially in two areas I wanted to develop. Composition and night photography fascinated me. I love landscapes that draw you through the image from foreground to background and I enjoy night shots that have a subject besides white dots on a black field. Night photography excites me because the camera sees more than we do and captures the moment for us to enjoy in detail later. I am a bit lazy but the really good night shots of some of the photographers I follow on Viewbug keeps on exciting me to get off the couch and back out there to develop my skills. I am hemmed in by trees here in Missouri right now but this fall and winter in Arizona promises to fill my hard drive with some good shots.Editing
This image got quite an overhaul. I use Lightroom which is a terrific program and a terrific bargain when you get it with Photoshop month by month from Adobe. In this case, I corrected for my lens profile, then added almost three stops to the exposure. Then I took shadows to -100 (yeah, excessive!) and took down the highlights -50. After sharpening a bit (75) and smoothing with luminance (25) I did just a little white and black adjusting and add in a wee bit of clarity and vibrance. I liked it that way so kept it and put it up on Viewbug and am blessed that others have enjoyed it a little.In my camera bag
The important stuff in my bag are my Nikon 5100 DLSR, the 18-55mm kit lens, an 18-270mm Tamron Zoom that has become my "walk-around" lens, and a Nikon F1.8 35mm prime lens that is making a better photographer out of me. There are the usual things like a spare camera battery, a couple of remote releases, a cheap intervalometer that I hope to use a lot more at night this winter, polarizing and ND filters, a speedlight flash I never use, and the usual lens wipes, little batteries, and some cables. Nothing expensive or fancy!Feedback
The best advice I can give is the advice I found online early on. Try to learn just enough to get started though, the goal is to have fun taking photos, not passing online courses. Then you need to get out there some clear, moonless night to a place where there is as little ambient light as possible and let your eyes adjust for a while you fumble around setting up your camera in the dark. Try to do it without a flashlight! I took an UDEMY course on night photography and learned the most important thing: where to set my camera to get started! Use MANUAL! Set the aperture to the lowest f stop you got (hopefully 4.5 or lower), ISO to 3200, and time to 5 seconds. You must use a tripod with a remote release! Set your focus on something 50-100 feet away using autofocus if you can (shine your flashlight on it!) and then set your lens to manual focus and leave it alone from there on. If you have nothing to focus on, manually set it to infinity, move it back a smidge, and give it a try. Point the camera at the sky at an angle you know will catch some horizon. An image of stars if boring! Stars sharp? You go it focused, if not change the focus a bit and try it again until you get it right! When your exposure looks acceptable (you can see stars!), take a flashlight while the camera is doing its 5 second thing and sweep back and forth over the foreground once each way. Take a look. Need more or less, just adjust the speed of your sweeps and the number of times you sweep. It takes less light than you would think. Play around, take LOTS of images, increase and decrease your aperture, exposure time, and ISO until you are getting images YOU like, then go home to Lightroom and make the best ones look the way you want them to. Finally, submit the best of them to challenges and contests in Viewbug so you can get a fuller and more satisfying experience, of course!