White Pyramid
The new span of the Oakland Bay Bridge as viewed from Treasure Island. I loved the symmetry of the bridge and its reflection, along with the subtle colors in t...
Read more
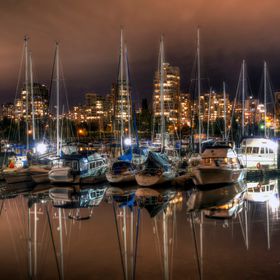
The new span of the Oakland Bay Bridge as viewed from Treasure Island. I loved the symmetry of the bridge and its reflection, along with the subtle colors in the water and sky and how they contrasted with the stark white structure.
Read less
Read less
Views
429
Likes
Awards
Action Award
Chatter Award
Zenith Award
Legendary Award
Hero Award
Member Selection Award
Summer Selection
Superb Composition
Absolute Masterpiece
Top Choice
Outstanding Creativity
Peer Award
Superior Skill
All Star
Magnificent Capture
Top Ranks
Categories

itsmemacld
July 08, 2016
Welcome to VIEWBUG! This is an environment for everyone who loves to share their photos. Keep posting! Keep sharing! YOU CAN FOLLOW AND LIKE OTHER PEOPLE’S PHOTOS. Enjoy your stay here. Keep posting! Keep sharing! HAVE FUN! Goodluck! Thank’s for joining. :) -MacLD
Same photographer See allBehind The Lens
-
Share to Facebook

-
Share to X

-
 Share to WhatsApp
-
 Share via Email

-
Share to Facebook
-
Share to X
-
Share to WhatsApp
-
Share via Email

-
Share to Facebook
-
Share to X
-
Share to WhatsApp
-
Share via Email

-
Share to Facebook
-
Share to X
-
Share to WhatsApp
-
Share via Email

-
Share to Facebook
-
Share to X
-
Share to WhatsApp
-
Share via Email

-
Share to Facebook
-
Share to X
-
Share to WhatsApp
-
Share via Email

-
Share to Facebook
-
Share to X
-
Share to WhatsApp
-
Share via Email

-
Share to Facebook
-
Share to X
-
Share to WhatsApp
-
Share via Email

-
Share to Facebook
-
Share to X
-
Share to WhatsApp
-
Share via Email

-
Share to Facebook
-
Share to X
-
Share to WhatsApp
-
Share via Email

-
Share to Facebook
-
Share to X
-
Share to WhatsApp
-
Share via Email

-
Share to Facebook
-
Share to X
-
Share to WhatsApp
-
Share via Email

-
Share to Facebook
-
Share to X
-
Share to WhatsApp
-
Share via Email

-
Share to Facebook
-
Share to X
-
Share to WhatsApp
-
Share via Email

-
Share to Facebook
-
Share to X
-
Share to WhatsApp
-
Share via Email

-
Share to Facebook
-
Share to X
-
Share to WhatsApp
-
Share via Email

-
Share to Facebook
-
Share to X
-
Share to WhatsApp
-
Share via Email

Discover more photos See all
-
Share to Facebook
-
Share to X
-
Share to WhatsApp
-
Share via Email

-
Share to Facebook
-
Share to X
-
Share to WhatsApp
-
Share via Email

-
Share to Facebook
-
Share to X
-
Share to WhatsApp
-
Share via Email

-
Share to Facebook
-
Share to X
-
Share to WhatsApp
-
Share via Email

-
Share to Facebook
-
Share to X
-
Share to WhatsApp
-
Share via Email

-
Share to Facebook
-
Share to X
-
Share to WhatsApp
-
Share via Email

-
Share to Facebook
-
Share to X
-
Share to WhatsApp
-
Share via Email

-
Share to Facebook
-
Share to X
-
Share to WhatsApp
-
Share via Email

-
Share to Facebook
-
Share to X
-
Share to WhatsApp
-
Share via Email

-
Share to Facebook
-
Share to X
-
Share to WhatsApp
-
Share via Email

-
Share to Facebook
-
Share to X
-
Share to WhatsApp
-
Share via Email

-
Share to Facebook
-
Share to X
-
Share to WhatsApp
-
Share via Email

-
Share to Facebook
-
Share to X
-
Share to WhatsApp
-
Share via Email

-
Share to Facebook
-
Share to X
-
Share to WhatsApp
-
Share via Email

-
Share to Facebook
-
Share to X
-
Share to WhatsApp
-
Share via Email

-
Share to Facebook
-
Share to X
-
Share to WhatsApp
-
Share via Email

-
Share to Facebook
-
Share to X
-
Share to WhatsApp
-
Share via Email

-
Share to Facebook
-
Share to X
-
Share to WhatsApp
-
Share via Email

Behind The Lens
Location
This is a shot of the new span of the Oakland Bay Bridge connecting San Francisco and Oakland . It was taken just east of the Treasure Island Marina which offers a great profile view of he structure which is easily accessible to the public.Time
I setup for my shot around 11 PM on a crisp November evening and took shots for about an hour. About half way through I got surprised by a large raccoon that decided to see what I was doing. Who knew?!Lighting
Obviously I didn't have a lot of control over lighting in this situation, but low cloud cover and humidity in the air helped transform the glow from the lights of the Oakland ship yards, into the perfect background lighting. I also used different exposure mixes to vary the impact of the light that was there. For example take one shot with the right aperture and ISO to allow for a 30 second exposure. Then up the exposure to 2 minutes and make the needed adjustment to get an equivalent exposure (even if you need to add a neutral density filter) and see if the subtle differences the longer exposure creates takes you closer to where you want to be with the look.Equipment
The photo was shot with a Nikon D600 using a Nikor AF-S 24 - 85MM lens zoomed all the way to its widest angle. I was using a Manfroto aluminum tripod to allow me to take very long exposures, and to allow for easy registration using layers as part of my processing. I set the camera up to use an infrared remote trigger with "mirror-up" to reduce vibration. My final set up was to manually focus using my LCD display with digitally zoomed in to the maximum.Inspiration
I'd been watching the building of the tower for years on my various visits to the area for work. I decided I wanted to be one of the first to capture an iconic view of the new bridge after it was opened and all the construction clutter cleared away. I wanted to set the bar for every other photographer that was going to come after me. I began to scout out spots months before it was opened to make sure I knew where I wanted to take the photo from when my opportunity came.Editing
I used Photomatix HDR software to put together multiple shots to help create the smooth water and reflections and pull out the subtle colors that are captured but need emphasis without overly saturating everything. HDR is too often used like a blunt instrument. Careful and light-handed use of the ability to combine layers and add effect can be an effective tool to enhance a scene without over-whelming the natural elements and feel.In my camera bag
I carry my camera everywhere I go including business trips so I have to travel light. My kit consists of the camera and lens mentioned above plus a Nikor AF-S 70 - 300MM zoom, a Manfroto tripod that fits in my carryon, variable density and polarization filters for both lens. I keep it all in a sling bag from case logic that is the perfect bag in my opinion for utility and packing light.Feedback
Don't be afraid to invest in a shot. A little planning goes a long way in putting you in the right place at the right time. Once you are there - patience! Better to take a hundred shots and toss most of them than take a couple and find out you missed your target later. Especially with long exposures and night shots. Try multiple exposures or series of exposures even if you feel you are duplicating. You'll find later that some of them have unwanted airplanes or auto light that spoil the shot. Doing sever of the same shot or series ensures you have usable material when you get to post processing. Also get the shots with the exposure you plan, then stick around and experiment with different angles, exposure mixes, and lenses. You'll often find that one of your experiments turns out to be the best of the night!