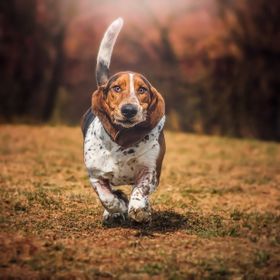
Tinsel & Lights
Nikon D7200
Tamron lens
ISO 500
45mm
f-3.5
1-250
Colored tinsel and string lights around the lens
One handsome dog mod
Nikon D7200
Tamron lens
ISO 500
45mm
f-3.5
1-250
Colored tinsel and string lights around the lens
One handsome dog model
Read less
Tamron lens
ISO 500
45mm
f-3.5
1-250
Colored tinsel and string lights around the lens
One handsome dog model
Read less
Views
1066
Likes
Awards
Contest Finalist in Anything Animals Photo Contest
Celebrity Award
Staff Favorite
Peer Award
Absolute Masterpiece
Top Choice
Magnificent Capture
All Star
Virtuoso
Outstanding Creativity
Superb Composition
Emotions
Impressed
Happy
Top Ranks
Categories
Same photographer See allBehind The Lens


Discover more photos See all


Behind The Lens
Location
I actually took this photo in the living room of my apartment. I threw up a quick backdrop and Finnick is sitting on my ottoman.Time
This was an early evening shot. We had just finished playing at the dog park and came home for some creative R&R.Lighting
This was all, literally, tinsel and lights. I put up typical studio lighting at 45 degrees to my subject and a fill light. Then I used small decorative string lights wrapped around colorful tinsel as vignette.Equipment
I used a Nikon D7200 body with a Tamron 24-70mm lens. I chose continuous lighting with a tripod so I had a better visual of the tinsel and string lights around the lens through the viewfinder. It allowed me to reposition the vignette touch-by-touch exactly how it would appear on an image without any flash variable. My most important “equipment”..... for sure the dog treats!Inspiration
To be honest, it was the Experimental Photography contest featured on ViewBug. I had a few ideas that came to me so I decided to try them. It’s probably pretty basic stuff but something I hadn’t done before. As a hobbyist I always stuck to the basics trying to get it right, so this was a fun twist on portraits for me!Editing
Definitely! Finnick blended into the background almost too well. I mostly utilized Photoshop to tweek his fur color with the backdrop just enough to keep them from being the same tone. I also added a little more Gaussian blur to the background which helped separate him from the wood and make him pop. I have a special set of actions for dog eyes that truly captures their clarity and glow that I applied. Then I added to the tinsel color in each four corners by matching the tone and adding a color gradient for more saturation. I finished the image as I do all my portraits with some sharpening and noise reduction settings.In my camera bag
My go to camera is my Nikon D7200 but I always have my D5000, just incase. I enjoy mostly portrait photography so I carry my Tamron 24-70mm lens, Nikkor 85mm lens and my Nikkor 50mm lens. I found these are my favorite portrait lens lengths since my bodies are not full sensor size. I have an old paper gray card I got when I took courses at the New York Institute of Photography that I still utilize before each shoot. Then all of your typical basics... extra battery, battery charger, memory cards, lens wipes, flash diffuser, etc.Feedback
Honestly... just try it! Pick a subject that is patient so that you can mess around with the lights and tinsel and get it just right. I chose continuous lighting so as I looked through the viewfinder and moved the tinsel and string lights where I wanted them I was looking exactly at the “finished product”. I also didn’t want Finnick to move and have the flash catch a section of his red eye just when I got the vignette right. I found using the tripod made it easier to know exactly where the center of my image would be. Once I got the tinsel and light wrapped in a nice over-hanging circle around the lens, I just moved Finnick to the center of the shot. By not moving the camera around, I eliminated the tinsel and lighting slipping off or falling into the center of the image. Your camera settings can vary but you want to use a shallow depth-of-field to ensure your vignette is blurred out appropriately. On this shot, my aperture was f/3.5. I also slightly underexposed the image to catch the string light highlights. Once you capture the image, don’t forget the power of editing to help give you a whimsical feel! And always... always remember the dog treats!