White Cosmos 2
The second in my series of flower photography
The second in my series of flower photography
Read less
Read less
Views
298
Likes
Awards
Member Selection Award
Superb Composition
Peer Award
Absolute Masterpiece
Top Choice
Outstanding Creativity
Magnificent Capture
Top Ranks
Categories
Same photographer See allBehind The Lens


Discover more photos See all


Behind The Lens
Location
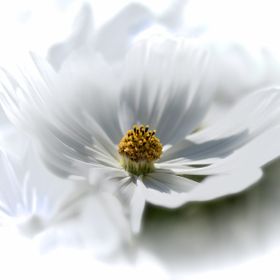
I took this photo in the local park. I live in south east England and as summer is so short in the UK I decided to have a little fun after work.Time
It was mid afternoon, around 3:30pm on a warm and partly cloudy day. There was a slight breeze which made capturing the cosmos interesting to say the least.Lighting
I was very lucky with the lighting on the day as the clouds coming and going gave varied effects and softer shadows and I did not need to use any external lighting sources.Equipment
This was shot using a Canon 7D Mark II and using a 60mm EF-S Macro lens. A favourite pairing when shooting close.Inspiration
I had recently watched an online course on 'Painterly Effects' and was inspired to try my hand at some of the hints and tips. I am still quite new to Photoshop and wanted to experiment. Boy, was I glad I did.Editing
This is a heavily manipulated shot so here goes. My first port of call was Lightroom to make the main adjustments and I then opened the image in Photo Shop. I made a duplicate layer and with filters added a Gaussian blur, then masked the detail in main flower back into the shot. Once this was done I opened Color Efex Pro 4 in Nik Collection and used the vignette option with a heavy bias on the opacity as well as using the eye dropper to choose the vignette colour from the flower. Once this was done, I went back into Photoshop and using the mask and varied the opacity to keep the main flower sharp but soften the rest.In my camera bag
I have a Canon 7D Mark II and a recently acquired Canon 5D Mark II. The Canon 7D Mark II is my baby and is my camera of choice. I have the 60mm EF-S Macro; a 28-135mm EF lens and a 100-400 EF L lens (this lives in my bag and is primarily for my wildlife stuff). Above this I have a Yongnuo flash, remote shutter release, cards, cleaning cloths and a Op-tech sling. I also have a recently acquired Lensbaby Composer Pro which is very exciting and I am having fun learning how to use the different optics.Feedback
I have found that one of the things that affects your ability to play with post processing an image like this is the angle of view. I took many pictures looking straight down on the flowers or at a direct 90 degrees and none of them have worked very well once back in Lightroom and Photoshop. It seems that a 45 degree angle or similar works better for this. The white cosmos seems to work the best for giving a 'clean' image afterwards. I have done some with the pink cosmos but they just don't seem to have the same impact. Blousy flowers seem to work the best. I've tried with Daisies and other more structured flowers but the effect is not as striking.