Pien (0501-2)
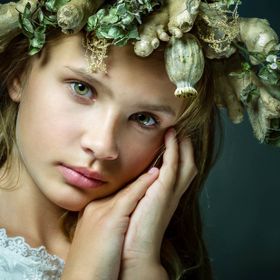
Photo shot at the models home.
Model: Pien
MUA: Claartje
Views
925
Likes
Awards
Featured
Staff Favorite
Peer Award
Superb Composition
Top Choice
Absolute Masterpiece
Outstanding Creativity
All Star
Virtuoso
Magnificent Capture
Superior Skill
Top Ranks
Categories
Same photographer See allBehind The Lens


Discover more photos See all


Behind The Lens
Location
This photo was shot at the models home in the livingroom with a portable photostudio.Time
The photo was shot around 2.30 PM.Lighting
The lighting setup is pretty simple one mainlight (strobe) on the right of the model and a fill light (strobe) on the left. Because my remote didn't function that day, I used a regular flash (not the built in one) to fire the strobes.Equipment
My camera to go is the Panasonic FZ-1000: an allround - although not a DSLR - camera that suits my needs. As mentioned above I used two strobes and a regular flash. One strobe on the right of the model as the mainlight and one strobe on the left of the model as a fill light. To fire the strobes, I used a regular flash. Beside that I used a colorchecker and greycard on location. To measure the light I used a Sekonic lightmeter. The background was a dark grey backdrop.Inspiration
In fact I wasn't inspired to take this photo, but the model was inspired by a photo I shot of her sister a couple of years ago and she wanted to have kinda similar photo.Editing
I shoot all my photos in RAW so there's always postprocessing involved considering the lighting, the contrast and the whitebalance. The first step in postprocessing was editing the RAW file in Adobes Lightroom. The next thing was importing the file into Photoshop as a smart object. The first thing I did was removing blemishes with the spot healing tool. After that I did a frequency seperation and on the so called low frequency layer I added a blur to soften the skincolors. Because I use cloth as a backdrop, there are always some folds. In the frequency seperation process it's easier to remove those folds. With dodge and burn layers I softened some darks and lights in the skin and with the same layers I added some darker parts in the irises and eyelashes and some lighter parts in the irises and the lips. When all was done, I did a highpass sharpening and reimport the file into Lightroom. In Lightroom I did the last touch-ups like adding a slight vignette to attract the viewers eye to the face. I also cropped the image a bit to lose some unnecesary negative space. For this photo I added a green toned graduaded filter.In my camera bag
In my bag there's always my favorite camera, the Panasonic FZ-1000. As a backup I also carry the "old" Panasonic FZ-200. I have an extra battery (and loader) as well as an extra SD-card, just to be sure. I also carry my greycard and colorchecker with me as well as my extra flash unit.Feedback
First you have to make contact and communicate with your model and make him/her at ease. That part already starts via e-mail in advance of the photoshoot. When the day of the photoshoot finally comes, I spend the first couple of minutes to tell the model what we'll be doing that shoot and I always tell what I'm doing, for example when I'm testing the light. The model will be part of the progress of the shoot and he/she will get more confident, especially when it's her/his first photoshoot ever. For this shot in particular I brought a couple of props with me. The model can choose from the several props, but in my experience don't exaggerate the props: it's the model that has to be the main subject, not the prop. For a portrait it's always important to have the eyes sharp. In this case it was a bit more complex because of the veil; patience is of the essence.