

Get ready to pack your camera bag, thick jacket and a snack, you'll want to stay out all night star gazing after reading this. Photographer Jamesrushforth shares some great tips on how to get started on capturing the stars. Enjoy!
From a personal point of view, photographing the night sky is one of the most difficult, frustrating yet ultimately rewarding aspects of photography. It requires perseverance and ultimately commitment, not least because any sane person would be in bed at 2am, rather than scrambling around in the dark with a load of camera kit. Here are a few tips to get you started on capturing the stars…
What you will need:
• A camera with as large a sensor as possible
• Tripod
• Remote release cable (only for star trails)
• Head-torch
• Warm clothing
• A lot of time
1. Choose the right night - There's little point in heading out to photo the night sky if it's cloudy, so find and check a decent weather forecast beforehand. If it’s particularly the stars and milky way you're after, choose a night with a small or ideally new moon. There are many lunar cycle phone apps that can be downloaded for free.
2. Location - Obviously you're looking for somewhere with some good scenic possibilities, however ideally this needs to be as far away as possible from any obvious light pollution.
3. Compose the photo - Before heading out into the dark it is important to have a good idea of what you're going to photo. Ideally if you have the time and the patience it's worthwhile composing the shot before full dark. However be prepared to improvise a bit depending on the location of the stars / moon (more on this later).
4. Focus to infinity - Night shots look best with the stars properly in focus. Learn where the infinity focus of your lens is (this varies between lenses and rarely exactly corresponds with the infinity symbol exactly, even on expensive lenses). If there is a moon or bright light in the distance you can use it to auto focus. Some people auto focus to infinity during the day and then tape their focus ring to stop it moving - a bit overkill but it works (just be sure to flick the lens to manual focus after).
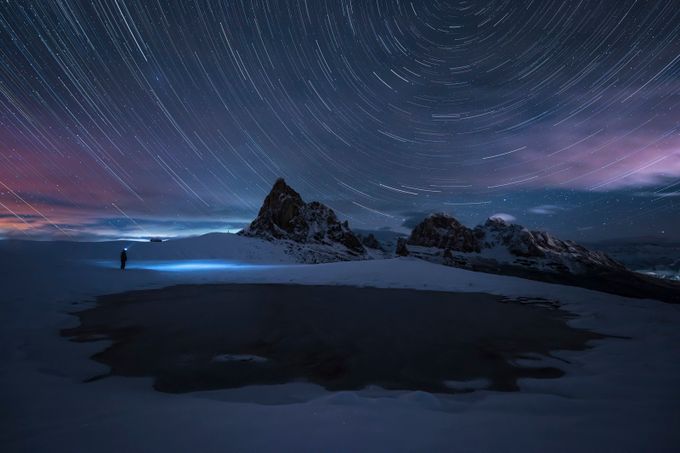
5. Static stars or star trails - This is the big decision you need to make when photographing the
night sky. Because of the Earth’s rotation, you only have a finite amount of time to expose the photo before the stars appear to 'move'. Thus a fairly short exposure is required for static stars whilst a longer exposure will produce star trails as the Earth rotates. The two require contrasting techniques which will be described in more detail below.

This is arguably the harder of the two techniques and is unfortunately more gear / equipment (read money) dependent.
Composition
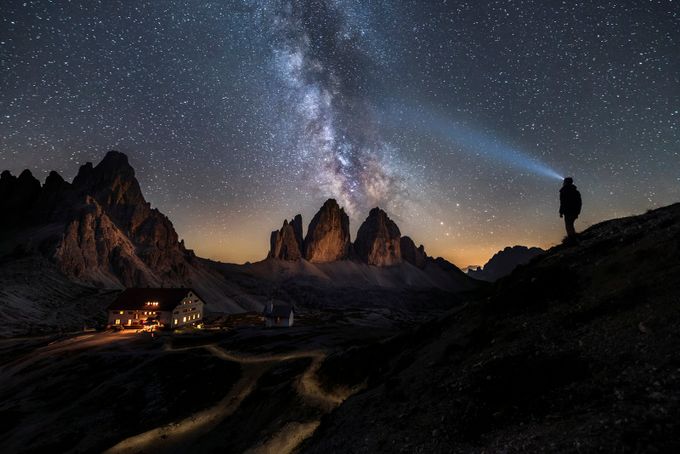
Static stars generally look best if you can get the milky way in the frame. Unless you're very much into astronomy you won't know where this will be (it moves) until it's full dark and you can recompose your shot.
Your camera will pick up more light than the naked eye but you should still be able to make out the line of the milky way which is usually brighter higher in the sky.
Camera settings (EXIF)
Focal length - Because of the Earth’s rotation you only get a finite amount of time before the stars move, making them blur and look out of focus.
The amount of time it takes before the stars move is dependent on the focal length of your lens.
The wider the lens the less the stars appear to move, allowing a longer exposure. Some time ago photographers developed the ‘600 rule’ for working out exposure times in correspondence with varying focal lengths. The straightforward formula divides 600 by the focal length in mm. For example a 50mm lens mounted on a full frame camera would get you a 12 second exposure window (600 / 50 = 12). Personally, due to the resolution of modern cameras and the personal need to print large, I use a ‘450’ rule which has been adopted by many photographers.

Exposure - You’re aiming for the maximum possible exposure time before the stars move and blur.
Aperture - Because you only get a relatively short exposure (see above) you generally want the lens 'wide open' with the lowest possible aperture. The only exception is on some pro setups where stopping down from wide open can improve corner sharpness (for most people this isn't an option however as you need all the light you can get).
ISO - As with nearly all photography you're aiming for the lowest possible ISO to prevent the image from looking grainy. How low you can get the ISO depends on the speed of your lens, focal length and light conditions at the time of shooting.
Example settings - The camera settings will change nearly every time you're out depending on
the light conditions. However here are two rough examples:
Full frame body - 24-105mm F4 lens. Using a focal length of 24mm on a full frame would give you a maximum exposure of 19 seconds. You’d want the lens wide open at F4. This would require an ISO of roughly 6400.
Full frame body - 14mm F2.8 prime lens . Using a focal length of 14mm would allow a 32 second exposure. With the lens wide open at 2.8 you can get away with an ISO as low as 800.

Well there you have it! There are some really great tips for you to get started. Please take a look at Jamesrushforth profile and enjoy his full portfolio!