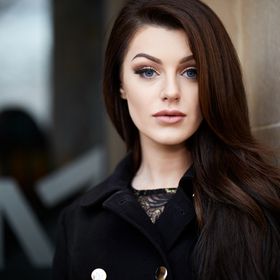
NYX Beauty
Follow on Instagram @contehfotos
Follow on Instagram @contehfotos
Read less
Read less
Views
1476
Likes
Awards
Staff Favorite
Peer Award
Outstanding Creativity
Top Choice
Superb Composition
Absolute Masterpiece
Magnificent Capture
All Star
Superior Skill
Emotions
Impressed
Top Ranks
Categories


rudi0911
June 05, 2018
Join the conversation. Add a comment or even better, a critique. Let's get better together!
Same photographer See allBehind The Lens
-
Share to Facebook

-
Share to X

-
 Share to WhatsApp
-
 Share via Email

-
Share to Facebook
-
Share to X
-
Share to WhatsApp
-
Share via Email

-
Share to Facebook
-
Share to X
-
Share to WhatsApp
-
Share via Email

-
Share to Facebook
-
Share to X
-
Share to WhatsApp
-
Share via Email

-
Share to Facebook
-
Share to X
-
Share to WhatsApp
-
Share via Email

-
Share to Facebook
-
Share to X
-
Share to WhatsApp
-
Share via Email

-
Share to Facebook
-
Share to X
-
Share to WhatsApp
-
Share via Email

-
Share to Facebook
-
Share to X
-
Share to WhatsApp
-
Share via Email

-
Share to Facebook
-
Share to X
-
Share to WhatsApp
-
Share via Email

-
Share to Facebook
-
Share to X
-
Share to WhatsApp
-
Share via Email

-
Share to Facebook
-
Share to X
-
Share to WhatsApp
-
Share via Email

-
Share to Facebook
-
Share to X
-
Share to WhatsApp
-
Share via Email

-
Share to Facebook
-
Share to X
-
Share to WhatsApp
-
Share via Email

-
Share to Facebook
-
Share to X
-
Share to WhatsApp
-
Share via Email

-
Share to Facebook
-
Share to X
-
Share to WhatsApp
-
Share via Email

-
Share to Facebook
-
Share to X
-
Share to WhatsApp
-
Share via Email

-
Share to Facebook
-
Share to X
-
Share to WhatsApp
-
Share via Email

Discover more photos See all
-
Share to Facebook
-
Share to X
-
Share to WhatsApp
-
Share via Email

-
Share to Facebook
-
Share to X
-
Share to WhatsApp
-
Share via Email

-
Share to Facebook
-
Share to X
-
Share to WhatsApp
-
Share via Email

-
Share to Facebook
-
Share to X
-
Share to WhatsApp
-
Share via Email

-
Share to Facebook
-
Share to X
-
Share to WhatsApp
-
Share via Email

-
Share to Facebook
-
Share to X
-
Share to WhatsApp
-
Share via Email

-
Share to Facebook
-
Share to X
-
Share to WhatsApp
-
Share via Email

-
Share to Facebook
-
Share to X
-
Share to WhatsApp
-
Share via Email

-
Share to Facebook
-
Share to X
-
Share to WhatsApp
-
Share via Email

-
Share to Facebook
-
Share to X
-
Share to WhatsApp
-
Share via Email

-
Share to Facebook
-
Share to X
-
Share to WhatsApp
-
Share via Email

-
Share to Facebook
-
Share to X
-
Share to WhatsApp
-
Share via Email

-
Share to Facebook
-
Share to X
-
Share to WhatsApp
-
Share via Email

-
Share to Facebook
-
Share to X
-
Share to WhatsApp
-
Share via Email

-
Share to Facebook
-
Share to X
-
Share to WhatsApp
-
Share via Email

-
Share to Facebook
-
Share to X
-
Share to WhatsApp
-
Share via Email

-
Share to Facebook
-
Share to X
-
Share to WhatsApp
-
Share via Email

-
Share to Facebook
-
Share to X
-
Share to WhatsApp
-
Share via Email

Behind The Lens
Location
This image didn't require space or natural light, so it was taken in my home studio in London.Time
As with most of my beauty shoots, this image was taken between 10 am and 2 pm. This is my preferred time for studio shoots as it idea for models traveling to my studio, I’m well rested, and I feel in the right creative frame of mind.Lighting
I wanted this image to show lots of texture but not to make them over pronounced. So I felt it was right for me to shoot at f7.1. I also want to have some shadows in the image for depth perception. Thus, for this image chose to work with a beauty dish at 30º camera right for a loop-like light pattern. I also used a hair light with a snoot and this also separated the subject from the background and a reflector to open up the shadows. I could have used other hard light sources for this shoot, but I felt the beauty dish gave the perfect balance of texture and softness of the skin and make-up. It was also gridded to control the light spill for a solid black background.Equipment
This image was created with my trusty Canon 5D Mark IV, Tamron G2 70-200mm f2.8 Lens. A Manfrotto tripod was used as I wanted the image to be sharp and 2 Godox AD600 strobes triggered by Xpro system. For light metering, I used Sekonic l-758dr, a Macbook pro and tethered tool cable for tethering.Inspiration
I’m constantly drawn towards photographing people. I love photographing people because of their complexity and the infinite number of ways to tell a story with them, even with a confined area like the face. I also love making beauty portraits and close-ups and for this image, I wanted to show expression to provoke some kind of emotion when the image is viewed. I hope I was successful at that. However, I worked with an excellent make-up artist on this image and she is responsible for the brilliant makeup. Thanks to her my post-processing time was cut down considerably.Editing
Yes, as with most of my images. The camera can only get you so far in realizing your vision when creating an image. I did some skin retouching and my go-to technique is cleaning up and dodge and burn. As Purple is the most significant color in this image I boosted it’s saturation and desaturated slightly the skin color. I also increased slightly the overall sharpness of the image. My workflow for post-processing is a round trip in capture one pro, using photoshop for skin retouching while doing most if not all my color work in capture one.In my camera bag
Although my Canon 5D Mark IV as never failed me, I usually carry around an extra Canon 5D Mark III. Perhaps because I’ve used it for so long and it too never failed me. I also carry my Tamron 85mm f1.8 prime, which is actually my favorite lens. A Tamron 70-200mm f2.8 and a Canon 50mm f1.8 STM. I also carry with me an expo disc and a light meter. Expo discs are great because they take out the guesswork around color temperature in post-processing.Feedback
It is very tempting to complicate things when trying to capture a beauty image. As we all have flaws, a fact, and even models do too. So always try to simplify your process. Start with one light, your key light and build up from it adding lights only to areas where they are needed. Don’t underestimate the significance of reflectors and light blockers, they can come in very handy in controlling shadow on a beauty image. For this image after deciding on how much depth of field was needed f7.1 and pose, I set my key light, the beauty dish. I metered it to give me the depth of field, then took a shot. From the resulting image, I felt I needed more separation from the background so I added a hair light and angled it down so the light just brushes past the shoulders and carve it out, much like a rim light. I used a snoot as modify to give me a lot of control over this light source as I didn't what it spilling into the shadow area. Snoots also give you a lot of contrast perfect for defining shapes. I then took another shot to see how everything is coming together and made changes in position as required. The shadow on the right side of the face to camera left and down the model's right arm was a bit dark for my liking. A consequence of using a beauty dish with grid. I wanted to open this shadow up to make the lighting more even but didn't want to add another light source. So I used a silver reflector to bounce the light from the beauty dish back into the shadow. I used silver for bring out the texture as well as giving that area a lot of fill light. I took a shot which was subsequently the final shot because I felt it had everything I was looking for. A large part of my capturing workflow involves critiquing my images and figuring out what needs to be done to make it better. I usually start off envisioning a final image in mind, deconstructing it and then try to patiently recreate it. I find that this works for me because I'm in control of the outcome and every image is as a result of careful planning. I can also be ambitious and push myself with every image I create.