

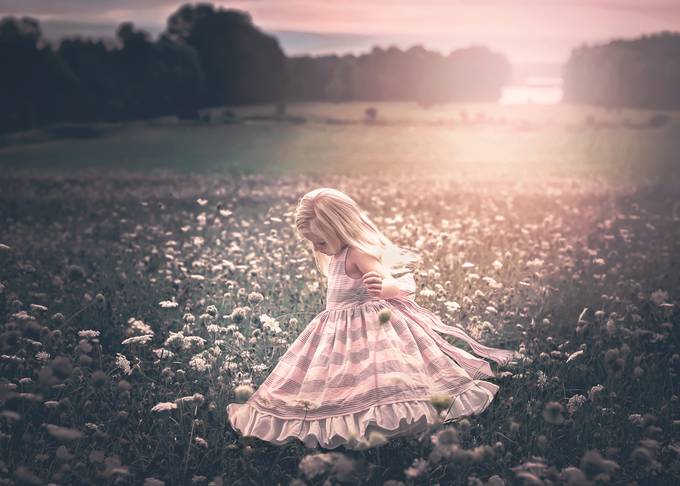
Author Christopher Moore once said “Children see magic because they look for it”, and isn’t that true? How children see the world differently because they choose to see it as something exceptional and fascinating, rather than something rational and taken for granted. Adults have a lot to learn, don’t they? Community member Judy Hurley’s (judyhurley) passion is to capture the whimsical and magical moments of children in action – thinking, playing; just being themselves. By combining her interesting ideas, a good grasp of tools and editing skills she creates a beautiful storybook feel to her children portraits. How does she do that? Here’s Judy’s Top 7 Fine Art Children’s Portraiture Photography Tips:

1. Start With A Vision
Creating a fine art portrait begins with vision. I create pictures in my mind (since I can’t draw). Often the pictures are colorful, magical, whimsical, light and airy. At times they are emotive, moody, sometimes dark and mysterious. It depends on my mood, the seasons, the subject and locations I am considering. Creativity has no boundaries. I envision the look and feel I hope to achieve with each image. I consider the message I want to send or the emotion I hope to evoke. If I do not have the knowledge or tools to execute my idea, I set out to acquire them. I try to learn something new and advance my skill with each project.
2. Know Your Subjects (Child/Parents/Participants)
Whether I hand select a model or am working with a client’s child, it is important for me to get to know my subject. Preferably before the session, I try to discover their interests, likes and dislikes. I ask what their favorite colors are, if they like animals, magic or sports. I tailor my vision to the personality and preferences of the model.
I get to know the parents and the other participants, learn their expectations and observe how they interact with their child. Interactions can lead to unwanted tension so I develop strategies to intervene where necessary. Pre-session consultations are extremely helpful for me in this regard. This is where I will help the parent/participants understand their role during the session. Giving them a job (holding a reflector for example) helps. I explain the do’s (where to stand, what to say and not say) and don’ts (“say cheese”, “smile” constant bribes, reprimanding, scolding, etc.).

3. Pre-planning
Planning ahead of the session is so vital. Together with the parent and child if possible we discuss the vision and session themes in great detail. Here I map out storyboards and suggest poses for the child. Clothing does not have to be formal. A barefoot child in jeans or a simple dress can make for a lovely image. I do provide my clients with a list of ideas for props, clothing and accessories that can enhance the look and feel of the final image.
Because 99% of my sessions depend on the use of available natural light, flexibility and timing are key. Once a date is set, I watch the forecast. I usually offer a session date as well as a rain date to clients. It goes without saying that we avoid harsh daylight at all costs. Sessions are usually held early in the morning or at sunset/early evening. If that is not possible we pray for clouds. Shooting in shade is my last resort. Light can always be added during post processing. I do use reflectors to redirect or soften light.

4. Execution
I arrive at least an hour or two ahead of my models and clients to carefully re-evaluate lighting and angles and set up props. Lighting changes throughout the session, something to keep in mind. Once everyone has arrived we review the plan. The attention span of young children is limited so I try to work quickly and efficiently. I set the mood for each pose by telling a story, a joke or creating a visual for them.
I try to break up more serious moments by being goofy and allowing my subjects to be playful and silly. I may ask them to make a sad face, a happy face, a scared face an angry face. I have them think about a favorite movie, show, play or hero/heroine. By asking them a question that requires them to reflect, often they will tilt their head, direct their eyes upwards and give me a lovely pensive look. I watch for expressions that evoke emotion and convey feelings of frustration, sadness, wonderment, joy or surprise. Connecting with the child is key.

5. Post Processing
This is where I spend most of my time. This is where the magic happens and the story unfolds. I begin editing in Lightroom and do basic adjustments (exposure, white balance, contrast, etc.) on my image then take it into Photoshop. I have an arsenal of actions overlays, textures, digital backgrounds, digital props and stock images from which to choose to enhance my image. I use additional software to help achieve a painterly look when desired. Topaz labs, Alien Skin and On1 software provide some good options. There are so many other great programs out there. I experiment until I achieve the look I like. That being said, I believe the tools should be used to enhance the image rather than overly dominate it.

6. Style
My style is ever evolving. I spend a lot of time studying images that deeply touch me, examining light, shadows, textures, expressions and subjects. I try to figure out what it is about certain images that separate them from the rest… Why some images are so memorable and others are not. Then I set out to grab my audience. I create what I love first and the rest follows.
If I had to choose three things that are most important to me in creating my art it would be the combinations of color, texture and expression (of the child). I love a whimsical, storybook feel to my images featuring young children. This is achieved using overlays such as animals. Butterflies, birds, sparkles, wings, Bokeh, lanterns, fireflies and more. The younger child may offer a curious, surprised, joyful look. I prefer a more sullen, pensive look for older children where they appear to be lost in thought, daydreaming, or even frightened.

7. The Sky is the Limit
I practice incessantly, try new techniques, experiment, critique my old work and study the work of other artists whenever I can. The ceiling will never be too high for me. That is what is so great about photography. There is always one more technique to try, one more idea to explore, one more tool to master and one more artist to offer inspiration.
For more beautiful images taken by Judy, visit her profile, website, Instagram and Facebook.