DSC_7809
Views
1198
Likes
Awards
Top Shot Award 21
Featured
Contest Finalist in In Transit Photo Contest
Peer Award
Superb Composition
Outstanding Creativity
Top Choice
Absolute Masterpiece
Superior Skill
All Star
Magnificent Capture
Top Ranks


Same photographer See allBehind The Lens
-
Share to Facebook

-
Share to X

-
 Share to WhatsApp
-
 Share via Email

-
Share to Facebook
-
Share to X
-
Share to WhatsApp
-
Share via Email

-
Share to Facebook
-
Share to X
-
Share to WhatsApp
-
Share via Email

-
Share to Facebook
-
Share to X
-
Share to WhatsApp
-
Share via Email

-
Share to Facebook
-
Share to X
-
Share to WhatsApp
-
Share via Email

-
Share to Facebook
-
Share to X
-
Share to WhatsApp
-
Share via Email

-
Share to Facebook
-
Share to X
-
Share to WhatsApp
-
Share via Email

-
Share to Facebook
-
Share to X
-
Share to WhatsApp
-
Share via Email

-
Share to Facebook
-
Share to X
-
Share to WhatsApp
-
Share via Email

-
Share to Facebook
-
Share to X
-
Share to WhatsApp
-
Share via Email

-
Share to Facebook
-
Share to X
-
Share to WhatsApp
-
Share via Email

-
Share to Facebook
-
Share to X
-
Share to WhatsApp
-
Share via Email

-
Share to Facebook
-
Share to X
-
Share to WhatsApp
-
Share via Email

-
Share to Facebook
-
Share to X
-
Share to WhatsApp
-
Share via Email

-
Share to Facebook
-
Share to X
-
Share to WhatsApp
-
Share via Email

-
Share to Facebook
-
Share to X
-
Share to WhatsApp
-
Share via Email

-
Share to Facebook
-
Share to X
-
Share to WhatsApp
-
Share via Email

Behind The Lens
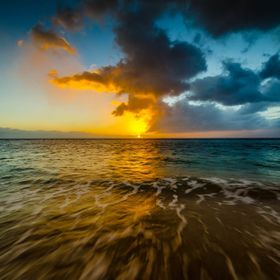
Location
San Francisco, CA. I'm blessed to live in such a scenic area. Wherever I point the camera there's something wonderful to shoot. This one was from Treasure Island, an island in the center of San Francisco Bay, which serves as the center anchor point for the San Francisco/Oakland Bay Bridge.Time
This was taken just after sunset on a weekend. It wouldn't have worked on a weekday because the bridge is usually bumper to bumper. I had spent the late afternoon shooting the sunset behind the silhouette of the city and was about to pack up when I decided to try my luck with the bridge.Lighting
There were a few of us up there shooting that night and we were all sharing shutter speed suggestions. Most were going with 5-10 second exposures to get the light trails. My goal was to get light trails from the cars along with starbursts from the traffic lights. I played around with the aperture and went with f11 to get the lights to starburst. I then dialed in the shutter speed and ISO to compensate. I took multiple exposures but liked this 8 second shot for the good balance between the trails from the tail lights and the lights from the city.Equipment
I shot this on a Nikon D7000 with a Nikor 10-24mm for 8 seconds at f11 on a Manfrotto tripod. I set the ISO at 400 to stop down the aperture to f11, which resulted in those nice little starbursts.Inspiration
I had always seen photos of the Bridge with the City behind and wanted to try and get one myself. I was originally going for more of an angle, shooting from the side of the Bridge with the City between the spans. However, when I walked over the Bridge I was struck with the symmetry of the towers and how one was framed inside another inside another. The curve of the Bridge was also really evident, which is something you don't notice while you're driving across it. I took a few snaps and moved on to my original spot to the side of the bridge, but I'm much happier with this shot than the others.Editing
I shoot in raw and post-process in Lightroom. Since this was taken with my 10-24mm I had much more of the sky and foreground in the original shot, but I found that the power of the Bridge got lost, so I cropped it down to the photo here. Cropping made all the difference in the world to make the Bridge the subject of the shot, not just a part of the shot. I then brought the white balance into the blues to make the sky a natural nighttime color, reduced highlights, upped the shadows and added clarity and contrast overall. I bumped up the saturation of the reds to make the taillight trails pop. I then reduced saturation in the yellow and orange channels to take away the orange tinge the traffic lights cast over the whole image. Lastly I added additional clarity and sharpening to the traffic on the bridge and the buildings in the City with the adjustment brush.In my camera bag
It depends on what I'm shooting. For landscapes such as this one I've always got my Nikon 10-24mm ultrawide, a Nikon 18-105mm, and a Nikon 70-300 for distance shots. For portrait work I change it up a little, keeping the ultrawide and the 18-105, but I add a Nikon 50mm prime 1.4 to get serious Bokeh behind the subject and a Sigma 17-70 to capture people in the event. I never go anywhere without my polarizers and neutral density filters.Feedback
Look around when you shoot. Have a game plan, but don't hold yourself to it. This photo was a happy accident. After I'm done shooting my primary subject, I turn around and look behind me. There may be a better angle from a slightly different perspective, but if you only focus on your original plan, you might miss it.