Red Rock
A sunset shot at the Red Rock Canyon. A 2 row panorama using focus stacking for huge depth of field and super large resolution. Using a normal focal length, a...
Read more
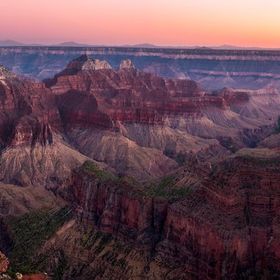
A sunset shot at the Red Rock Canyon. A 2 row panorama using focus stacking for huge depth of field and super large resolution. Using a normal focal length, about 18 shots 9 for the mountains and sky, and 9 for the foreground. A wide angle lens would have made the mountains super small.
Read less
Read less
Views
1053
Likes
Awards
Winner in Sunset Photo Challenge
Peer Award
Superb Composition
Absolute Masterpiece
Top Choice
Magnificent Capture
Superior Skill
Outstanding Creativity
All Star
Genius
Top Ranks

Same photographer See allBehind The Lens


Behind The Lens
Location
The photo was taken at the Red Rock National Conservation Area near Las Vegas.Time
As with most of my photography, I like to shoot at sunset. I often get there just before sunset to Recon the area and set up time lapse for my videos. Once the light gets good, I focus on panorama shots.Lighting
In this shot the sun had set for a few minutes, the illumination of color was optimal for the sky. However, due to the high contrast between sky and dark mountains and foreground, I used a multi row panorama technique. This involved several shots across the sky, and several across the foreground. By doing this, I was able to change the exposure of the foreground and sky with each shot, and blend the exposures in Lightroom 5. With auto focus on each shot, I was able to get full clarity from front to back.Equipment
The gear used: Nikon D1700, Nikon 18-140mm lens, 3LT Tony tripod, and a nodal rail with "L" bracket. Camera Settings: Shade WB, Auto focus, Manual exposure, Aperture f/8, ISO 100, Shutter varies with each shot. Focal length DX 35mm (50mm FX equivalent).Inspiration
The inspiration comes from the evolution of light through a sunset. Between the beginning of the sunset through the twilight (Blue Hour), everything changes rapidly illumination, temperature, humidity, colors of the sky etc... This change from day to night can be felt, as well as seen while shooting landscape. Also, the DSLR captures colors, and details the eye can't see. It's always exciting to see what the camera's long exposure will unveil once everything is processed.Editing
Absolutely, IMO for landscape photography post processing is the key to expressing the scene in a unique creative way. For this shot, I used Lightroom 5, and Microsoft Image Composite Editor (MS ICE). With Lightroom, I balance the exposure of each shot I took for the panorama assuring the row of images for the sky matches the row of images for the foreground. I use the Lightroom tools like grad filters to help match the exposure overlap of each shot. Then I do the basic clarity, shadow detail, highlights, contrast, etc... Once complete, I take all the images in the Panorama auto stitch program MS ICE, and auto stitch it, crop it, and render it in JPEG. Then I bring it back in Lightroom to put on the final touches and enhancements.In my camera bag
For my landscape kit, I pack light as possible. Nikon D7100 with 18-140 lens, D3300 with Tokina 12-28mm f/4 lens, 2 tripods, the nodal rail, L Bracket, and intervalometer. Plus, the basic stuff like food, water, 1st aid, lights, and whatever extra clothing is needed for the shooting conditions.Feedback
Best advice I can give is, get your gear out, shoot in the good light when the sky has a lot of color. Also, avoid the ultra wide lens for landscape and explore multi shot panorama. Once you learn how to do multi-shot panorama, you'll have a lot more control over exposure, focus, and composition. Explore various focal lengths from wide to tele to see what kind of composition you can create with multi-shot panorama. Remember, multi-shot panoramas create huge images, with the highest resolution. They are best viewed large for the full effect.