Magnolia
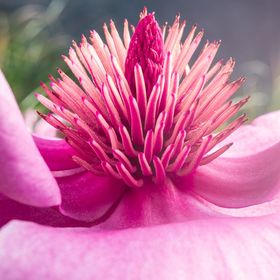
I took this photo of a magnolia one morning at the Auckland Botanical Gardens.
I took this photo of a magnolia one morning at the Auckland Botanical Gardens.
Read less
Read less
Views
24
Likes
Awards
Winter 23 Award
Top Choice
Top Ranks
Categories
Same photographer See allBehind The Lens


Discover more photos See all


Behind The Lens
Location
Auckland, where I live in New Zealand, has plenty of beautiful parks full of flowers. And many homes have their own magnolia trees in their yards. But the place that takes the cake, so to speak, for magnolia trees, is the Auckland Botanical Gardens in Manurewa. It has free entry, which is important to me as I’m unable to work due to several health conditions and my husband works for a not-for-profit organisation. This park has many huge magnolia trees in their grounds which bloom every spring.Time
I usually try to go to hugely popular places such as the botanical gardens on a weekday, when there are less people around, as I don’t want myself and my gear to get in the way of other people’s enjoyment of the flowers. But sometimes you just have to work with the weather. Almost all of August consisted of typical squally spring weather – lots of wind and rain. This was the first opportunity with calm weather right in the window when the magnolia buds and petals would be at the perfect stage for photographing. So although it was a Saturday, I decided to go for it. As it turns out, I had this tree all to myself for about an hour before other magnolia admirers showed up. This particular photo was taken at 10.24am on the 26th of August 2023.Lighting
There was very little cloud cover on this day so I brought along with me a large light diffuser I had made (using semi-transparent TPU material usually used for making raincoats attached to a foam board frame I created). This was housed in a huge home-made art portfolio case cobbled together with cardboard I had lying around at home, complete with a padded shoulder strap nicked from an old camera bag, for which I was very grateful as I was carrying a lot of heavy gear for reasonably long distances throughout my time at the park that day. It was quite tricky trying to hold the diffuser between the sun and magnolia as there was very little space between it and the neighbouring bud/petals, so I ended up needing to use both hands to hold the diffuser in place. This meant I needed to set my camera up on a tripod and use a remote release to trigger the shutter once everything was in place. I’m glad I went to all this effort because from experience, I know that glare on magnolia petals in particular results in a lot of distracting white, and I needed the viewer’s eyes to be drawn to the centre/bud rather than the outer petals.Equipment
To take this photo, I used a Nikon D5500 camera and sigma 18-35mm f/1.8 lens set to f/11 with a shutter speed of 1/100, ISO of 100, and at a focal length of 35mm. I also used a lens hood, a tripod, and the remote shutter release and home-made diffuser mentioned earlier. Sandwiched between my camera body and lens was a 12mm extension tube which allowed me to get closer to the flower, giving it a slight ‘macro’ feel to the image whilst still revealing its surroundings due to the wide angle lens I used.Inspiration
I love magnolia trees and had been wanting to take photos of one in particular that I had spotted in a previous excursion to the Botanical Gardens a year prior when I was with my husband, and had no camera with me. This year, he was overseas and I had access to our shared car and all the time in the world. The reason I had my eye on this particular tree was because this one was low enough to the ground that I could capture the flower side-on, something that was also made possible by the time of year which meant the petals had opened up to the extent that the bud was entirely visible, but the petals hadn’t yet browned or dropped off.Editing
I imported the raw file into Photoshop CC, cropped the image slightly, and used luminosity channels to selectively add contrast and saturation before clone stamping out distracting pollen debris on the petals and finishing the editing off with a vignette to draw the viewer’s eyes more to the centre of the flower.In my camera bag
As I am an astro-photographer as well as a landscape and flower photographer, I have a different set of photography equipment to suit each of the aforementioned purposes. When doing a flower shoot, I take out of my bag and leave behind the things I’d usually take on an astro or landscape shoot. So on this day, what was in my bag was my extension tube set, my other lens (Nikon 55-200mm f/4.5-5.6), remote shutter release, spare camera batteries, spare remote release batteries, a microfiber lens cloth and lenspen to get rid of smudges. In addition, I carried a pillow inside a sturdy plastic bag upon which I could kneel on the ground - I have fibromyalgia and the tender points in my knees flare up if I attempt to do this without a cushion. And of course, the all essential reading glasses for my 44 year old eyes to be able to check the back of the camera screen for focus and exposure.Feedback
Make sure you get your timing right – if you go too early in the season, the petals will be almost entirely enclosing the bud, making it impossible to capture the bud. If you go too late in the season, the petals will have browned and/or fallen off, leaving only the bud. Go on a day that has little to no wind, so that you don’t have to be limited by either a higher ISO or faster shutter speed. Also choose a day that is overcast to reduce glare off the petals, or be prepared to use a light diffuser to achieve the same effect. Going first thing in the morning is helpful because generally wind is more settled, the light is warmer and it’s easier to prevent harsh shadows and glare. Experiment with angles – get low, (even from underneath for a different perspective entirely!) or try a birds eye view looking down into the bud from above – anything that’s different to the way we usually view flowers when out and about. For this reason, it’s a good idea to find a tree whose branches are closer to the ground. Use a shallow depth of field to blur the background, making the flower stand out from its background. If possible, use a macro lens or equipment that mimics macro, such as extension tubes or close up filters, so you can capture more of the bud’s detail. The pinks in magnolias are easy to over-expose. When in the field, your histogram may show that there is no clipping going on, but I find reducing the exposure by one stop gives you more flexibility in post processing to ensure those pinks don’t over-saturate too quickly as soon as you make any edits.