Glow-Stix
Views
1242
Likes
Awards
Top Shot Award 21
Featured
Peer Award
Superb Composition
Top Choice
Absolute Masterpiece
Outstanding Creativity
Magnificent Capture
Superior Skill
Top Ranks

Same photographer See allBehind The Lens
-
Share to Facebook

-
Share to X

-
 Share to WhatsApp
-
 Share via Email

-
Share to Facebook
-
Share to X
-
Share to WhatsApp
-
Share via Email

-
Share to Facebook
-
Share to X
-
Share to WhatsApp
-
Share via Email

-
Share to Facebook
-
Share to X
-
Share to WhatsApp
-
Share via Email

-
Share to Facebook
-
Share to X
-
Share to WhatsApp
-
Share via Email

-
Share to Facebook
-
Share to X
-
Share to WhatsApp
-
Share via Email

-
Share to Facebook
-
Share to X
-
Share to WhatsApp
-
Share via Email

-
Share to Facebook
-
Share to X
-
Share to WhatsApp
-
Share via Email

-
Share to Facebook
-
Share to X
-
Share to WhatsApp
-
Share via Email

-
Share to Facebook
-
Share to X
-
Share to WhatsApp
-
Share via Email

-
Share to Facebook
-
Share to X
-
Share to WhatsApp
-
Share via Email

-
Share to Facebook
-
Share to X
-
Share to WhatsApp
-
Share via Email

-
Share to Facebook
-
Share to X
-
Share to WhatsApp
-
Share via Email

-
Share to Facebook
-
Share to X
-
Share to WhatsApp
-
Share via Email

-
Share to Facebook
-
Share to X
-
Share to WhatsApp
-
Share via Email

-
Share to Facebook
-
Share to X
-
Share to WhatsApp
-
Share via Email

-
Share to Facebook
-
Share to X
-
Share to WhatsApp
-
Share via Email

Behind The Lens
Location
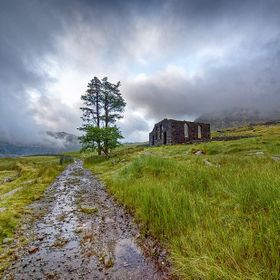
I took this photo on the coast of North Wales UK. The place is called Llandulas and it features lots of photo opportunities with old Jetties and stony beaches being the most prevalent.Time
It was around 8.00 pm in March 2011 The sun had just dipped below the horizon, and the colours became more intense in the sky.Lighting
The lighting was pretty much natural, but as always I find the softer evening or dawn light to be much more forgiving and easier to work with when attempting long exposures.Equipment
I used a Nikon D700, a Nikon 14 - 24 mm Lens I rate the lens as being one of the best Nikon ever made, it has never let me down! I used a tripod and a cable release. ISO was set at 200 and Aperture was F/22Inspiration
I had seen a similar image taken by son in law albeit in a different location, and I wanted to get the same kind of effect without directly copying his work. I was fortunate that the sea state was calm and the soft evening light produced enough color to make the shot interesting.Editing
I always shoot in RAW and find the Adobe Lightroom is the best way of processing images for me. I used the graduated filter and brought some of the details out of the shadows, slight adjustments to vibrancy, saturation and sharpness and finally a small amount of vignette. I then finished the processing on adobe photo-shop with fine tuning to sharpness and contrast.In my camera bag
2 Camera's Both Nikon (These days Nikon D810 and Nikon D7000) Lens 14 - 24mm ( which I would never be without) Nikon 24 - 70 mm and the new Nikon 80 - 400. I always carry several cleaning cloths, 2 x cable releases, Various ND Graduated Filters Plus 10 Stop and 6 Stop Haida Filters. Packamac Rain Jacket, Spare Battery,Filter Holders. Pencil / Torch. Pen.Feedback
Timing and location is of the essence. Study the weather forecast, get to the desired location to allow plenty of time to survey the area and find the best possible views. Note where the sun will be setting or rising and without putting the camera on the tripod, walk around the scene and compose the shot from different heights and angles, until you find one that you are happy with. Then secure the camera firmly on the tripod. Check the area beneath the tripod legs and ensure stability by pushing down. Then re-check your composition, check the horizon is level and where possible keep the camera as level as possible to minimize distortion. Then it is a case of trial and error to some degree, but just remember that as the sun sets the light changes rapidly and so check your histogram after every shot and make the necessary adjustments to ISO, Aperture, and filters (if used) and exposure compensation controls. Zoom in to view your image on the camera display to check for sharpness. Once you have the image you want, try another angle or height, or move along to another viewpoint to get some variety in your shoot.