
All around the World ViewBug members are shooting awesome landscapes and nature images. Today we are featuring btcphotography who has a special way of capturing nature. Enjoy and learn!

Can you share 5 quick tips on how photographers can improve their nature photography?
Know the area
First of all research the area of interest before hand if possible. Walk around and have a look and make note of places that will work for a photo. Some times they jump out at you, sometimes not, but its always good to have a few areas in mind when you out to take pictures.
Sunrise & Sunset
Knowing the times of the sunrise and sunset will help you get the most from a scene. The best light comes around sunrise and sunset, so knowing what time that will be helps you plan ahead. Combined with researching the area means you can be there and set up in time and won’t miss any chances.
Know your camera
Knowing your camera, how to change the settings quickly and the relationship between them means you can adapt quickly to the changing conditions that happen, especially the light around sunrise and sunset. The last thing you want is to miss a great opportunity because you were fumbling around with camera settings. (I’ve learnt from experience!)
Use a tripod
Whether you are shooting a wide angle landscape or using a longer lens for wildlife, I always try to use a tripod. It gives you more control over the shot and means you can get sharp images even in low light.
Composition
Think about the composition of the shot your taking. Try and use the rule of thirds to give more impact to the shot. Also think of the foreground and background, try and avoid it being to busy as this distracts from the subject.

How did you capture the sunlight in this photo?
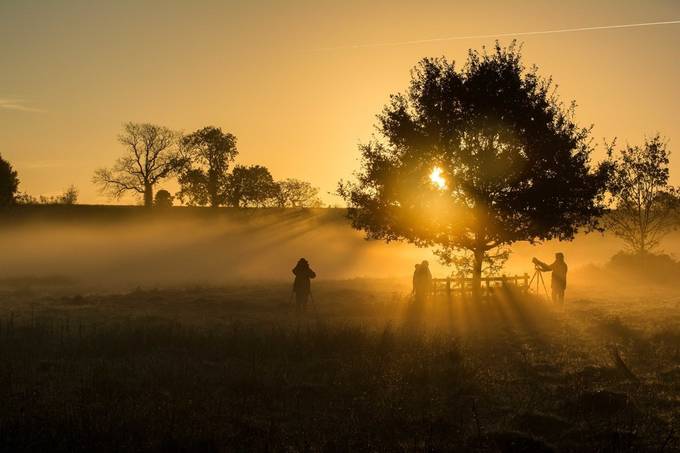
This photo almost didn’t happen. I was out one November morning looking to photograph the deer rut but wasn’t having much luck. I had found an area that looked like it could produce a great shot with the sun due to rise from behind the trees and a few deer in the near by wood. The weather conditions were perfect, with a light ground mist sticking around as it began to get lighter. The only thing missing was the deer. A few other photographers also had the same idea, waiting patiently for the deer to arrive too. I’d set up and was waiting as the sun began to rise from behind the trees. The way the mist dispersed the light looked fantastic but I felt disappointed that no deer had showed to make the image complete. I then noticed that the other photographers setting up made an interesting silhouette, which combined with the beautiful morning light could make an alright image. Although I wasn’t 100% convinced it would make an interesting shot, I took a few shots anyway before the sun had risen too high into the sky. It turned out the light was perfect, the way the morning mist shows up the rays of light against the darker foreground of the grass and the silhouettes of the photographers looked fantastic. It soon became one of my favourite shots, even though I almost gave up and never took the shot.
We really like this shot, what is your favorite thing about it?
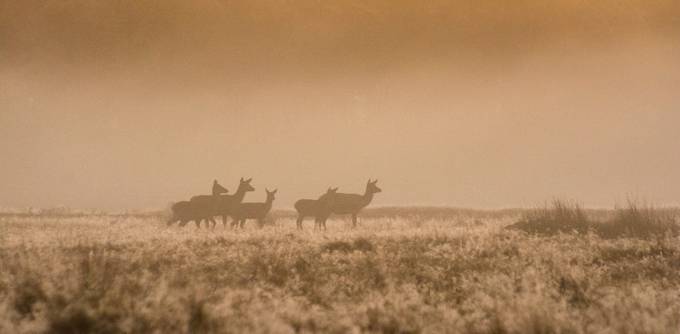
My favourite thing about this photo is the simplicity of it. Nothing distracts from the group of deer. The background is very plain; the foreground is also quite subtle, just enough to set the image off. I also like the colour of the image. The pink/light brown light coming from the sunrise; a slight mist across the whole scene also helping to keep the light soft. Rather than showing the details of the deer the silhouettes seem to work really well. It adds to the simplicity of the shot but at the same time they remain recognisable. Again it wasn’t the shot I had hoped to get that day. I had my mind set on getting a similar shot but I wanted a red stag instead of a group of fallow deer. I thought a stag shot would be more powerful and make a more impressive photo. As it turns out I was happy to come away with this shot, not what I set out to get but just a good simple shot of a group of young fallow deer.
This is another great deer photo! Can you share a quick tip on how to capture a similar shot?

I’d say keep an eye on what’s going on in the shot. Try to avoid anything that will cause distraction from the subject. Keep the background uncluttered and simple. Use the rule of thirds to make the image more striking and make sure the animal is looking into the frame rather than out of the frame. It might take a while for the animal to get into a position that works, so patience is also key. A simple clean foreground and background really draws your attention to the subject, makes it stand out and I think that’s the key to capturing a shot similar to this one.
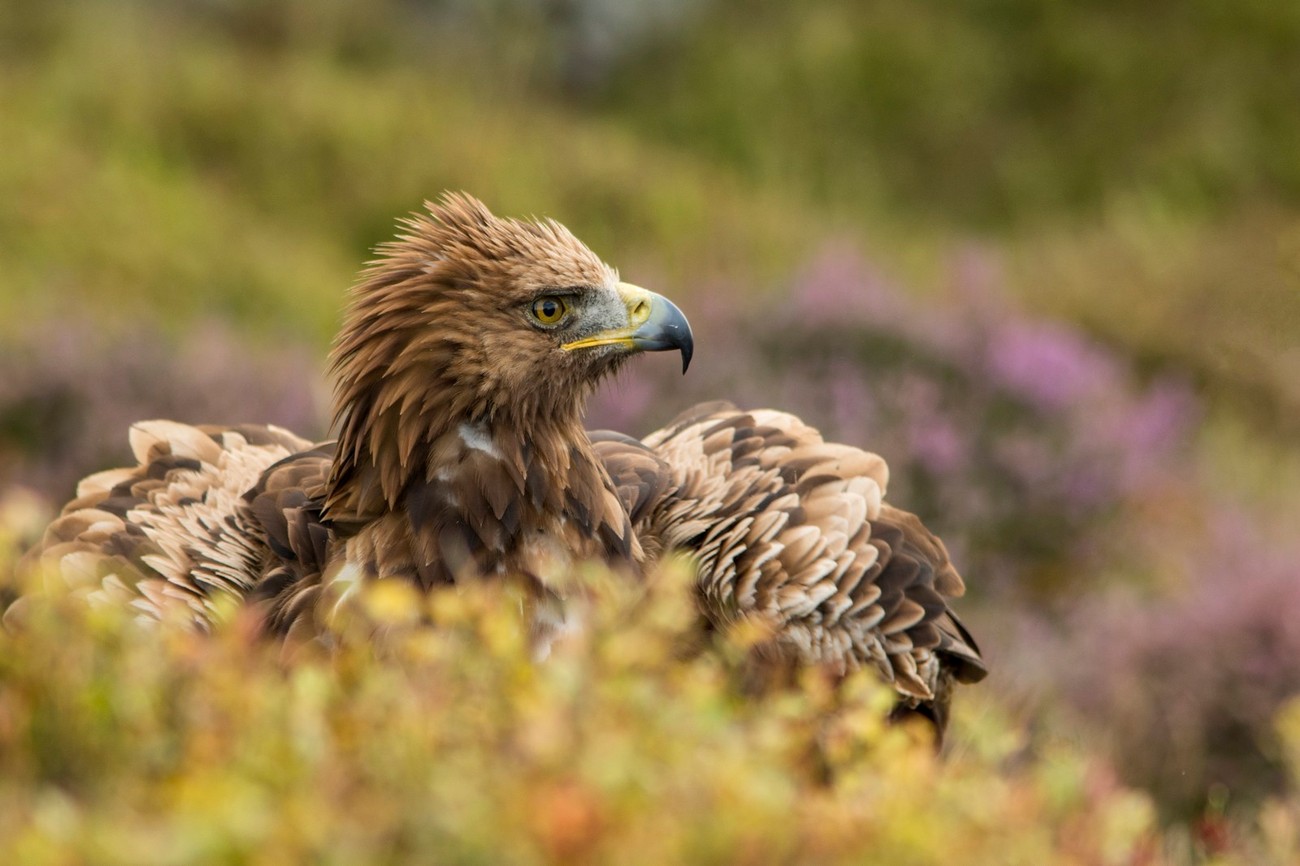
What an incredible shot! Can you share the story behind it?
This is one of my favourite shots from a day I spent photographing moorland birds of prey. It was a day spent in a local moorland spot with an experienced falconer who brought along 4 birds of prey for us to photograph. He was experienced with the birds and also the needs of photographers as he’d worked with many pro wildlife photographers in the past. The idea was to gain experience photographing birds, especially birds of prey, an area which I’m not too confident in. Being around the birds and having the time to look and compose a shot to show the birds in the best way was a huge help and improved my photography a lot! You learn what shots work, what doesn’t and also a bit about how the birds would act in the wild which all helps when time is against you to get that perfect shot.
Framing
With this shot I wanted to get something a little different. A lot of the shots I’d seen before, and taken that day were your typical eagle shot. I wanted to catch it when it was displaying its feathers. I had seen it display its feathers a couple of times before and that’s when I decided it would make a interesting and different shot. I’d not seen many like it before and I hadn’t taken one similar and thought it would add some diversity to the small portfolio of moorland birds I was building up that day. I decided on a low down, straight on perspective with the eagle large in the frame. The eagle large in the frame would show the details in the feathers and the straight on perspective meant I could have a shallow depth of field to blur both the foreground and background.
Lighting
For this shot I was using a 200-400mm lens mounted on a tripod. This gives you the stability that hand holding a large lens cant achieve. I didn’t use a flash as the shot was taken mid afternoon. The light was nice and warm but even so I had the ISO set 400 the ensure that I had the shutter speed to capture the shot without any movement in the photo. I wanted a shallow depth of field and this was achieved by using a aperture of f7.1. As I had already set myself up to shoot side on, it meant I could get the eagle in focus despite such a shallow depth of field. It also meant that the background and foreground was nice blurred and out of focus bringing the attention back onto the eagle.
Subject
I was looking for a different and interesting way of photographing the eagle, as a lot of my shots and others I’d seen before didn’t show the bird in such a way. I had planned the shot in as much as I was looking for different way to show the bird, but I had made the decision quickly once I had seen the bird display its feathers. I felt it would be a strong image if I could catch it mid display and be a different look to some of my previous shots that day. I’m choosing to stay as far away from the eagle as I can for two reasons. One is to not alert the eagle too much to your presence that it is constantly looking at you and making a natural shot impossible. The second is staying far away and using a long telephoto lens gives you a lot more flexibility in composition. It allows you to use a shallower depth of field whilst keeping the subject sharp yet keeping the background and foreground out of focus which is more difficult if you are closer to the subject. When considering POV I’m thinking that I want to make the eagle look as natural as possible, to make a striking image and also keeping the background uncluttered. I might alter my POV if I find that the original idea had a distracting background or that it made the eagle appear in an unnatural, unflattering way.
Composition
In the back of mind I’m always thinking about the rule of thirds. The first thing I do is look at how the eagle will fit into the rules and alter my camera to make sure it is. I’m also looking at the way the eagle is facing to make sure its looking into the frame and not out. I use the grid function on my camera to display a grid in the view finder which helps a lot when composing the image. In this image I’m not thinking too much about symmetry or reflections but its something that does sit in the back of your mind. I try if I have time to look over the camera once I’ve set up a shot as this allows me too see something I might have missed when looking through the viewfinder. I’m paying attention to both subject, background and foreground in this shot. This is because a sharp subject with a simple blurred background and foreground complement each other and draw the viewers attention to the subject by the contrast. I choice to use this angle as it allowed me to have the eagle nice and sharp whilst keeping the back and foreground blurred.
Post-Processing
I decided to leave the shot in colour as that was the image I had planned. I wanted to show the colours in the eagle and the background. They work well together and show the eagle in a natural environment and that was my aim from the beginning. I did a slight bit of post processing, a few adjustments to blacks, highlights, shadows and clarity in the RAW processor and then a simple sharpen to give the image its final look. It didn’t need much to be honest as I was pretty happy with the result straight from the camera.
Thank you for sharing such a detailed explanation of the secrets behind this photo plus some awesome tips!