Silver Bullet Bus
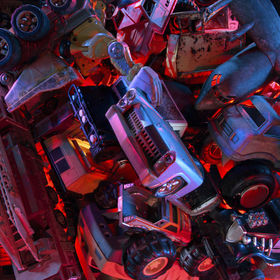
An old Greyhound bus parked by an antique store in Forney, Texas.
An old Greyhound bus parked by an antique store in Forney, Texas.
Read less
Read less
Views
2738
Likes
Awards
Spring 21 Award
Celebrity Award
Contest Finalist in My Best Shot Photo Contest Vol8
Runner Up in Covers Photo Contest Volume4
Contest Finalist in Covers Photo Contest Volume4
Editor's Choice
Peer Award
Outstanding Creativity
Top Choice
Absolute Masterpiece
Superb Composition
Superior Skill
All Star
Magnificent Capture
Virtuoso
Genius
Top Ranks
Categories
 PRO+
PRO+

 PRO+
PRO+
paulatchinson
November 11, 2019
Hi - this image would be a great entry for a challenge I have just created. Could you be persuaded to give it a go. Its ‘TRAVELLING AT NIGHT’.
The URL is viewbug.com/challenge/travelling-at-night-photo-challenge-by-paulatchinson.
To enter Go to my Viewbug Page - click on my avatar image - click on the link to CHALLENGES, then CREATED and choose 'IN THE KITCHEN'.
I hope you enter and best of luck.
Paul
The URL is viewbug.com/challenge/travelling-at-night-photo-challenge-by-paulatchinson.
To enter Go to my Viewbug Page - click on my avatar image - click on the link to CHALLENGES, then CREATED and choose 'IN THE KITCHEN'.
I hope you enter and best of luck.
Paul

Coping_Mechanism
December 14, 2019
this totally looks like the bus from Black Ops Zombies. I forget what map... idk if thays what you were going for, but it sure is spot on.


Same photographer See allBehind The Lens
-
Share to Facebook

-
Share to X

-
 Share to WhatsApp
-
 Share via Email

-
Share to Facebook
-
Share to X
-
Share to WhatsApp
-
Share via Email

-
Share to Facebook
-
Share to X
-
Share to WhatsApp
-
Share via Email

-
Share to Facebook
-
Share to X
-
Share to WhatsApp
-
Share via Email

-
Share to Facebook
-
Share to X
-
Share to WhatsApp
-
Share via Email

-
Share to Facebook
-
Share to X
-
Share to WhatsApp
-
Share via Email

-
Share to Facebook
-
Share to X
-
Share to WhatsApp
-
Share via Email

-
Share to Facebook
-
Share to X
-
Share to WhatsApp
-
Share via Email

-
Share to Facebook
-
Share to X
-
Share to WhatsApp
-
Share via Email

-
Share to Facebook
-
Share to X
-
Share to WhatsApp
-
Share via Email

-
Share to Facebook
-
Share to X
-
Share to WhatsApp
-
Share via Email

-
Share to Facebook
-
Share to X
-
Share to WhatsApp
-
Share via Email

-
Share to Facebook
-
Share to X
-
Share to WhatsApp
-
Share via Email

-
Share to Facebook
-
Share to X
-
Share to WhatsApp
-
Share via Email

-
Share to Facebook
-
Share to X
-
Share to WhatsApp
-
Share via Email

-
Share to Facebook
-
Share to X
-
Share to WhatsApp
-
Share via Email

-
Share to Facebook
-
Share to X
-
Share to WhatsApp
-
Share via Email

Discover more photos See all
-
Share to Facebook
-
Share to X
-
Share to WhatsApp
-
Share via Email

-
Share to Facebook
-
Share to X
-
Share to WhatsApp
-
Share via Email

-
Share to Facebook
-
Share to X
-
Share to WhatsApp
-
Share via Email

-
Share to Facebook
-
Share to X
-
Share to WhatsApp
-
Share via Email

-
Share to Facebook
-
Share to X
-
Share to WhatsApp
-
Share via Email

-
Share to Facebook
-
Share to X
-
Share to WhatsApp
-
Share via Email

-
Share to Facebook
-
Share to X
-
Share to WhatsApp
-
Share via Email

-
Share to Facebook
-
Share to X
-
Share to WhatsApp
-
Share via Email

-
Share to Facebook
-
Share to X
-
Share to WhatsApp
-
Share via Email

-
Share to Facebook
-
Share to X
-
Share to WhatsApp
-
Share via Email

-
Share to Facebook
-
Share to X
-
Share to WhatsApp
-
Share via Email

-
Share to Facebook
-
Share to X
-
Share to WhatsApp
-
Share via Email

-
Share to Facebook
-
Share to X
-
Share to WhatsApp
-
Share via Email

-
Share to Facebook
-
Share to X
-
Share to WhatsApp
-
Share via Email

-
Share to Facebook
-
Share to X
-
Share to WhatsApp
-
Share via Email

-
Share to Facebook
-
Share to X
-
Share to WhatsApp
-
Share via Email

-
Share to Facebook
-
Share to X
-
Share to WhatsApp
-
Share via Email

-
Share to Facebook
-
Share to X
-
Share to WhatsApp
-
Share via Email

Behind The Lens
Location
It's an old Greyhound tour bus, parked next to an antiques mall in Forney Texas, just east of Dallas.Time
It was after 10 pm when I began the shoot. I had just finished light painting an old Russian MIG fighter jet in the same parking lot, and moved to shoot this next.Lighting
This is a light painting composite made from dozens of exposures. Most exposures are typically 10-25 sec with an aperture of f8. Each element in the shot was lit separately and composited in Photoshop. The interior of the bus was lit with a hand held camera flash held up to the side of the bus hidden from camera. The ground was lit with an LED spotlight and cheap LED worklights from a hardware store. Headlights were lit by holding a tiny LED penlight up to the edge of the glass. Although I am in many of the exposures, I simply mask myself out in Photoshop.Equipment
My camera is a Nikon D7100 with a Tokina AT-X 124 PRO DX wide angle lens. In light painting, a steady tripod is an absolute must. I use an old Bogen steel mono tube leg tripod with a modern Manfrotto 3-axis head. For lighting, I primarily use a cheap handheld 35mm camera flash and a collection of hardware store LED flashlights.Inspiration
I came to the antiques mall on a Saturday night after they were closed, in order to do a light painting photo of an old Russian MIG fighter jet they had on display in the lot. I did not know of the bus until I arrived, but once I saw it, I knew I would be shooting it next. Being silver and chrome, I could light the bus with different colors and make it come to life.Editing
My light painting technique requires intense Photoshop work in post. First, all my RAW images are cropped and color corrected as a group batch. Then I open each RAW image and make further color and contrast adjustments and save each as a JPG. Then I begin to build my master Photoshop image by compositing. Essentially I start with a dark JPG to use as a base layer and lay subsequent JPGs on top, each layer set to lighten. When I am in the shot, I mask myself out. Those are the basics of light painting compositing in Photoshop, the remaining tricks are my own trade secrets and would require a video to teach.In my camera bag
In my camera bag, I have my Nikon D7100, an 18-105 Nikon VR lens, a Tokina AT-X 124 wide angle lens, a polarizer filter for each lens and a camera flash. For night shoots, I also have a plastic toolbox full of various LED flashlights, colored LED wand lights and hand held LED spotlight. I also keep other various items such as rubber bands, zip ties, multi-tools and typically a bottle of mosquito repellent for summertime use.Feedback
In most cases of light painting a big object like a bus, I tell people to know their shot before they shoot it. That is, arrive before sunset to take advantage of the ambient light for framing your image, focusing and for capturing the sunset sky if possible. Also, before sunset allows you to study the terrain around your subject for your own safety. However in this photo, I did not know about the existence of this bus before I arrived. Luckily, it was in a flat parking lot and there was plenty, if not too much ambient light. Tripping or falling in the dark, was not much of a danger. For focusing, I shined a bright spot on the front of the bus, to make best use of my camera's auto focus ability. At night, it is difficult for me to see if the image is in focus through my eyepiece, so manual focus is more reliant. However, I always do a zoom on my monitor to double check the camera's focus. Once I know the focus is sharp, I turn off the auto focus and lock down my tripod. To avoid any camera movement, I use either a wireless remote or a shuttle release cable, so I'm touching the camera as little as possible. In each exposure, I am lighting a different part of the bus, with either flashlights or a camera flash. Everyone learns through trial and error, but perhaps the best piece of advice I can give for lighting is to always light your subject at a right angle or opposing angle to your camera. In other words, avoid lighting the subject from the direction of the camera. Direct lighting is dull and flat. Light from an angle or opposing the camera, gives wonderful shadows and highlights on small details!