Vermilion Vertipano
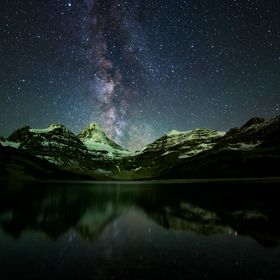
Vertical Panorama from Vermillion lakes last spring.
This photo is made up of three landscape oriented images stitched together in photoshop. The sky was ...
Read more
Vertical Panorama from Vermillion lakes last spring.
This photo is made up of three landscape oriented images stitched together in photoshop. The sky was very hazy with a few wispy clouds which muted the detail in the Milky Way a little but gave a nice effect to the photo.
Read less
This photo is made up of three landscape oriented images stitched together in photoshop. The sky was very hazy with a few wispy clouds which muted the detail in the Milky Way a little but gave a nice effect to the photo.
Read less
Views
995
Likes
Awards
Contest Finalist in High Peaks Photo Contest
Member Selection Award
Peer Award
Absolute Masterpiece
Superb Composition
Top Choice
Superior Skill
Magnificent Capture
Outstanding Creativity
Genius
Top Ranks

Same photographer See allBehind The Lens
-
Share to Facebook

-
Share to X

-
 Share to WhatsApp
-
 Share via Email

-
Share to Facebook
-
Share to X
-
Share to WhatsApp
-
Share via Email

-
Share to Facebook
-
Share to X
-
Share to WhatsApp
-
Share via Email

-
Share to Facebook
-
Share to X
-
Share to WhatsApp
-
Share via Email

-
Share to Facebook
-
Share to X
-
Share to WhatsApp
-
Share via Email

-
Share to Facebook
-
Share to X
-
Share to WhatsApp
-
Share via Email

-
Share to Facebook
-
Share to X
-
Share to WhatsApp
-
Share via Email

-
Share to Facebook
-
Share to X
-
Share to WhatsApp
-
Share via Email

-
Share to Facebook
-
Share to X
-
Share to WhatsApp
-
Share via Email

-
Share to Facebook
-
Share to X
-
Share to WhatsApp
-
Share via Email

-
Share to Facebook
-
Share to X
-
Share to WhatsApp
-
Share via Email

-
Share to Facebook
-
Share to X
-
Share to WhatsApp
-
Share via Email

-
Share to Facebook
-
Share to X
-
Share to WhatsApp
-
Share via Email

-
Share to Facebook
-
Share to X
-
Share to WhatsApp
-
Share via Email

-
Share to Facebook
-
Share to X
-
Share to WhatsApp
-
Share via Email

-
Share to Facebook
-
Share to X
-
Share to WhatsApp
-
Share via Email

-
Share to Facebook
-
Share to X
-
Share to WhatsApp
-
Share via Email

Behind The Lens
Location
The photo was taken at Vermilion Lakes in Banff National Park. It’s a very popular photography spot for sunrise and a tourist attraction at all times of day.Time
This photo was taken a few days after a new moon in May 2015, around 12:30am and it turned out to be an ideal month and time to shoot the Milky Way at this location. I was actually very new to night photography at this point, having gone out only a few times before this night to try to shoot the Milky Way. I initially wanted to try shooting at a reflecting pond that I had checked out during the day, but when I came back at night I realized there was something giving off very bad light pollution around where the core of the galaxy would come up so I needed to find a new spot. Banff was close by and I decided to try out Vermilion Lakes. I had seen many photos of the Milky Way at Two Jack Lake (another popular spot in Banff) but not Vermilion Lakes so it was lucky that the timing worked out. Now I know how to plan and figure out the Milky Way position and that I can use apps like PhotoPills to visualize compositions with the galaxy and my potential foregrounds.Lighting
The town of Banff lies in front of Mount Rundle and the light pollution from the town is what creates the glowing oranges and yellows on the mountains. This night was a bit hazy so the wispy clouds also reflect the light coming from Banff. The light pollution and haze on this night made the Milky Way look more subdued but I thought the effect was quite nice.Equipment
I shot this with a Nikon D3s and the Nikkor 24-70mm f2.8 which was my widest lens at the time. I currently shoot most of my night photos with the Nikkor 14-24mm f2.8. If I’m not travelling far, like for this shot where I can just walk a few meters from the car, I use a Manfrotto (055XDB) ball head tripod. If I’m hiking I use a MeFoto Backpacker. To trigger my shots I have a Vello wireless remote which is also great for setting up time lapses and star trails.Inspiration
As I mentioned above, I was looking for a another place to shoot the Milky Way, or at least one that wasn’t overshot. I am always looking for new spots to explore and shoot from. I like to get creative and shoot unique material. A lot of people have never seen the Milky Way or a truly dark sky, even in this shot there is a lot of light pollution, but it was dark enough for me to see the Milky Way with my eyes. It’s really cool to inspire people to go out and see the night sky or try to photograph it themselves. I really like the following quote because my life has changed significantly since I took my first Milky Way photo and realized how much there is to see in the night sky when you get away from cities. “If people sat outside and looked at the stars each night, I’ll bet they’d live a lot differently.” – Bill WattersonEditing
This image is a three shot vertical panorama. Since I was restricted a 24mm focal length at the time I couldn’t get the composition I wanted in portrait orientation with the lens, so I shot three landscape oriented shots. I used Lightroom CC to stitch the panorama (this year I started using PTGui for my panoramas, it’s a great program). I also use Lightroom to do lens corrections, color adjustments (I increase contrast a bit too to bring out colors), and denoise. In Photoshop I use adjustment layers to bring out the Milky Way and ensure all adjustments blend in well with the rest of the image. I like to keep the colors as natural as possible, meaning I keep it as true to what the camera was able to pick up and account for what a sky temperature should approximately be. I will often edit the sky and foreground separately.In my camera bag
For night photography I always take my Nikon D3s, Nikkor 14-24mm and 24-70mm f2.8 lenses, vello remote and a tripod. The Nikkor 14-24mm is such a great lens day or night, I always take it out with me. Other equipment I might add in or change out for day time shots or concerts include Lee ND filters and Big Stopper, Nikkor 70-200mm f2.8 and various light sources for light painting.Feedback
To be consistently successful at capturing great images of the night sky, you need to do the planning ahead of time! My first few aurora chasing attempts ended with no shots because I didn’t know how to read the solar data nor did I have very good sources for cloud cover predictions. The Vermilion Lakes image was a lucky one – if I had gone in July I would not have been able to see the core in this position over Rundle. I use various apps like PhotoPills and SkySafari to figure out Milky Way positions at different times and light pollutions maps are good to reference as well. I’ve learned to read satellite data from ACE and now DSCOVR to get a better idea of what might happen with aurora. I cross check a few weather sites (cleardarksky.com, spotwx.com, mountain-forecast.com) to ensure I will have the best chance at clear skies. I spend a lot of time researching locations and trying to come up with new places and concepts. You also need to practice. A full frame camera with good low light capabilities is the best choice for night photography but you can also get great results with a crop sensor for example. A wide angle lens will allow you push your exposure time (general rule is divide 500 by your focal length to get the time interval) and minimize star trails and you also want a fast lens (2.8 or faster is ideal). Make sure you manually focus and use a remote or timer to trigger your camera to avoid movement when you press the shutter button. Lastly, make sure you step away from the camera and just take in the night sky. You need to really see and feel what is around you to convey that into your images.