cozy angel
Views
143
Likes
Awards
Spring Selection Award
Cool Capture
Outstanding Creativity
Absolute Masterpiece
Superb Composition
Top Choice
Magnificent Capture
Top Ranks
Categories
Same photographer See allBehind The Lens
-
Share to Facebook

-
Share to X

-
 Share to WhatsApp
-
 Share via Email

-
Share to Facebook
-
Share to X
-
Share to WhatsApp
-
Share via Email

-
Share to Facebook
-
Share to X
-
Share to WhatsApp
-
Share via Email

-
Share to Facebook
-
Share to X
-
Share to WhatsApp
-
Share via Email

-
Share to Facebook
-
Share to X
-
Share to WhatsApp
-
Share via Email

-
Share to Facebook
-
Share to X
-
Share to WhatsApp
-
Share via Email

-
Share to Facebook
-
Share to X
-
Share to WhatsApp
-
Share via Email

-
Share to Facebook
-
Share to X
-
Share to WhatsApp
-
Share via Email

-
Share to Facebook
-
Share to X
-
Share to WhatsApp
-
Share via Email

-
Share to Facebook
-
Share to X
-
Share to WhatsApp
-
Share via Email

-
Share to Facebook
-
Share to X
-
Share to WhatsApp
-
Share via Email

-
Share to Facebook
-
Share to X
-
Share to WhatsApp
-
Share via Email

-
Share to Facebook
-
Share to X
-
Share to WhatsApp
-
Share via Email

-
Share to Facebook
-
Share to X
-
Share to WhatsApp
-
Share via Email

-
Share to Facebook
-
Share to X
-
Share to WhatsApp
-
Share via Email

-
Share to Facebook
-
Share to X
-
Share to WhatsApp
-
Share via Email

-
Share to Facebook
-
Share to X
-
Share to WhatsApp
-
Share via Email

Discover more photos See all
-
Share to Facebook
-
Share to X
-
Share to WhatsApp
-
Share via Email

-
Share to Facebook
-
Share to X
-
Share to WhatsApp
-
Share via Email

-
Share to Facebook
-
Share to X
-
Share to WhatsApp
-
Share via Email

-
Share to Facebook
-
Share to X
-
Share to WhatsApp
-
Share via Email

-
Share to Facebook
-
Share to X
-
Share to WhatsApp
-
Share via Email

-
Share to Facebook
-
Share to X
-
Share to WhatsApp
-
Share via Email

-
Share to Facebook
-
Share to X
-
Share to WhatsApp
-
Share via Email

-
Share to Facebook
-
Share to X
-
Share to WhatsApp
-
Share via Email

-
Share to Facebook
-
Share to X
-
Share to WhatsApp
-
Share via Email

-
Share to Facebook
-
Share to X
-
Share to WhatsApp
-
Share via Email

-
Share to Facebook
-
Share to X
-
Share to WhatsApp
-
Share via Email

-
Share to Facebook
-
Share to X
-
Share to WhatsApp
-
Share via Email

-
Share to Facebook
-
Share to X
-
Share to WhatsApp
-
Share via Email

-
Share to Facebook
-
Share to X
-
Share to WhatsApp
-
Share via Email

-
Share to Facebook
-
Share to X
-
Share to WhatsApp
-
Share via Email

-
Share to Facebook
-
Share to X
-
Share to WhatsApp
-
Share via Email

-
Share to Facebook
-
Share to X
-
Share to WhatsApp
-
Share via Email

-
Share to Facebook
-
Share to X
-
Share to WhatsApp
-
Share via Email

Behind The Lens
Location
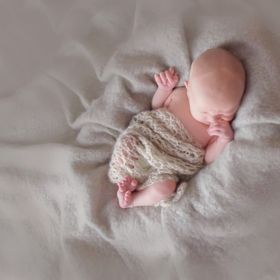
This shot was taken in my home studio as part of a special newborn session, one of the first in my new home. I added a few artistic shots, and tried a few new things which led to this amazing photo. It will always be one of my favourites, as it does not fit the "mold" of newborn posing. Instead, this portrait evokes emotion through a soft, delicate, and minimalist artistic style.Time
this photo was taken in studio, in the late morning. I used a combination of natural light as well as soft box light, overhead. I remember well since I was going for this look which I had envisioned in my mind before the session itself.Lighting
I was going for a soft dewy look, while still creating enough depth and contrast between the highlights and shadows. I love light airy photos, and so the mix of natural light and soft box diffused light from above the baby at approximately a 45 degree angle, was the perfect combination to bring my vision to life.Equipment
I used my Canon t3i ( I have since upgraded to the 5d mk III). I shot this photos at 1/160 and f 2.5, focal length of 50mm (prime canon lens) I used one soft box, 20 x 20 by Westcott with continuous light in combination with natural light from large windows in my studio. The baby was placed in a nest of blankets on top of my bean bag poser, with a soft beige/brown blanket on the top.Inspiration
I am always looking for new ways to take interesting artistic newborn portraits. I love my set of go to poses, however I always try to think of something new for every session. This was inspired by somewhat similar style photos that a photographer idol of mine had taken. Although mine turned out quite different, I had so much fun creating this. In fact I am glad it turned out different, since it reflects my own personal touch.Editing
I use Adobe Photoshop CC for basic retouching such as adjusting the levels, and exposure, hues, skin smoothing, removing redness or blotchy skin, sharpening slightly, as well as softening the blanket with layers of gaussian blur, and manual painting techniques.In my camera bag
I always have my canon 5DMK III now, my canon 50mm 1.4 prime lens, and Sigma 24-70mm f 2.8. I have UV/Haze protective filters on all my lenses. I LOVE my new Einstein strobe by Paul Buff, and of course my extra Westcott lights in case I need a little bit of a boost. My 5 in 1 reflector is also one of my favourite tools for studio or on location shoots. When going on location I also bring my canon speedlight 430EXII and mini softbox as well, in case I need to create more light for dark rooms, or to make sure I have that catch light in my client's eyes!Feedback
For a newborn photo like this, it is very important that the baby be super sleepy! Carefully prepare your "nest" with a nest pillow, or several receiving blankets or small towels, then place a couple layers of blankets with your top blanket of choice over the nest. Place your top blanket how you like. I purposely placed the blanket in a way that had sort of layered wrinkles, as I was going for this textured, casual look, and wanted to blend the nest into the blanket. Once the baby is ready, gently place on it's back in the little nest/well of your bean bag poser. Always remain close with one hand on or right near the baby in case it wakes. Then you can choose to add a wrap if you like, gently tucking under and beside the baby bit by bit, keeping baby sleepy! White noise and a heated studio are also key for newborn photography. Dry, Warm, Fed....White Noise! That is the magic formula. My main light source was placed almost directly above the baby, at a slight angle. Make sure it is coming from the head down, or from head down in an angle, not from the feet up! Closer to the light source will create less shadows, further away will add depth, shadows and contrast. Find the sweet spot for the look you are going for. Most importantly, you MUST wear your camera strap always, but ESPECIALLY when shooting from above. I used a small stepping stool so that I could get up above the baby. Also making sure your light source is very secure and will not fall on the baby! If you find you cannot get enough of the baby and blanket in your shot from overhead (I have an advantage of being very tall), simply use a smaller focal length, such as 24. This is where a zoom lens can come in handy for sure. Lastly, getting to know your light, and your camera, and lenses is key. knowing the best settings for SS, Aperture, ISO are imperative and will save your so much time in post processing. Try to get it as perfect as possible in camera! Also I always shoot in RAW, thus allowing me more room to adjust in Photoshop :) ***Practice first with a doll, and notice where your highlights and shadows fall. Take note of your preferred settings and there you have it. Now replace doll with baby and you are all set!