Summer Sweetheart
Views
1433
Likes
Awards
Featured
Contest Finalist in Mastering Portrait Lighting Photo Contest
People's Choice in Everyday People Photo Challenge
Peer Award
Top Choice
Superb Composition
Absolute Masterpiece
Outstanding Creativity
All Star
Superior Skill
Magnificent Capture
Top Ranks
Categories


Same photographer See allBehind The Lens
-
Share to Facebook

-
Share to X

-
 Share to WhatsApp
-
 Share via Email

-
Share to Facebook
-
Share to X
-
Share to WhatsApp
-
Share via Email

-
Share to Facebook
-
Share to X
-
Share to WhatsApp
-
Share via Email

-
Share to Facebook
-
Share to X
-
Share to WhatsApp
-
Share via Email

-
Share to Facebook
-
Share to X
-
Share to WhatsApp
-
Share via Email

-
Share to Facebook
-
Share to X
-
Share to WhatsApp
-
Share via Email

-
Share to Facebook
-
Share to X
-
Share to WhatsApp
-
Share via Email

-
Share to Facebook
-
Share to X
-
Share to WhatsApp
-
Share via Email

-
Share to Facebook
-
Share to X
-
Share to WhatsApp
-
Share via Email

-
Share to Facebook
-
Share to X
-
Share to WhatsApp
-
Share via Email

-
Share to Facebook
-
Share to X
-
Share to WhatsApp
-
Share via Email

-
Share to Facebook
-
Share to X
-
Share to WhatsApp
-
Share via Email

-
Share to Facebook
-
Share to X
-
Share to WhatsApp
-
Share via Email

-
Share to Facebook
-
Share to X
-
Share to WhatsApp
-
Share via Email

-
Share to Facebook
-
Share to X
-
Share to WhatsApp
-
Share via Email

-
Share to Facebook
-
Share to X
-
Share to WhatsApp
-
Share via Email

-
Share to Facebook
-
Share to X
-
Share to WhatsApp
-
Share via Email

Discover more photos See all
-
Share to Facebook
-
Share to X
-
Share to WhatsApp
-
Share via Email

-
Share to Facebook
-
Share to X
-
Share to WhatsApp
-
Share via Email

-
Share to Facebook
-
Share to X
-
Share to WhatsApp
-
Share via Email

-
Share to Facebook
-
Share to X
-
Share to WhatsApp
-
Share via Email

-
Share to Facebook
-
Share to X
-
Share to WhatsApp
-
Share via Email

-
Share to Facebook
-
Share to X
-
Share to WhatsApp
-
Share via Email

-
Share to Facebook
-
Share to X
-
Share to WhatsApp
-
Share via Email

-
Share to Facebook
-
Share to X
-
Share to WhatsApp
-
Share via Email

-
Share to Facebook
-
Share to X
-
Share to WhatsApp
-
Share via Email

-
Share to Facebook
-
Share to X
-
Share to WhatsApp
-
Share via Email

-
Share to Facebook
-
Share to X
-
Share to WhatsApp
-
Share via Email

-
Share to Facebook
-
Share to X
-
Share to WhatsApp
-
Share via Email

-
Share to Facebook
-
Share to X
-
Share to WhatsApp
-
Share via Email

-
Share to Facebook
-
Share to X
-
Share to WhatsApp
-
Share via Email

-
Share to Facebook
-
Share to X
-
Share to WhatsApp
-
Share via Email

-
Share to Facebook
-
Share to X
-
Share to WhatsApp
-
Share via Email

-
Share to Facebook
-
Share to X
-
Share to WhatsApp
-
Share via Email

-
Share to Facebook
-
Share to X
-
Share to WhatsApp
-
Share via Email


Behind The Lens
Location
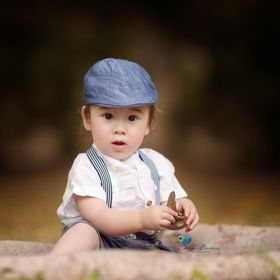
This was a client session, and we travelled approximately an hour to get to this location. Our aim was to get images in a location that wasn't going to be the same as every other photographer in our area. I wanted to get family artwork for their home where the locations wouldn't be recognised in her network of friends. This was taken in Toowoomba, Queensland.Time
Our session was held during the Australian Summer, where the light tends to disappear around 7pm in the evening. Our session was at 5pm, during beautiful afternoon light. Even at 5pm, the light is still a little too much so we found open shade and this treeline was perfect!Lighting
This was shot using natural light. I don't use reflectors or speedlights during my session. With the natural lighting still being quite harsh at 5pm in the evening, we found open shade with this amazing treeline. I find it's best to either find open shade when the light is still too harsh, as it is your best friend during these lighting conditions.Equipment
This gorgeous shot was taken using a Canon 6D body and a Canon 135mm L Series f2.0 lens. I don't use a tripod for family sessions, as children and toddlers move far too quickly for tripod use, so this was shot handheld.Inspiration
As this was a client session, and my second session with this family, I wanted to ensure their images during this session were in a location that was different to what most people in our city would see. A lot of photographers in my area recycle the same park locations over and over again and I didn't want my clients to have images that were similar to any of their friends in terms of location. When you walk into your friends' home, the last thing you want is to recognise the location of their family photos. One thing I pride myself on is listening to my clients wants for their session, and scouting a location for them.Editing
I use Adobe Camera Raw and Photoshop CS6 to post process my images. I do all basic adjustments in ACR, making sure I bring my highlights down and then I take the image into Photoshop. I wanted a more chocolate colour tone throughout this image, to compliment the skin tones and hair of this little sweetheart. I did a series of gradients, levels adjustments and curves adjustments to enhance this image. One thing I did on this image different was that I flipped the background and blended it back so that the treelines were as mirrored as possible. Blending a flipped background can be difficult to get right, as sometimes it becomes really obvious it was done - but if you bring your brush flow down to about 5% (not your brush opacity), you will find that blending is much easier. In fact, I will bring my brush flow down before I will bring my brush opacity down - it is much more forgiving when masking than a lower brush opacity that has a high brush flow. Trust me, brush flow is where it's at!In my camera bag
Nowadays, I have a crazy belief that if it cannot be shot with my 135L, it's almost not worth shooting! I will do anything and try anything to make sure I get my shot using this lens, I am completely obsessed with it. My kit bag contains a Canon 7D - it has a faster frames per second rate, a Canon 6D, and the following lenses: 30mm 1.4, 105mm f2.8 macro, 24-70mm f2.8, 70-200mm f2.8, 50mm 1.4, 40mm 2.8 and 135L f2.0. I am not a brand snob, so a lot of my lenses are Sigma and Tamron brand. The only Canon lenses I own are the 135, 50mm and 40mm. The rest are either Sigma or Tamron.Feedback
Consider your background and your intended background compression and how it will look, particularly if shooting wide open. I am notorious for shooting as wide open as possible. Watch for background issues that will feature either a very bright spot or a very dark spot, and angle your subject and yourself to avoid this as much as possible as you will save yourself time in post processing correcting these issues. Use age appropriate poses - this little sweetheart is three, so I wanted to capture her sweet innocence for this age that was natural and not contrived. I see a lot of photographers shooting this age group and creating a scene that is far beyond the age. Let kids be kids and keep it simple? You don't need an elaborate set up - less is more. Shoot for the crop and composition - I generally don't do a lot of cropping in post processing because I shoot for the crop. I like to make sure my sensor captures as much information as possible that doesn't need to be lost during post processing because of cropping. I do a basic straightening if required and then leave the crop and composition intact - after all, that's how I shot it, and I'm the artist and that was my vision at the time, so I trust myself.