

In-camera double exposures are wonderfully creative and work very well for portraits. I love creating these in the summertime to take advantage of flowers in bloom. However, Autumn is a great time of year for double exposures as well. Fall leaves, pine trees, and holiday decor work really well with this style and the opportunities to experiment are endless.
In order to create double exposures in-camera, you need to have a camera with this feature built-in. I’m using a Canon EOS 5D Mark IV but there are a number of cameras with the feature available. You can also create a double exposure look using an editing program like Photoshop but I find that creating these in camera is a lot more fun and can yield unexpected results.
We have more tips and techniques in our double exposure photography guide, check it out.
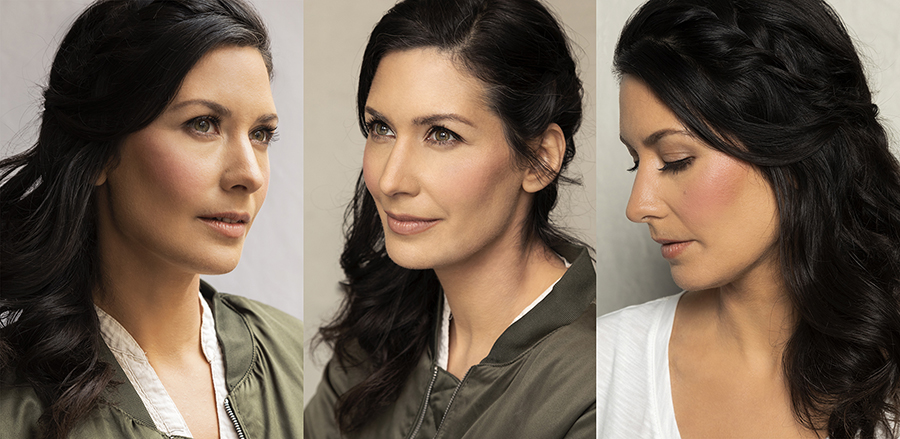
Starting with a Good Base Portrait
For the best results with portraits, I find that a white, off-white or “blank” backdrop works best as it isolates your subject against the background. If the background behind your subject is too busy, there may be too much going on once the second exposure is layered on top. Using a background of plain white or an area of blank sky behind your subject, helps them to stand out and be the clear focus of the portrait. There are exceptions to this rule of course but I always utilize a white background to make sure I have a clean portrait to work with before I start experimenting with a busier background.
In terms of posing, I like to avoid direct eye contact shots as much as possible. Occasionally I will have the subject look right into the camera but my preference for double exposures is to have the subject looking away as I think it looks more natural and lends itself better to visual storytelling. This comes down to personal preference and the look you are going for with your double exposure portraits. For a dreamier look, I like to have the subject look away from camera but for a bolder and more dramatic look, I will have the subject look right into the lens.
The example portraits below are a good place to begin with double exposures. The two portraits on the left were photographed in natural light with an aperture of f/5.6 while the portrait on the far right was captured in a studio setting using a Canon Speedlite at f/8.
Practical Tricks for a Faster Workflow
When the double exposure feature was first introduced a few years ago, it was very reminiscent of the process using a film camera. It was necessary to shoot your subject’s portrait first and then the very next frame had to be your double exposure image. These days this feature has been updated and you can use any file you have recorded on your memory card as your base portrait. This is great as it allows you to shoot base portraits and then you can explore the double exposure aspect when you have time or in another location. I like to keep a memory card of base portraits in my camera bag for the occasional double-exposure when the mood strikes.
Another update to this feature that I love is the ability to use Live View for composing your shots. This allows you to see your double exposure come together on the LCD and you don’t have to do as much guess work with the composition. This makes the process a lot easier and more fun as you have more creative control. The video below shows how easy it is to compose using Live View.
Composition Best Practices
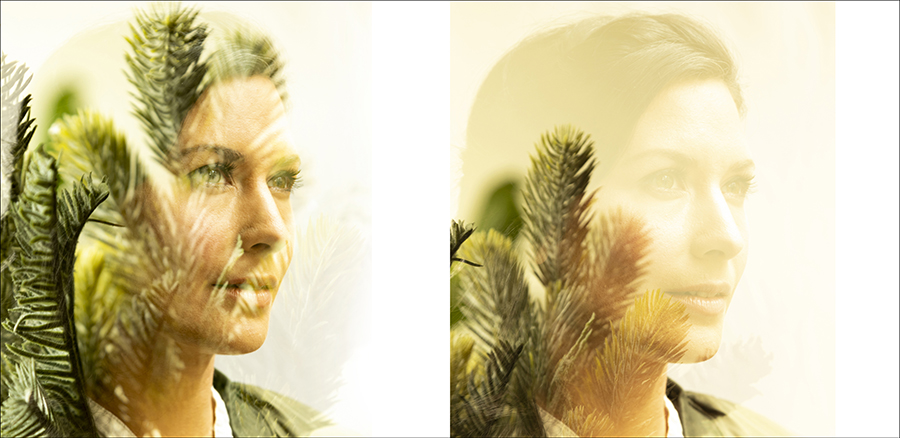
Regarding composition, it can be tricky to get the right combination of overlap between two images while still being able to make out the base portrait. I find that I get the best results when I make sure that the eyes of my subject are completely overlapped with the object in the second exposure. Without overlapping, your subject’s face can get lost in the highlights. In the example below, the shot on the left utilizes the overlapping technique while the shot on the right does not. You can see the details in the face were lost when overlapping was not used.
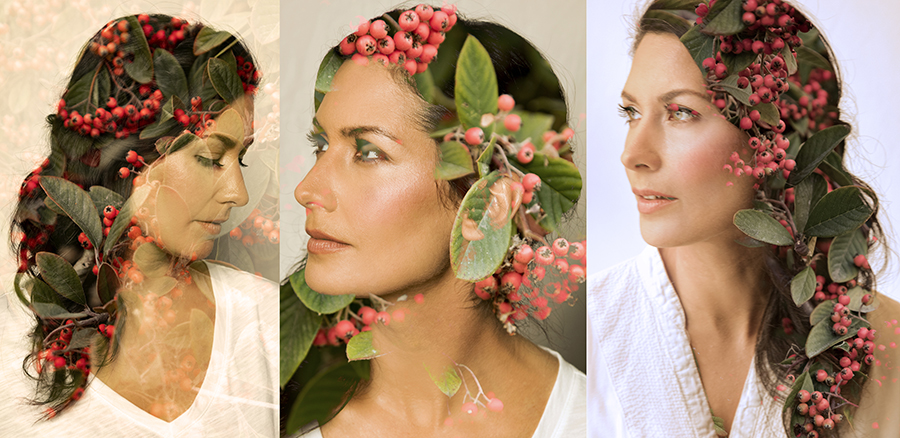
When your subject has dark hair, it can work well to fill the hair area with your second exposure like the examples below. This technique is effective as the dark areas will reflect whatever you have chosen to capture in your second frame while the face remains recognizable.
Exposure Compensation & Shooting Modes
Due to the nature of stacking two images together, nailing the exposure can be a real challenge. The good news is that most cameras require that the double exposures be shot in RAW file format. This will allow you to push and pull the file during the editing process, which is especially needed with double exposures.
To start with, I like to capture double exposures using the Aperture Priority mode. With the base portrait already captured, the most important aspect of the second exposure is the aperture as it will determine how much of your subject is in sharp focus. Using Aperture Priority, you can focus on the composition of your images and not worry about changing the shutter speed as you move the camera.
With the exposure itself, when I find that my shots are looking over-exposed and/or washed out, I like to use Exposure Compensation to bring the exposure down for the second image. This will ensure that I’m capturing enough detail in the second image to get the results I’m looking for. In the example below, the portrait on the left was captured with zero exposure compensation while the portrait on the right was captured with a compensation of minus one full stop.

Sometimes you will need to go the other way and over-expose the second image for the best results. It all depends on the lighting conditions you are working with and the mood you want to create. In the example below, the portrait in the left was captured with zero exposure compensation while the portrait on the right was captured with a full stop added.

Stay tuned for Part Two of this article that will cover focusing strategies, experimental techniques and post-production tips. Coming very soon! In the meanwhile check out the lightroom photo editing classes in the ViewBug educational platform.
Based on the California coast, commercial photographer Laura Tillinghast began taking photos in the 90’s and never stopped. Her love of lighting and photography is contagious and she enjoys teaching the next generation of photography addicts. Shooting primarily commercial work, you never know what you will find in front of her lens. Whether it's a gorgeous model, a rock band or a bowl of oatmeal, she shoots with the same goal in mind; make it beautiful. See more of her work at her website: lauratillinghast.com