Ying & Yang
Views
348
Likes
Awards
Zenith Award
Top Shot Award 22
Spring 21 Award
9Teen Award
Contest Finalist in Rule of Thirds Photo Contest vol8
Superb Composition
Absolute Masterpiece
Outstanding Creativity
Top Choice
Peer Award
Magnificent Capture
Emotions
Happy
Same photographer See allBehind The Lens
-
Share to Facebook

-
Share to X

-
 Share to WhatsApp
-
 Share via Email

-
Share to Facebook
-
Share to X
-
Share to WhatsApp
-
Share via Email

-
Share to Facebook
-
Share to X
-
Share to WhatsApp
-
Share via Email

-
Share to Facebook
-
Share to X
-
Share to WhatsApp
-
Share via Email

-
Share to Facebook
-
Share to X
-
Share to WhatsApp
-
Share via Email

-
Share to Facebook
-
Share to X
-
Share to WhatsApp
-
Share via Email

-
Share to Facebook
-
Share to X
-
Share to WhatsApp
-
Share via Email

-
Share to Facebook
-
Share to X
-
Share to WhatsApp
-
Share via Email

-
Share to Facebook
-
Share to X
-
Share to WhatsApp
-
Share via Email

-
Share to Facebook
-
Share to X
-
Share to WhatsApp
-
Share via Email

-
Share to Facebook
-
Share to X
-
Share to WhatsApp
-
Share via Email

-
Share to Facebook
-
Share to X
-
Share to WhatsApp
-
Share via Email

-
Share to Facebook
-
Share to X
-
Share to WhatsApp
-
Share via Email

-
Share to Facebook
-
Share to X
-
Share to WhatsApp
-
Share via Email

-
Share to Facebook
-
Share to X
-
Share to WhatsApp
-
Share via Email

-
Share to Facebook
-
Share to X
-
Share to WhatsApp
-
Share via Email

-
Share to Facebook
-
Share to X
-
Share to WhatsApp
-
Share via Email

Behind The Lens
Location
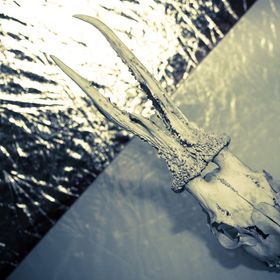
This is a photo I took for a performance group (I used to know a few circus/performance artists). They hired me to take some program shots for marketing. This was around 15 years ago and I offered a mobile studio service and if I remember correctly it was an old school gym where they were practicing, also and there was quite a lot of natural light in the space. I also went to the practice performance to take some shots for myself. They had actually hired a different photographer for that event. Awkward.Time
The afternoon I guessLighting
My standard set up at the time was 1 key light and a reflector, I like the depth this set up gave and we get in to habits. I saw with this pose that there could be an intersting contrast between the background and the foreground and I used fabric backgrounds because they were more convenient to transport, so I split the white and black fabrics across the rail. The key light is to the left of me and the reflector on the right and closer to the subject. This way the light and dark of the background is opposite to the light and dark of the foreground and both dark and light sides have a little bit of light and dark. Hence Ying and Yang.Equipment
I had finished studying photography about a year earlier and owned a beautiful Sinar, large format camera with some lovely lenses which I used at college. When I finished studying photography I wanted to go backpacking and try and get a style of photography and felt I would be better served by a digital camera. This was the early days of digital and it was expensive, so I sold this beautiful Sinar kit to get what was the cheapest DSLR at the time, a Canon EOS 20D, which came with a cheap, plasticy lens. I know this was the camera I used and it may have also been that toy lens. The flash head was a Bowens 500. The reflector was a 6 foot, reversible, pop up reflector I bought from Mr. Cads in Croydon, which was like this beautiful museum of second hand photographic equipment. The black cloth was crushed velvet.Inspiration
Observation I guess. You are taking pictures and you just see something that may be interesting. Once you get the digital camera you have done the expensive part so just try different things. Look at different art from different visual mediums and you will get inspired. My ideas are based on a collection of what I have seen previously.Editing
Of course there is post on this. This was before Lightroom, so it was done in Photoshop. There is not much more than you would do in the dark room. Straightening, maybe some minor cropping, brightness and contrast. Definetly some burning and dodging as light and dark was the most important element of the image.In my camera bag
Well I haven't done much real photography for the last 5 years as I am depressed and have lost my motivation. Having to do photography was like having to breath for me and I just don't feel that way anymore. But this is what is in my bag in the cupboard. A camera back pack, a Canon EOS 60D body, a Canon EF-S 17-85mm f/4-5.6 IS USM lens, a Tamron SP 15-30mm f2.8 lens, a Sigma 18-35mm F1.8 DC HSM lens, a Metz Mecablitz 58 AF-2 flash gun (My favourite flash I have owned, travelled everywhere with me and only repaired once, because it got damp in a rain forest.), instructions for both the flash and camera body just in case, a USB cable, spare batteries for the camera and flash and spare memory cards, a soft cloth and a soft brush, some old business cards.Feedback
Well you have seen it so it is alread in your library of ideas. Seriously look at other photos and other art, don't be afraid to be inspired. I have loads of art and photography books We are not islands, we build on what has gone before. Also don't worry about kit to much. The last big project I did for myself are the pictures that look like polaroids (Hopefully they do anyway, as that was the intention) on my page and they were taken on a Samsung Note 2. Mobile phones take amazing pictures these days. What is important is you learn how to use whatever you are using and learn the limits of what your are using. Read them boring arse instructions.