Glowing in Darkness
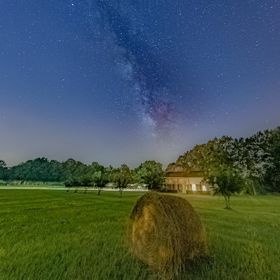
Jacksonville Beach Pier and Galactic Center above fade to darkness. A rare clear must humid misty night.
Jacksonville Beach Pier and Galactic Center above fade to darkness. A rare clear must humid misty night.
Read less
Read less
Views
603
Likes
Awards
Contest Finalist in Rule Of Seconds Photo Contest vol1
Peer Award
Absolute Masterpiece
Superb Composition
Magnificent Capture
Top Choice
Superior Skill
Top Ranks
Categories
Same photographer See allBehind The Lens
-
Share to Facebook

-
Share to X

-
 Share to WhatsApp
-
 Share via Email

-
Share to Facebook
-
Share to X
-
Share to WhatsApp
-
Share via Email

-
Share to Facebook
-
Share to X
-
Share to WhatsApp
-
Share via Email

-
Share to Facebook
-
Share to X
-
Share to WhatsApp
-
Share via Email

-
Share to Facebook
-
Share to X
-
Share to WhatsApp
-
Share via Email

-
Share to Facebook
-
Share to X
-
Share to WhatsApp
-
Share via Email

-
Share to Facebook
-
Share to X
-
Share to WhatsApp
-
Share via Email

-
Share to Facebook
-
Share to X
-
Share to WhatsApp
-
Share via Email

-
Share to Facebook
-
Share to X
-
Share to WhatsApp
-
Share via Email

-
Share to Facebook
-
Share to X
-
Share to WhatsApp
-
Share via Email

-
Share to Facebook
-
Share to X
-
Share to WhatsApp
-
Share via Email

-
Share to Facebook
-
Share to X
-
Share to WhatsApp
-
Share via Email

-
Share to Facebook
-
Share to X
-
Share to WhatsApp
-
Share via Email

-
Share to Facebook
-
Share to X
-
Share to WhatsApp
-
Share via Email

-
Share to Facebook
-
Share to X
-
Share to WhatsApp
-
Share via Email

-
Share to Facebook
-
Share to X
-
Share to WhatsApp
-
Share via Email

-
Share to Facebook
-
Share to X
-
Share to WhatsApp
-
Share via Email

-
Share to Facebook
-
Share to X
-
Share to WhatsApp
-
Share via Email

Discover more photos See all
-
Share to Facebook
-
Share to X
-
Share to WhatsApp
-
Share via Email

-
Share to Facebook
-
Share to X
-
Share to WhatsApp
-
Share via Email

-
Share to Facebook
-
Share to X
-
Share to WhatsApp
-
Share via Email

-
Share to Facebook
-
Share to X
-
Share to WhatsApp
-
Share via Email

-
Share to Facebook
-
Share to X
-
Share to WhatsApp
-
Share via Email

-
Share to Facebook
-
Share to X
-
Share to WhatsApp
-
Share via Email

-
Share to Facebook
-
Share to X
-
Share to WhatsApp
-
Share via Email

-
Share to Facebook
-
Share to X
-
Share to WhatsApp
-
Share via Email

-
Share to Facebook
-
Share to X
-
Share to WhatsApp
-
Share via Email

-
Share to Facebook
-
Share to X
-
Share to WhatsApp
-
Share via Email

-
Share to Facebook
-
Share to X
-
Share to WhatsApp
-
Share via Email

-
Share to Facebook
-
Share to X
-
Share to WhatsApp
-
Share via Email

-
Share to Facebook
-
Share to X
-
Share to WhatsApp
-
Share via Email

-
Share to Facebook
-
Share to X
-
Share to WhatsApp
-
Share via Email

-
Share to Facebook
-
Share to X
-
Share to WhatsApp
-
Share via Email

-
Share to Facebook
-
Share to X
-
Share to WhatsApp
-
Share via Email

-
Share to Facebook
-
Share to X
-
Share to WhatsApp
-
Share via Email

-
Share to Facebook
-
Share to X
-
Share to WhatsApp
-
Share via Email

Behind The Lens
Location
I went out to Jacksonville Beach Florida to the Jacksonville Beach Pier a short drive but also traveled to my many other location I had a list for during the night of shooting all down the coast to St. Augustine and below wherever a dark location I could find without city sky glow.Time
This was in May 2017 when the Milky Way rises earlier, a reverse early, say just after 11 pm vs in February at 5 am or 6 am just before sunrise. This just after midnight at 00:30 am, giving a longer night of capturing giving you a reason to have scouted many foregrounds to drive to during a long night. Most will just stay planted like a tree and just take many shots of one place.Lighting
The light here is rather unusual and during night capture you have to look around and study!! This capture is after the last October Hurricane damage, this being May, And the pier lighting was off but there are businesses up and down the beach lit up as well as the entrance to the pier lit by a very bright LED light, that had to be avoided in the capture. So with a brightly lit foreground I use aperture mode and control Shutter Speed with ISO, lowering ISO to get a longer capture. This way highlights do not get blown out but the stars in the dark sky are brighter with a longer shutter speed. Ground lights can be helpful for night capture for your foreground subject, while most say no way you can not do it. As long as the lights are at your back (watch your shadow) to the north they will help even Sky Glow from the back can be like a studio soft box lighting up your foreground. Just with well lit areas it is better to use aperture mode controlling SS with a lower ISO and longer SS for more dark sky brightness. Also The correct SS for mm of lens say 12mm is 500 rule 41 sec, but the default NPF rule is 30.57sec but for accurate no star trails 15.28 sec. So the more foreground light the slower the shutter speed you can have but get a very bright foreground subject matter. Some are afraid of a lot of light during Astro Milky Way BUT as long as the Sky is dark and ground light is to the north and behind it is and can be of great help in a capture. Like spot lights on lighthouses may turn off at 2 or 3 am but some local ground lighting from behind may light everything up in the foreground allowing for a faster SS and less star trailing.Equipment
I was using the Sony A7S with the Sony SEL1018 f/4 lens, a APS-C lens but used in full frame mode at 12mm (a very good and small lens for a full frame camera) it can be used in full frame mode from 12mm to 18mm (18mm if you remove the light shield at the back of the lens) or if you select APS-C mode in the camera menu from 15mm to 27mm. The lens is a little soft at the edges and corners during night shooting But sharp, very sharp!! And this was May 2017 BEFORE the Sony SEL1224G lens came out in June, and the only other wide angle lenses were the Rokinon 14mm f/2.8 and 12mm f/2.8 Fish Eye (that have star streaking in the upper corners) or the Voigtlander's 10mm f/5.6 and 12mm f/5.6 in Sony E Mount and chipped that are very good with no star streaking, I have and use all four other lenses. I chose the Sony SEL1018 f/4 this night for the ability to zoom in if needed for framing purposes. In bright places Milky Way capture at night does not require a f/1.8 or f/2.8 unless you have movement of clouds or people but you want the longest SS for the most light. A lot of fast glass have problems where you have to increase f stop to f/4 anyway!!! But practice with your camera take many shots at different setting to get a great capture.Inspiration
I got hooked on Milky Way capture in June of 2015 after learning that my A7S bought in September with it's big pixels and great noise control was the camera for astro Milky Way capture, but there was no info in books or on the net till the PhotoPills app came out in April 2015 with video mainly in Spanish because they are in Spain, But read all the blog info. Bottom line the Milky Way rises in the Southeast and goes across the sky like the moon/sun during the night. Everyone goes out west for dark sky but most of us can not afford a trip. So one day in June during the new moon I went out to the beach faced to the SE on a hazy night and took a shot with the Rokinon 14mm and there it was up high and not able to see with the eye but on my Camera LCD, WOW!!! Well after that I would go out every night it was clear and moonless anywhere I was. This night a front passed over with a high pressure system over us (you come to follow weather also). This night also a low tide (if along coastal areas you also follow the tides like a fisherman). First thing is if you watch the moon rise it is orange due to dirty atmosphere, so also is the Milky Way when it rises so you have to wait some till it get some height so as to get the right colors. But the Milky Way Galactic Spiral stretches level and parallel to the horizon across the sky, so the pier I figured would be a great contrast in lines. The pier seemed to go out into the darkness of dark water and sky but a reflection on a pool of water at low tide allowed for the reflection of the pier also and a bonus. Also People were behind me so I did not have to worry about cloning out people (it was wet were I was and others were barefoot and the water cold). This also was a bracketed shot with no noise control but I picked the - 1 ev shot to PP. Later I PP'ed all combined shots which also came out good.Editing
Everyone thinks the Milky Way is hard to capture and even harder to process, sometimes it is hard. I use Lightroom mostly so I am used some basic slider movement. First in Capturing use AWB or a Temp of 3800 (proper temp for MW colors). So in post you want to start at temp 3800 unless you have a lot of shore lights reflecting off the sky, this can make it too warm to start. In this case there was too much light from shore. I started with a temp that gave a baby blue sky. Then the basic sliders highlights/whites left and shadows/darks right but use the Tone Cure sliders in Medium Contrast to get the results I like with Highlights/lights and darks/shadows. Now for some things most do know : 1. the graduated filter for contrast/temp/clarity/dehaze 2. the radial filter inverted around the Milky Way and also use all the sliders but kinda opposite you want to increase temp to get the magenta/blue color (warmer than the sky) but increase Milky Way brightness with increase in highlights/whites but decrease darks and shadows to bring out the dark horse nebula and galactic spiral. Now a little cooler temp (not less shadows/dark) brush through the spiral and around the Dark Horse Nebula to add depth. After that different brushes along the shore lit buildings to lower brightness but to keep them up and not under lit (empty light sorta). with the latest update to Lr you may at first want to start with camera landscape (for a bluer sky and rich brown/tan beach and if vegetation for greening) and always before you start go down to lens correction and you may have to do some manual stuff like with SEL1224G you have to reduce vignetting to 30 because the profile is wrong. If you have a soft at the sides lens you will get some magenta noise color in the lower corners just use a brush low saturation/temp brush to get good ground blended color.In my camera bag
Today doing Astro Milky Way I use primarily the Sony A7S with the Sony SEL1224G with a Manfrotto Befree Advanced Alpha Travel Tripod (light but stable and a plate for either RC2 or Arca Swiss connection) but will use the A7RM2 because of "Bright Monitoring" function (to compose in the dark[ no flashlight needed]) and because it is "ISO Invariant" meaning you can do a capture at a lower ISO getting more dynamic range/less noise but in post you can increase exposure by 5 ev or more (do a 200 ISO and get a 6400 ISO capture to work with or a 1600 to get a 51200 brightness capture) kinda getting a f/1.8 or f/2.8 shot also at f/4. Also this helps with printing your capture Why? When editing a dark sky image even after all adjustment the program histogram brightness part will be to the left some giving a darker image than you see on your monitor when printed! So while you increase exposure in post the brightness section of the histogram move to the right more and can be centered or more to start things off so a final edit brightness wise is centered so for metal or wood prints it comes out brighter. And most of all you get more foreground brightness with no magenta noise and a daylight type photo not a darker night looking photo that you have to have lit to see the detail up on a wall. I like bright night shots that look almost like a daytime shot BUT with Stars. I guess the A7SM2 or A7M3 would be better at brightness but have not used them. Oh, also I like the on camera Sony Apps only available on the Mark2 cameras and below not the Mark3's, because of the most used Sky HDR, Digital Filter (both for using settings of two captures made into one in a raw file for sky and foreground like having to carry and using external graduated filter for say the Milky Way over a town), Smart Remote (for connecting a pad wireless and shooting with the pad and viewing a capture all the while saving battery power with the LCD turned off) and Time-lapse (for when you forget your intervalometer or do not want to use one) and say you have a manual lens with no chip and want its info embedded in EXIF file the Lens Compensation app where you put the name of the lens and do your own lens compensations (that Lr will not have doing a RAW file). Options are the the key to using your camera!!!Feedback
First you do not need any special camera and lenses, I have done the same capture with my old Canon T2i with the 10- 22 lens (at 16mm at f/3.5). I think imagination and planning with a internal drive to get up out of bed in the AM. Kinda like sunrise photography you have to be out before the sunrise to get the shots. And with Milky Way photography you get both in one night/morning. Once you capture the Milky Way (something your eye can not clearly see) you will be hooked (hopefully), As you drive/walk around you will always look to the south and see the Milky Way in your mind and composing a capture and marking on a map the locations you want to use. Everyone wants to go out west where the light pollution is less BUT all up and down the the east coast and the gulf coast there are dark sky also and many live or are a short drive to a beach with a good foreground object or light house. You can also do bracketed shots (HDR type) for a bright Lighthouse against a dark sky. I mean there are so many tools in your camera along with tools outside your camera. Sensors are so good today. If you watch the moon and sun go across the sky the Milky Way takes the same path through the year February to October (times are different each month). Apps : PhotoPills, gives location, times and Shutter Speed for camera/lens used (a lot of math you do not have to do), even a VR mode where you can see the milky way while out scouting during the day with your phone or pad camera so you can mark your spot when you come back at night; Planit! for Photographers all the above but also Tide info for your location and a mode where you can select the mm of your lens and do a panoramic shot with marked points on the compass for pointing your camera across and up and down (if needed) to get that rainbow milky way look; SkySafari Pro, your planetarium in your hand for anywhere anyplace to see the night sky move by second/minute,hour, day, or year with the names of anything you see in the sky!!! First get a group together do not go alone into the night, a camera/lens/tripod maybe $1K or more a thief knows on sticks, Let others know where you are going and check in when you get there and when you change locations (very important), Tear Gar/pepper spay you have to have a carry permit (you may also get arrested or sued by the person you sprayed if you use them in some states use wasp/hornet - bear spray for two/four legged critters in the dark good for snakes/gators/bears (yes it works) and you do not get arrested for killing/hurting something/person. In the south beware of critter mating seasons. Only take the gear you will need not all your gear and leave nothing in the car you drove in. Two head lamps (one back up) with a green filter not red (better night vision [I have found]), a couple of Tactical flashlights with a head strap for each, bug repellent - Skin so Soft ( an oil but dilute) or a product called ODO- Ban has eucalyptus and not an oil, Air all your clothes with dryer sheets in a dryer before going out and make a neck wrap with 3 or 4 as well a for wrest and legs, for those out in tall grass VICKS on legs,socks and boots for the powerful red bug/tick repellent. Invest in snake boots/snake chaps (Rattle snakes out west and some parts in the east are protected [ I was out west and had two on both sides of me go by at the same time in the dark])/ rubber boots for walking on the beach the water is cold at night and you may find a low tide pool for a reflecting of the stars. Also for summer a battery powered fan to keep moisture/bugs off the lens and for cold Feb/Mar/Apr nights (even cold in the south) hand warmers in a couple of socks wrapped around your lens to also keep moisture form fog/misty mornings off your lens. There are external filters for city sky glow follow directions of WB to use and how many ev's you loose so you capture a good shot (they make a sky bluer while reducing temp of ground city lights also reduce night haze (sometimes a win win), but most all super wide angle lenses require an external fit over filter holder that you have to carry also. Also do not forget water and some snacks (coffee and camera work do not mix as alcohol and driving) if June and July you will be out all night and early morning (sunrise) and both blue hour skies give good color and light up the foreground. When to go - there are about 15 to 20 days a month when the moon is not up or is setting in the west. In March for example a crescent moon will rise below the MW about 7 days before the new moon for a awesome shot people will think is PS'ed and in June and July the moon will rise way late after sunset several days before the new moon. Example this month (May) I went out a week before the new moon because storms were protected for the new moon but was able to go out at 11 pm with no moon up and capture till 4 am. After a full moon it sets later and later so with a setting moon you get a good lit foreground both WIN WIN!!! Camping either tent or motoring for several days can get you some awesome capture most anywhere you are, but you become a night owl sorta!!!! But full of fun, FUN. Also for the beach to keep salt out of your tripod legs 1. zip tied sandwich bags 2. Tennis balls slit and attached to the bottom legs. Also for the beach a bike (fat tire [for soft sand areas) with a folding beach wagon (for gear, like also a folding chair [long night]) in tow!!! IF IF you need to change a lens out in the humid air on the beach or where ever use big clear trash bags, put camera and new lens in, push air out, change lenses. I wear a photo vest and keep extra handy stuff in all the extra pockets. If you are older and have to wear bifocal glasses wear the bifocals not the progressives you will see stars and lights better and clearer where progressives you have to point your nose at a star or light. A light sheet (plastic for wet area) to put on the ground under your tripod for if you drop something (you always will) or if you want to get down for a low shot. You will always think or find something new every time out so have a check list before going out it will be more enjoyable.