0E842257-AAE5-401C-B9A1-9F3B35A5470C
Views
137
Likes
Awards
Peer Choice Award
Peer Award
Absolute Masterpiece
Top Choice
Superb Composition
Top Ranks
Same photographer See allBehind The Lens
-
Share to Facebook

-
Share to X

-
 Share to WhatsApp
-
 Share via Email

-
Share to Facebook
-
Share to X
-
Share to WhatsApp
-
Share via Email

-
Share to Facebook
-
Share to X
-
Share to WhatsApp
-
Share via Email

-
Share to Facebook
-
Share to X
-
Share to WhatsApp
-
Share via Email

-
Share to Facebook
-
Share to X
-
Share to WhatsApp
-
Share via Email

-
Share to Facebook
-
Share to X
-
Share to WhatsApp
-
Share via Email

-
Share to Facebook
-
Share to X
-
Share to WhatsApp
-
Share via Email

-
Share to Facebook
-
Share to X
-
Share to WhatsApp
-
Share via Email

-
Share to Facebook
-
Share to X
-
Share to WhatsApp
-
Share via Email

-
Share to Facebook
-
Share to X
-
Share to WhatsApp
-
Share via Email

-
Share to Facebook
-
Share to X
-
Share to WhatsApp
-
Share via Email

-
Share to Facebook
-
Share to X
-
Share to WhatsApp
-
Share via Email

-
Share to Facebook
-
Share to X
-
Share to WhatsApp
-
Share via Email

-
Share to Facebook
-
Share to X
-
Share to WhatsApp
-
Share via Email

-
Share to Facebook
-
Share to X
-
Share to WhatsApp
-
Share via Email

-
Share to Facebook
-
Share to X
-
Share to WhatsApp
-
Share via Email

-
Share to Facebook
-
Share to X
-
Share to WhatsApp
-
Share via Email

Behind The Lens
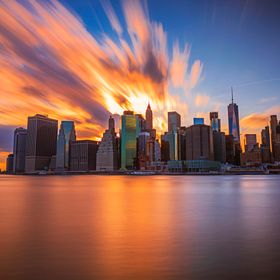
Location
I shot this May 8th, 2017Time
7:00 PM, about 15 minutes before sunset below the horizon lineLighting
Mother nature lit it, I had to figure out the correct exposure, which is tricky with Landscape because the sky is usually brighter than the foreground, so if exposing for the sky, the ground goes dark and if exposing for the ground, the sky is blown out, plus the sun was behind the buildings so they also need to be exposed properly. Additionally, I was shooting a 2:00 minute exposure to stretch the clouds and make the image more stylistic than realistic. I set my iso to 50, the lowest ISO to allow the least amount of light and set the shutter speed to 30 seconds. This is how i find the f/stop. I than meter the sky (foreground) and the water (Background) separately to determine their + or - difference to find their f/stop difference. I took a third reading of the buildings to decide the overall latitude or forgiveness between the water, the sky and the buildings. The sky is usually 2 to 3 stops brighter than the foreground this time of day, so I decided to overexpose the sky 1 stop ( a little brighter) and underexpose the foreground 1 stop (a little darker) and the buildings were about 1.5 to 2 stops underexposed. I than switch to Bulb setting and set the exposure at 120 seconds. I dial down the f/stop, clicking 1/3 at a time and closing down from f/8 to f/18. In post production I add separate curve layers to balance the imageEquipment
Canon 5D Mark IV, Tiffen Polarizer, Tiffen XLE (10 stop ND long exposure) TripodInspiration
The light is always my first inspiration, the second inspiration is the contour of those buildings that define lower manhattanEditing
Post processing is essential when shooting in RAW files, just like film needs to be developed, RAW files need photo editing software. I do global color corrections in Adobe Camera RAW (ACR) or Bridge to balance exposures and make my color correction adjustments. I use Photoshop for local adjustments, adding separate curve masks for the sky, the foreground water and a third isolating the buildings. I added one vibrance layer and individual color dedicated saturation masks, for red, for blue, for magenta and for yellow, each dedicated to specific areas of the image. I added a final sharpening layer by duplicating the background layer and scrolling down from filter to other, than highlighting highpass and moving the slider to +13, than adjust the blending option to soft light. My last step is adding The Orten Effect, plus 40In my camera bag
i normally carry three filters; a polarizer, 6 stop ND and 10 stop ND and shoot with three Canon lenses, 16-35mm, 24-70 mm and depending on what i am shooting i might take my Canon 70-200 long lens. I always carry 3 batteries, and an assortment of lens cleaner and cloths, a remote shutter release cable and lens hoods.Feedback
Two things. If shooting long exposures, Practice, practice, practice, then practice some more to get an idea on how many seconds of an exposure affects the clouds and what the final image might look like. If shooting landscapes, whether long exposures or normal exposures, it's about the light so shoot early in the morning or late in the late afternoon/early evening, Don't bother shooting in between one hour after sunrise to one hour before sunset. You are wasting your time unless shooting street images during this time. Landscapes are dependent upon amazing light and brilliant colors. If shooting long exposures, you need a certain amount and a certain type of cloud to make the final image mesmerizing. Isn't that the goal, mesmerizing and memorable?