Roof Panorama Polar
Views
58
Likes
Awards
Outstanding
Top Choice
Peer Award
Outstanding Creativity
Emotions
Happy
Same photographer See allBehind The Lens


Behind The Lens
Location
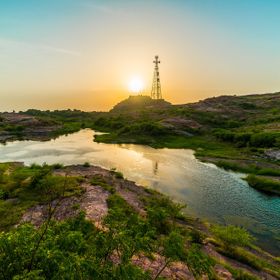
I took this photo on my roof! My family had recently acquired access to go to the roof of the building, and we were up there planning how to make changes to it to add more greenery.Time
I took this late evening, when the sun was going down. I was up on my roof, and the house behind ours was blocking the view of the sunset because of it's higher step roof for water tanks. So I climbed up on mine, and I was able to see the sunset much better. The whole sky was blue, and there was this glimmer of red and orange hues on the west side because of the sunset. The moon was out and bright, and it was just a surreal feeling!Lighting
Well since the light was dying, I had to be very still while trying to maintain a relatively slow shutter speed so that the iso was not as high. There was no artificial light source that can light up the sky anyway, right? Atleast not yet!Equipment
I used my trusty Nikon D750. At the time I didn't have my wide angle lenses with me and I didn't wanna lose out on the sunset by running down to get it, so I used my kit lens Nikon 24-120mm f4 and with it I started taking shots on the wide plane to stack together to make this beautiful polar panorama.Inspiration
The sunset and just the feeling of being on my roof, with the wind moving the clouds. I had seen many 360 polar panoramas from and always wondered if I could stitch together a polar panorama from a 24mm lens, and then went on to shoot so many photographs to precisely do just that.Editing
Well to make the polar panorama, you obviously have to stitch together multiple photos. After clicking the photos, I opened them up in Adobe Lightroom and made a panorama with them. I had the choice to lift the shadows so that the buildings would be more visible, but I preferred this low dynamic range, so that the buildings wouldn't be a distraction. After this I opened the panorama file in photoshop and applied the Polar Panorama effect, and then worked on ensuring that the edges of the photo were a lot more regular.In my camera bag
Normally I carry my Nikon Z6ii, D750, 24-70f4 S, 50mm 1.8S, 85mm 1.8G, Tamron 17-35mmf2.8-4, Tokina 100mm 2.8 Macro, FTZ Adapter, Godox AD200Pro flash for any situation that might come, and many other small accessories.Feedback
I think if it is possible for you to have a tripod, then it is a must. Otherwise how I did it was to keep the camera close to my body, with my eye on the viewfinder and to rotate my body slowly. This method wouldn't work if you have some object close by or a line close by that might get distorted slightly because the camera changes it's position. Click some sample photos of the brightest spot in your sky, to set your exposure level. Not those settings and then dial them in the manual settings, it is important to keep the camera in manual so that the exposure of the whole scene doesnot change because of the position of the sun/light sources in the shots. Next, fix your focus so that the most important part of the scene is in focus, like the sky for me in this one, and then turn it to manual focus. Then click the photos in a way that atleast 15% of the each photo is common with the previous one, so that with the distortion factored in, the software is able to easily stitch together the photos. When it's your first time do it twice or thrice for a backup shot!