The Old Driftwood Beach.jpeg
Back when Driftwood Beach was fun to photograph 2015. Hurricanes took all of this away. Driftwood Beach Jekyll Island State Park Ga.. ...
Read more
Back when Driftwood Beach was fun to photograph 2015. Hurricanes took all of this away. Driftwood Beach Jekyll Island State Park Ga..
Read less
Read less
Views
387
Likes
Awards
Contest Finalist in A Milky Way Photo Contest
Peer Award
Magnificent Capture
Top Ranks
Categories
Same photographer See allBehind The Lens


Discover more photos See all


Behind The Lens
Location
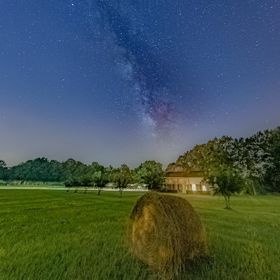
I was just learning to capture the Milky Way and after some study of where to find it i took a trip to Jekyll Island State Park Georgia , a 100 miles away or an hour and a half and stayed a couple of nights during the new moon. I go camping there and Driftwood Beach, 5th romantic beach, had all this driftwood that I thought would make a good foreground.Time
It was in July 2015 so the Milky Way was visible in the late evening at around 10pm. But with so many driftwood trees I kept walking around and getting capture. This capture was at 11:37pm when the Milky Way was almost directly over the beach.Lighting
A secret to the lighting that all photographers (that I have meet on the beach, maybe three) getting captures of the Milky Way is the fact that the Milky Way is to the southeast, south and southwest through the months of February to October and to my delight St. Simons Island is to the north and is very bright. It is so bright that it is like a studio softbox, so when doing night capture long exposure it is almost like daylight even at ISO 1600 and 20 seconds. So all you need is a green head lamp so you do not trip over some of the driftwood and you can see your camera and it's dials.Equipment
In October 2014 I bought the Sony A7S and in May I was studying about Milky Way capture after finding out about how it was with night photography. I had quickly ordered the Samyang 14mm f/2.8 for that is what everyone was using. It works great BUT the lens correction can only be found in Lightroom even today 2019. But I had to wait almost a year and a half before Lightroom had it. I did not find out till in the morning when trying to edit. For info the SEL1635G f/4 is better more awesome, I used it the next nights.Inspiration
At the time I had not pre scouted and had only taken sunrise shots before. Also there was a family group fishing with headlamps and I was trying to get some driftwood to block their lights. This area was a pathway along the top of the dunes through the driftwood during high tide and the tide was going out. Day time and night are two different lightings and this was like a tunnel at night. But bottom line was trying to block headlamp lights!!! Also I walk about looking for good framing all night and get 50 to 100 shots, I even drive to other places as the Milky Way moves across the sky. I highly suggest today to use PhotoPills VR mode while scouting an area for future shots to see where the MW will be all night long so you will have a start place with other spots marked on a map sort of. Even using trail tape to hang on a local spot or stake in the ground to find your spot.Editing
I keep coming back to this nights images and using different programs practicing different processing ways. I took many shots at different ISO's and even did some bracketing (I had no idea at the time) for manual mode was new to me. Lightroom in 2019 is way ahead of Lightroom in 2015 and you can start in Lr getting the lens correction but then use another program to process then bring back to Lr to fine tune your capture. The image is so bright and low noise anyway. The one thing I learned the use was the radial filter, very good tool. First use portrait filter for the tan beach, then graduated graduated filter from tok to mid for a light blue sky next put the radial filter (inverted) around the Milky Way and elongate from side to side and increase temp to the right till a light magenta then adjust contrast and highlights to the right shadows left whites right maybe some exposure some dehaze. Learning from others not too much clarity for a little blurry is like you would see it if you could see it clearly and in color. Just for info with a Sony you can in a well lit area (long exposure type) use Aperture mode using ISO to adjust SS like 10 seconds But most important use AWB and the natural colors will be there on every shot for the colors of the Milky Way, You can not paint/brush them on by selecting colors. When on it's side for example the top is blueish and the bottom magenta and a blend in between. The galactic center at the bottom is a bright white and the band between is dark but stars in side it grouped are bright. The bottom where the Galactic center is from right to left a dull white and lightly brush to enhance. The top where the Dark Horse/face(kitty cat) has a space then some brushed increase temp (not color selected). Also you will find decreasing saturation will mellow out the magenta (do not want to bright or heavy). On global wise a little Vibrance will adjust the sky blue color, you have do decide the shade you want. But really to get all the colors right look at a jpeg (as seen on the camera) using AWB to get the colors just right.In my camera bag
Back in 2015 a lot of lenses because everyone was using Canon and Nikon limited to ISO 6400 I thought I needed f2.8 lens or faster I had the SEL1635G f/4 but got the Samyang 14mm f/2.8 (has mustache lens warp and trailing stars in the cornes, have all and all the same). Before there were full frame wide lenses I found the SEL1018 f/4 use Full Frame at 12mm to 18mm (18 by removing light shield), soft in corners with color noise but solved with some vignetting in post. Loving the wide shot with a small Milky Way also used the Samyang 12mm f/2.8 fisheye (again only Lr has lens correction and some star trailing), found the Voigtlander 12mm f/5.6 using M mount before they made Sony FE mount but got the Voigtlander 10mm f/5.6 Sony FE can be used at 50 seconds in bulb mode. Lastly the SEL1224G f/4 the most perfect of lenses, it is wide with no coma with sharp stars. BUT ALSO with all lenses you need to use PhotoPills Spot Stars where you get the proper shutter speed for lens mm and camera being used. Today when out for a night I use the Sony SEL1224G f/4 and the SEL24240G with A7M3- is ISO Invariant meaning to persevere highlights you can shoot at ISO 800 and increase shadows and exposure to get the same as a 12800 brightness. Noise is the same from 800 up to 25600 from 50 to 640 a little more noise at night. but what is nice the lower the ISO the more dynamic range able to bring clear detail and color in the shadows, even great for sunrise/sets. Yes only two lenses f/4 for night and f/11 for day.Feedback
Number one get PhotoPills app for both pad and phone and go to the website and read all articles to learn when and where to find Milky Way (always look south). Second to not be afraid of the bright places, as long as the sky is dark you can capture under a street light it is sky glow you have to watch out for but even then, like this capture, it can be done. You do not need an expensive camera, to start go to a pawn shop or flea market get a camera with a kit lens if lucky you will find some fast glass with one and do not knock a 35mm it will work. Yes a wide to very wide would be nice, the wider the longer the shot getting more light. But for the money and value AND ISO range the Sony A7SM2 or A7M3 (both in camera stabilized) least expensive A7S with the SEL1224G. But be prepared to go out at 4am in February and March but stay for the sunrise and get blue hour stars also. June, July and August are all nighters from sunset blue hour to blue hour sunrise. It goes across the sky like the moon and sun. The sun and moon move their diameter every two minutes so stars are smaller and move further in two minutes so a max of 30 seconds for any lens including a 10mm just adjust ISO for more light. Do not shoot in tungsten white balance (old advice) it is too blue and hard to get colors right. Also those night filters not really needed anymore because of cities going LED lighting get white night glow not yellow. Several web and youtube places like lonelyspeck.com also alynwallacephotography.com have excellent info. also do not get hooked on the fast glass idea can be expensive, you will need to increase f/# to get rid of coma anyways. OH! OH! NEVER GO OUT ALONE GET A FRIEND OR TWO AND ALWAYS TELL SOMEONE WHERE YOU ARE GOING, EVEN CALLING SOMEONE WHEN YOU CHANGE LOCATIONS....... I have even had Police officers watch me because they alway drive up and ask about what you are doing at 3am!!! After you show them your shots they want to learn!!!