Lightpainting Editorial
Lightpainting testshoot for editorial purpose
Lightpainting testshoot for editorial purpose
Read less
Read less
Views
966
Likes
Awards
Top Shot Award 21
Featured
Peer Award
Outstanding Creativity
Top Choice
Superb Composition
Absolute Masterpiece
Superior Skill
Genius
All Star
Emotions
Impressed
Relaxed
Top Ranks
Categories
Same photographer See allBehind The Lens


Discover more photos See all


Behind The Lens
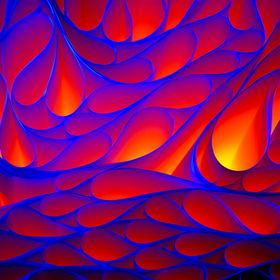
Location
The photo was shot in an old power plants control room. The concrete floor was kinda glossy but still a bit edgy and perfect to pick up the reflections from the lights.Time
The control room was not heated at that time, it was late autumn and I was aware that we had to be quick to capture the perfect image with only a few tryouts. The combination of LED torches and an RGB changing acrylic stick was a minimal but effective choice, perfect to light up the model and the hotspot with only 3 lightsources. As I was wearing black, I disappeared in the longexposure just by moving around the model.Lighting
Basically the entire photo is shot in a complete dark setup. No studio lighting, just a couple of different torches. One torch with a red filter was simply lying on the floor behind the models chair and created the glossy floor reflections. So first I placed a torch behind the chair on the floor, then I took the triple led to light up the model from toe to the head without pointing towards the lens, just when I reached her hand i was twisting the LED so the triple reflection trails became visible while I was walking out of the scene. Behind the chair again, I switched on the acrylic stick. As this one has a different frequency of light, it creates blurred color strokes when you hold it parallel to the camera and changes to dotted lines when you point the tip towards the lensEquipment
Back then I was using a Canon EOS 7D on tripod, a 19-35mm Sigma lens and a remote control - camera set on bulp mode, ISO 100 and F5,6. That´s it.Inspiration
I like the combination of color-blockings and had the bodystocking in black and white checkerboard pattern on hold for quiet a while. When I asked a friend to collaborate on some new highfashion pictures, she liked the edgy look idea of my abstract lightpainting techniques and combined it with neon bodypaint makeup. So I had this dark cool location, the chair and a cool model. A simple but matching setup.Editing
I shot the scene in one go, no PS editing afterwards, so its a straight-out-of-camera lightpainting.In my camera bag
I shoot with a Canon 5D MKIV with various lenses, mostly using 19-35mm, a 16mm fisheye, a Tele lens and a 100mm macro. Additionally there are tons of lighting torches, fiberglas brushes, acrylic adapters, pixelsticks, led whips and color tubes, depending on the project and the scale of the location, the range can be from minimal to overkill...Feedback
Go threw the process in your mind, only thinking of each step upfront makes the perfect shot possible. The less lightsources you use, the better the output will become. Sometime it´s done in one shot, sometimes it can take ages to get the result you want. If you dive deeper into lightpainting, you will see that the choice of location, the surrounding lights and also weather can play an important role besides the choice of your lighting equipment. But in the end it´s not the highend material or studio setup that makes the perfect picture - it´s you and your vision.