Niagara's Fury
Views
115
Likes
Outstanding Creativity
Absolute Masterpiece
Peer Award
Superb Composition
Top Ranks
Categories
Same photographer See allBehind The Lens


Discover more photos See all


Behind The Lens
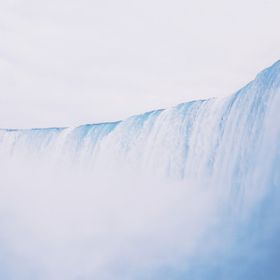
Location
The photo was taken on the Canadian side of Niagara Falls in what's known as Horseshoe Falls or Victoria Falls there.Time
The photograph was actually taken in the late afternoon a bit after 4PM. My friend and I had decided to purchase the adventure pass which included a variety of activities from a 4D movie to seeing the rapids, embarking on a boat tour that essentially goes up to the waterfall, and finally, a journey behind the falls.Lighting
After a last minute decision that occurred around 9PM, my friend and I decided to travel over six hours in the dead of night to reach Niagara. From crossing the border at 3AM to checking in an hour later only to get a few hours of sleep, the journey was rough and we were excited to bask in the summer sun and see it was that Niagara had to offer. Throughout the day, patches of small white clouds drifted through the sky, but during the last leg of our excursion, the patches faded, giving way to overcast skies. While to me at the time, overcast conditions weren't ideal because I would have much rather had blue skies, in hindsight, this photograph would have never worked or occurred had it not been for the shift in weather and lighting. The clouds provided a uniform distribution of soft light as opposed to harsh light and also places a crucial role in the overall atmosphere of the image. Needless to say, sometimes it just boils down to luck and it's good to be lucky sometimes.Equipment
The set-up in capturing this photo was essentially non-existent; because the sky was overcast, light throughout the area was incredibly even, meaning no tripods, filters, more technical applications like bracketing or really anything of the sort aside from my Canon 6D and 24-105mm f/4L IS USM lens. I also neglected to bring my tripod, so that's a plus, although it would have been nice to get a longer exposure and milky tones.Inspiration
In every literal sense, simply witnessing the unbridled power of the Falls themselves. As I've traveled more and more over the last few years, I've come to realize that in spite all the pictures and videos we may take of all these amazing places around the world, you can't truly grasp the magnitude and gravity of them without being there. That's not to necessarily say that we shouldn't try, or that it's futile, but rather, that's what I look to capture. Aside from people that have been to the location you're shooting at, they don't see everything. They don't see the tunnel I had to go through just to get to the platform where this photograph was taken, nor do they see the swathes of water pouring down on everyone, battle against water droplets on the lens, or how I climbed a concrete block with a small fence atop of it just to capture this image. What they do see, however, is my representation of the experience and I hope that through that, it'll inspire a sense of wanderlust so that they truly can experience what it was like for me to be there.Editing
Yes, and for this photograph in particular, it was actually very simple and basic. Before delving into my editing process, I think it's important to note that I always shoot RAW for the most flexibility in post and since capturing this image, my workflow has changed from using just Photoshop to both Lightroom and Photoshop. When editing this photo, I looked to bring out the details in the shadows while ensuring that the whites and highlights were balanced and not blown out or overexposed. In essence, I made sure that the whites in the water and gray in the sky had a sense of dimensionality to them separate from that of the blues. From there, I began to adjust the curves and the HSL sliders, which control the hue, saturation, and luminescence of colors in the image before bringing it into Photoshop. In terms of the initial edit, I simply look to balance out the light and colors. Photoshop is where the image truly comes to life. Once in Photoshop, I used five basic adjustment layers to set the foundation for the image. Those adjustment layers were: levels, curves, color balance, selective color, and hue and saturation. These not only helped to establish the overall tone and mood of the image, but further balance out the tones and really bring forth the color. I then isolated the whites and the gray in the sky in order to ensure that they remained protected while I deepened the blues and cyans of the water. At the end of the day, post-processing is an art and a reflection your voice, who you are. There's no right or wrong way to necessarily go about it and for me, that means striking a balance between what I saw and envision it to be and how it actually is.In my camera bag
Since I mainly photograph nature and landscapes, whenever I travel, weight is always a big emphasis of mine. In that sense, I like to travel as light as possible, meaning that all of my camera gear fits within a small backpack that I have. Inside my backpack, I have a Canon 6D, 24-105mm wide angle lens, 50mm prime lens, 70-300mm telephoto lens, a 6-stop Breakthrough ND filter, two spare batteries, chargers, and a Fujifilm x100F. I also occasionally use a lens hood on my 24-105mm when there's glare. While it may seem a bit trivial, I also wanted to point out that all of my lenses are USMs. Having used regular lenses in the past when first starting out with my Rebel T3, the difference is absolutely massive. USM lenses not only focus infinity faster than traditional lenses, but they are also incredibly quiet. Despite the extra cost, I would definitely recommend getting USM lenses if it's possible.Feedback
Embrace the elements and don't be afraid. Despite the base of the Falls being approximately a hundred or more meters away from the waterfall itself, water poured in a non-stop frenzy. Within a few seconds, my friend and I, along with everyone else in the area were completely soaked and my lens, riddled with a seemingly endless amount of water droplets. From that point on, I knew it would be an uphill battle, and spent roughly twenty minutes or so trying to capture what it meant to be there while constantly having to wipe my lens in order to try and get the cleanest image possible. Because the area was low and directly next to the falls, in order to get a good angle and to show the curve of Niagara, I positioned myself on the right side of the platform and stood on top of a low concrete slab that zoned off the area and held up a miniature fence so that I could see everything and have a more level shot. In order to get to the area where you're beside the Falls, you must purchase tickets to the "Journey Behind the Falls". It's a self-guided tour where you descend through a series of tunnels before reaching the platform beside the waterfall. Within those tunnels are paths where you can view the waterfall from behind through port holes. Also, bring an extra set of clothes because you will get soaked, even with the ponchos they hand out prior.