Sydney Harbour Bridge Illuminated
Sydney Harbour Bridge at Night
Sydney Harbour Bridge at Night
Read less
Read less
Views
122
Likes
Awards
Zenith Award
Creative Winter Award
Well Done
Superb Composition
Top Choice
Absolute Masterpiece
Outstanding Creativity
Peer Award
Superior Skill
All Star
Categories

Same photographer See allBehind The Lens


Discover more photos See all


Behind The Lens
Location
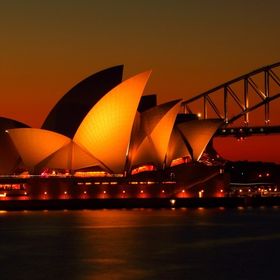
This picture, of the Sydney Harbour Bridge, was taken from the North side of the harbour.Time
It was taken early evening whilst on the way to the annual Sydney Vivid Light Show.Lighting
The aperture was only closed down to F8 with the ISO set 100. However for recent photographs I have used a higher aperture (F16+) with the ISO set to 400 or even 600 in order to give the lights on the bridge more clarity and to make them sparkle.Equipment
Canon D60 camera with a Tamron 18-270 lens on a Tripod. I also turned off the automatic image stabiliser on the lens as this tends to sometimes cause blur if there is any movement in the scene (eg. water ripples or boats etc).Inspiration
Canons annual Vivid Light show is all about lightEditing
No I mostly prefer to let the camera tell the story although I will adjust the White Balance to deepen colours especially for Sunrises and Sunsets.In my camera bag
I have a reminder card with a list of things to take on a shoot and they are: 1) Camera with Full Battery 2) Lens & Caps (& Spare Caps) 3) Lens Hoods 4) Tripod (Small or Large) 5) Spare Battery 6) Spare Memory card 7) Remote Release 8) Small Torch 9) Cleaning Cloth and Brush 10) USB Cables to link to Mobile/Tablet 11) Notebook & Pen or Use Mobile NotebookFeedback
As the shutter speed is going to be very long (30 secs in this case) you need the camera to be stable so a Tripod is essential. However if I don't have my tripod with I normally find a suitable flat surface to place the camera and use the remote release or failing that set the timer to 2 secs. Also when using a tripod or the latter method I prefer to turn the automatic image stabiliser off otherwise any movement in the scene may confuse the lens into making an adjustment is unnecessary. Some lens apparently don't need the stabiliser to be turned off however I find it best to do without it especially if there is any movement, even clouds for instance, in the scene. Just need to remember to switch it back on afterwards.