flower--004-essence-copy
Views
115
Likes
Awards
Member Selection Award
Summer Selection
Peer Award
Outstanding Creativity
Superb Composition
All Star
Top Choice
Absolute Masterpiece
Superior Skill
Top Ranks
Same photographer See allBehind The Lens


Behind The Lens
Location
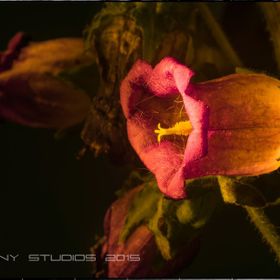
This photo was taken in my studio, I had finished my other commercial work and these flowers in my office got my attention and I decided to finish the day with some work for myself.Time
In my studio I can create any time of the day, that is the beauty of my work, I can recreate or simulate almost any lighting condition to enhance the product. In this case the light was simulating in a way the last rays of the day, but in a very special way.Lighting
I have numerous light heads and light modifiers to choose from, and in this case I decided to use my compact small light brush system, as my hosemaster optical fibre light was out of commission. This is like painting with light, simply said, it is like a modified torch and with a very narrow nozzle attached to the "light brush" I could highlight very specific areas of the flowers. These flowers were near the end of their life, so not many parts were still photogenic enough to highlight; throwing the light of the softbox onto them would do them no justice and I would end up with a rather boring photograph.Equipment
Using a digital camera, you select a long shutter speed to allow the light to enter at leisure the sensor. In this case I chose 30 seconds by remote control which is very easy to do as my studio is painted black (to minimise any reflections) and has no windows. The ISO setting was 50 ISO, and the output of my "light brush" measured F5 .6 at 30 cm distance. This way I could keep the light brush out of the view of my viewfinder and I was close enough to keep the illuminated area very small, the diameter of the light nozzle was only 6 mm. This allowed for very accurate highlighting specific areas of the flower. My camera was mounted on a Cambo UST studio stand.Inspiration
These flowers had some really interesting textures, colours, shapes that were so interesting to experience. Flowers that are almost at the end of their life are for me sometimes more interesting than at the peak of their bloom. Working with the little "light brush" or the hose master would be ideal to highlight these textures, colours and shapes far more intensely than any other conventional light source could produce, and a variety of lighting directions makes it more dynamically interesting.Editing
The image was captured in raw, I adjusted the colour temperature to a lovely warm feeling. There was no noise in the photograph, I did not make any other adjustments other than normal sharpening. This is the benefit of working with the hosemaster or the light brush, all your lighting - like brightness, colour intensity and areas of illumination are created while making the photograph so there is almost no need for post processing. What is dark should be dark what is bright should be bright, where there is a hint of detail they should be a hint of detail.In my camera bag
I do not have a camera bag, I have a studio full of gear, I can choose almost anything from spot to ring flash, short strip to long strip, softboxes to grids, beauty dishes et cetera. Which is ideal, I can select the appropriate light source(s), the appropriate lens, to suit my subject. This is sometimes a bit awkward, too many ways to solve a problem!Feedback
If you like to do something similar, get your torch light out, wrap the head of the torch in a cone of black sturdy paper that does not bend so it's creates a long cone through which the light can travel in an almost straight line to what your subject. Make sure your object does not move, put your camera on a long shutter speed, keep the ISO to your minimum lowest setting if you can, experiment with time and distance of the light of your torch to find the correct exposure. You can do a test by holding your torch on a specific distance on a grey card for a specified short time, process that capture and see if it is a correct exposure. Experiment until you know how long you have to hold your torch at a certain distance on that grey card to get the correct exposure time. When you start "light brushing" and you want the correct exposure in that photograph somewhere special - you hold it for that specified time there, if you want something looking darker you hold your torch in that area for a shorter time et cetera. Shoot in raw, adjust your light source temperature later to the colour temperature you like in raw processing and take it from there. Use an audible timer to keep track of the time, and do a few practice runs before you go for the final version.