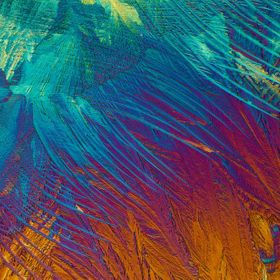
Magnified Snowflake
Collected snowflakes during a flurry to place under a microscope outside in the cold.
Collected snowflakes during a flurry to place under a microscope outside in the cold.
Read less
Read less
Views
147
Likes
Awards
Member Selection Award
Superb Composition
Peer Award
Absolute Masterpiece
Top Choice
Outstanding Creativity
Superior Skill
Magnificent Capture
Love it
Genius
All Star
Top Ranks
Categories
Same photographer See allBehind The Lens


Discover more photos See all


Behind The Lens
Location
I took this photo at the Rochester Institute of Technology in January, 2016.Time
I took this photo around 2:30 PM. It had started snowing so I rushed over to the photography building in order to get some flakes while I could. I parked in 20 minute parking, hoping I wouldn't get a ticket (I did, but I got it appealed) and headed over to the photography cage to check out gear. As a Biomedical Photography student we have access to what we call the Snowflake Shack: a locked wooden box with a microscope, slides, and other necessary gear for catching and imaging snowflakes thats already acclimated to the temperature outside.Lighting
I used Rheinberg illumination to get the colors of the background and snowflake. I used colored gels cut in a circle to fit into the Rheinberg condensor. This imaged was stitched together since the flake was too big for the 4x objective. That's why the colors look a little wonky, I tried to edit them. I actually uploaded a better version later on, but ViewBug wanted this one to be in the blog.Equipment
I used a Nikon D810 with a Nikon microscope mount, an Olympus light microscope, microscope slide, tray with black velvet to collect snowflakes, a pencil with a pin on the end to transfer snowflakes, and a Rheinberg illumination kit.Inspiration
One of my professor's is well known for his snowflake photography, and when I visited RIT his pictures were on display. I thought they were amazing, and one of the reasons I went to this school was to learn how to image these beautiful crystals.Editing
Yes, I edited exposure, sharpness, and stitched two shots together in order to get the whole snowflake in one frame. I also tried to fix the background so it looked cohesive, as I moved the slide, different parts of the snowflake were against different colors in the background. In my newer version of this image I completely edited out the background and added a gradient layer of the same colors so it looks smoother.In my camera bag
When I go out hiking and exploring what I usually have depends on what is available for checkout at the cage. Students are allowed to borrow equipment for 24 hours at a time, and sometimes certain items are in high demand. I like to try to get either a Nikon D810 or D750, a 24-70 or 14-24 depending on where I'm going, and a tripod. I have a 105 macro, 70-300mm, and 50mm lens of my own.Feedback
It's very difficult to photograph snowflakes if you don't know what you're doing. It is extremely weather dependent, and you have to be willing to stand/ kneel outside in cold for a long time in order to get the perfect picture. A microscope and slides acclimated to the temperature is definitely necessary, otherwise the flakes will melt immediately. I would say go out as many times as you can to experience all the different types of snowflakes. I noticed they tended to melt at above 28 degrees, so it's gotta be a pretty cold day to get good shots.