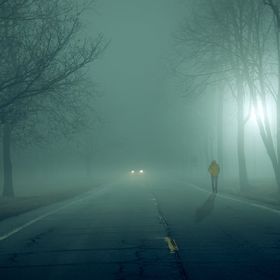
Find A Way
Views
1672
Likes
Awards
Featured
Contest Finalist in Covers Photo Contest Vol 25
Peer Award
Superb Composition
Absolute Masterpiece
Top Choice
Outstanding Creativity
Superior Skill
All Star
Magnificent Capture
Emotions
Impressed
Top Ranks
Categories


Same photographer See allBehind The Lens


Discover more photos See all


Behind The Lens
Location
I take the vast majority of my floral shots at local nature preserves and parks. However, this shot was taken in my garden at home. All of my shots are taken in their natural environment, as I find them, without any kind of arranging. I think taking them as they are helps to train the eye, especially regards composition. The same subject can have a totally different composition just by moving around it.Time
I shot this around midday in quite harsh light, far from ideal. I used one hand to create some shade and then shot a number of shots one handed to increase my chances of getting one sharp and in focus shot. Luckily, this one came out sharp.Lighting
The style that I have developed for my floral portraits makes great use of soft light and shadows. I use focus and light together to direct the eye, give depth to the image and to give a mood or emotion. I always try to shoot in the best natural light as possible and then enhance and direct this in post.Equipment
This was shot with my Canon T3i and EF-100mm f/2.8 Macro USM lens, hand held. No flash or any other equipment was used other than one hand to cast some shade to soften the harsh light.Inspiration
I am always looking for shots, even when I don't have my camera with me. I think after shooting macro for a while you start to see and appreciate things differently, things that you may have otherwise paid little or no attention to. I saw this shot after arriving back from a shoot at a local nature preserve. The colors and the composition of one flower partially covering the other caught my eye. The one flower partially overhanging the other helped to add dimension and depth in the shot. It wasn't until I came to process the image that I noticed a tiny little fly on the edge of one of the petals!Editing
I only use LR to process my floral portraits. I process them all using the same technique that I developed over some time. Although the base edits are loosely the same for each one, each calls for it's own unique processing, a preset would never work. For this shot, besides the usual and numerous local adjustments that would take too much to detail here, I also made the following global adjustments... I changed the WB to tungsten. This was done to really tone down the oranges and make them more yellow as the flowers were a very bright orange in color. The contrast and clarity were increased some, along with decreasing the highlights a little, which helps to bring out more detail. Vibrancy was increased just a little and the yellow, green, blue and aqua hues were all decreased some to add some warmth back into the image after the tungsten WB was set. A small amount of split toning was added, again to add a light more warmth to the image. Finally, the blue primary saturation, under camera calibration, was increased slightly. I'll often use this little trick to add a little more 'pop' to oranges and yellows.In my camera bag
I have my Canon EF-100mm f/2.8 Macro USM lens almost permanently attached to my Canon T3i. It's my favorite lens, super sharp and able to give a good narrow DOF with great bokeh. I also carry the 18-135mm kit lens (that I use only for the odd landscape) and the 50mm f/1.8 STM. I need to start using the 50mm more and give it a really good test. From the times I have used it, it seems to be a fantastic lens for the price. I recently started carrying my speedlight and a small softbox, as I am experimenting with different lighting techniques. I also carry a remote cable release, ND filter, CPL filter and a tripod for the landscape shots. I always carry a small spray bottle of water. This is great for adding instant dew or raindrops to add some mood and drama to a shot. Spare batteries and memory cards are also always in my bag. Two additional non photographic related items that I started carrying after being bitten by large Alsatian dog are a knife and MACE!! I'll carry all this in either my Clik Elite Contrejour 40 backpack, which I use for longer hikes and in winter or my Tenba Messenger for shorter walks.Feedback
Find good soft light, free of harsh highlights and shadows. Golden hour is of course a good time but even midday, if it's an overcast day, can be great. If harsh light is falling onto your subject try and soften it, create some shade. You can of course use a diffuser or I'll often position my body to create shade (if I can still get a good composition) or use one hand to cast some shade and shoot one handed (as I did with this shot), use your bag or anything that's available. Harsh highlights and shadows are difficult to deal with in post and will not give the same soft feel. Don't just see what's in the frame, look. Look for any distractions and if possible remove them or reframe. Look at the composition, look from different angles all around your subject. The look, feel and overall composition can vary greatly just by moving a few feet to one side or the other. When you are ready to shoot, shoot a number of shots bracketing the aperture. I will usually shoot a couple of shots each at f2.8, f.3.2, f4 up to f5 if shutter speed allows without cranking up the ISO and use different focus points. This way you can choose the shot with the focus and DOF you like the best when you come to edit. Focus point and DOF can go a long way to giving the feeling of depth, mood and atmosphere that you are trying to convey. When it comes to editing, don't worry too much about 'rules' and what you 'should do'. Play around with different adjustments, try things that maybe they weren't intended for (using dehaze to add haze can give a great look), let yourself go and most of all enjoy it and have fun!