Wine Glass
A little experiment with an LED flashlight.
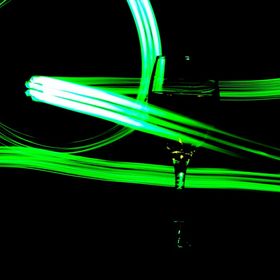
I placed a wine glass on on a black seamless background, shut off all the lights, and shot at different shut...
Read more
A little experiment with an LED flashlight.
I placed a wine glass on on a black seamless background, shut off all the lights, and shot at different shutter speeds while moving the flashlight within the frame. A little post editing in Photoshop CS5.
Read less
I placed a wine glass on on a black seamless background, shut off all the lights, and shot at different shutter speeds while moving the flashlight within the frame. A little post editing in Photoshop CS5.
Read less
Views
131
Likes
Awards
Member Selection Award
Staff Winter Selection 2015
Outstanding Creativity
Absolute Masterpiece
Top Choice
Superb Composition
Top Ranks
Categories
Same photographer See allBehind The Lens


Discover more photos See all


Behind The Lens
Location
This was taken in my kitchen, on the table. I'm pretty much self taught and enjoy doing fun projects that I see in magazines. I happened across this one last year and couldn't wait to try it out.Time
I remember this one well as I had been waiting all day while at work to get home and set everything up. I had to wait until it got dark outside as I don't have a really dark area in my apartment. On my way home I stopped at a local arts and crafts store to pick up some black poster board. It was in Feb of 2014 at around 6:30 in the evening.Lighting
The only light source was the small LED flashlight used to make the trails. I waited until it got dark outside and I shut off all the lights in the apartment. I used the flashlight to make the trails by leaving the shutter open for 10 to 15 secs at a time while moving the flashlight around the field of view of my camera.Equipment
I used an Olympus E-1 with 14-54mm 2.8-3.5 attached at the 25mm focal distance, a Manfrotto 3001BN tripod, a small metal shelf for a backdrop holder, black poster board, a cheap wine glass I picked up from a second hand shop, a shutter release cable, and a small LED flashlight.Inspiration
I was looking through a photo magazine one day and they had a write up on how to do this and I was intrigued from the beginning. I'm always looking for ways to improve the art in my photography and this was a fun project to do.Editing
I uploaded the raw files into Adobe Camera Raw and tweaked the white balance a little. The flashlight LEDs were white and I thought that might be a bit boring. I moved the slider up and down until I got the color I was looking for. I then open the selected file in Photoshop CS5 and began to remove all the little distracting reflections off the wine glass. I also deepened the black and smoothed out the light from the flashlight a little.In my camera bag
Right now I have gone completely Micro Four Thirds. I have my 2 go to primes the 45mm 1.8 and 25mm 1.8. I don't go anywhere without them. I use the 25mm for street shooting and the 45mm for portraits and more intimate street shots. I also have the 12-50mm kit lens that came with my OM-D E-M5. My Olympus OM-D E-M5 body and an Olympus E-P3 body. An Olympus FL-36 Flashgun for those times when my fast primes just can't get the job done and I need just a little more light. I really love how much I can fit into a small messanger style shoulder bag. Using Micro Four Thirds gear is so much easier than when I was lugging around a Nikon D300 with a 70-200mm 2.8 in a backpack along with everything else to go along with it. I can pretty much take my bag wherever I go.Feedback
In order to recreate this shot you will need to be in a very dark area without a lot of stray light, you'll be thankful come post proccessing. Get some black poster board from any arts and crafts store. Set up the poster board so you have a backdrop as well as a flat surface to place your glass to give it a seamless background. So in other words have it curve forward from top to bottom. Use a tripod, There is no way around this, as you'll be using long shutter speeds in the 10 to 15 sec range. Set up you're tripod and background so you have only what you want in the viewfinder. Place the glass off to one side or the other, use the rule of thirds. Use a shutter release cable or your camera's self timer. Shut off all the lights and turn on your flashlight, Make sure its an LED type as the standard bulbs won't work correctly. Start moving the flashlight around within your camera frame pointed at the lens. While moving it around trigger your shutter. Continue moving the flashlight around until after you hear your shutter close. Always shoot in raw as it makes it a lot easier to get the results you want in post processing. Take a bunch of shots using different shutter speeds and have fun!!