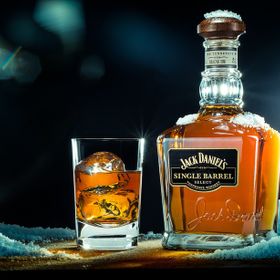
Jack Daniel's Single Barrel Whiskey
This image was shot in studio for a tutorial featured on www.Photigy.com.
Taken with a Nikon D800 body on a Horseman LD view system; Rodenstock 90m...
Read more
This image was shot in studio for a tutorial featured on www.Photigy.com.
Taken with a Nikon D800 body on a Horseman LD view system; Rodenstock 90mm f-6.8 Grandagon-n Lens.
Read less
Taken with a Nikon D800 body on a Horseman LD view system; Rodenstock 90mm f-6.8 Grandagon-n Lens.
Read less
Views
5632
Likes
Awards
Chatter Award
Contest Finalist in Letters And Words Photo Contest
Member Selection Award
Contest Finalist in Social Exposure Photo Contest Vol 5
Featured
32-Inch LED TV
Contest Finalist in Commercial Shots Photo Contest
Peer Award
Superb Composition
Top Choice
Outstanding Creativity
Absolute Masterpiece
Superior Skill
Magnificent Capture
All Star
Genius
Emotions
Happy
Top Ranks
Categories


Same photographer See allBehind The Lens
-
Share to Facebook

-
Share to X

-
 Share to WhatsApp
-
 Share via Email

-
Share to Facebook
-
Share to X
-
Share to WhatsApp
-
Share via Email

-
Share to Facebook
-
Share to X
-
Share to WhatsApp
-
Share via Email

-
Share to Facebook
-
Share to X
-
Share to WhatsApp
-
Share via Email

-
Share to Facebook
-
Share to X
-
Share to WhatsApp
-
Share via Email

-
Share to Facebook
-
Share to X
-
Share to WhatsApp
-
Share via Email

-
Share to Facebook
-
Share to X
-
Share to WhatsApp
-
Share via Email

-
Share to Facebook
-
Share to X
-
Share to WhatsApp
-
Share via Email

-
Share to Facebook
-
Share to X
-
Share to WhatsApp
-
Share via Email

-
Share to Facebook
-
Share to X
-
Share to WhatsApp
-
Share via Email

-
Share to Facebook
-
Share to X
-
Share to WhatsApp
-
Share via Email

-
Share to Facebook
-
Share to X
-
Share to WhatsApp
-
Share via Email

-
Share to Facebook
-
Share to X
-
Share to WhatsApp
-
Share via Email

-
Share to Facebook
-
Share to X
-
Share to WhatsApp
-
Share via Email

-
Share to Facebook
-
Share to X
-
Share to WhatsApp
-
Share via Email

-
Share to Facebook
-
Share to X
-
Share to WhatsApp
-
Share via Email

-
Share to Facebook
-
Share to X
-
Share to WhatsApp
-
Share via Email

Discover more photos See all
-
Share to Facebook
-
Share to X
-
Share to WhatsApp
-
Share via Email

-
Share to Facebook
-
Share to X
-
Share to WhatsApp
-
Share via Email

-
Share to Facebook
-
Share to X
-
Share to WhatsApp
-
Share via Email

-
Share to Facebook
-
Share to X
-
Share to WhatsApp
-
Share via Email

-
Share to Facebook
-
Share to X
-
Share to WhatsApp
-
Share via Email

-
Share to Facebook
-
Share to X
-
Share to WhatsApp
-
Share via Email

-
Share to Facebook
-
Share to X
-
Share to WhatsApp
-
Share via Email


-
Share to Facebook
-
Share to X
-
Share to WhatsApp
-
Share via Email

-
Share to Facebook
-
Share to X
-
Share to WhatsApp
-
Share via Email

-
Share to Facebook
-
Share to X
-
Share to WhatsApp
-
Share via Email

-
Share to Facebook
-
Share to X
-
Share to WhatsApp
-
Share via Email

-
Share to Facebook
-
Share to X
-
Share to WhatsApp
-
Share via Email

-
Share to Facebook
-
Share to X
-
Share to WhatsApp
-
Share via Email

-
Share to Facebook
-
Share to X
-
Share to WhatsApp
-
Share via Email

-
Share to Facebook
-
Share to X
-
Share to WhatsApp
-
Share via Email

-
Share to Facebook
-
Share to X
-
Share to WhatsApp
-
Share via Email

-
Share to Facebook
-
Share to X
-
Share to WhatsApp
-
Share via Email

-
Share to Facebook
-
Share to X
-
Share to WhatsApp
-
Share via Email

Behind The Lens
Location
This image was taken at my company, Imagineering Studios, Inc. in Arlington Heights.Time
It took close to 4 hours from developing the concept to the final post-processed shot.Lighting
This is a 5 light setup. It was taken with a few different exposures and composited together in Photoshop.Equipment
I used primarily studio strobes, and I had my camera mounted on a Foba 8' Camera Stand. I shot in on a Nikon D800 body attached to a Horseman LD technical system for DSLR. The focal length was 90mm, and I used a fixed focal length Rodenstock lens. Everything was photographed at room temperature, so I needed acrylic ice cubes (from Trengove Studios) and artificial snow.Inspiration
I shot it as a tutorial for a holiday themed challenge on Photigy.com. The idea was to give the feeling of a festive drink, or an ad shot for the holiday season.Editing
The image was taken with a few different exposures. I used basic masking and brushing methods to retouch the image to it's final polished state. The Photoshop healing brush is a key tool to any retoucher's arsenal. The secret is: take the time to pay attention to detail.In my camera bag
I have a fully equipped studio, so it's hard to boil down to what I "normally" use. For product photography, I typically shoot with my Nikon D800 camera with a few pocket wizards to trigger my flashes. My lighting is mostly Paul C. Buff Einsteins and Calumet (Bowens) lighting. I use strip boxes most of the time for light modification, but I'll also use square soft boxes and beauty dishes. I also modify with a Bowens Fresnel 2000.Feedback
The best way to learn this kind of photography is to immerse yourself in the world of ad photography. Don't just look at photos. Try to break them down. Pay attention to reflections, highlights and shadows. If you can't shoot it in one exposure, don't be afraid to use tools like Photoshop to realize your final concept. Also, be creative with your props. Themed images always present opportunities to spice up the image with peripheral props. Don't overdo it, though. The props should increase the focus of the image on the product itself, and should enhance the overall feel of the image. A prop that draws too much attention to itself has failed its purpose.