The secret garden
Facebook Page
Google+
Youtube Channel
Twitter
Behance portfolio
Deviantart ProfileRead more
Facebook Page
Google+
Youtube Channel
Twitter
Behance portfolio
Deviantart Profile
Shadowness Profile
Youpic profile
Model Mayhem
Read less
Google+
Youtube Channel
Behance portfolio
Deviantart Profile
Shadowness Profile
Youpic profile
Model Mayhem
Read less
Views
163
Likes
Awards
Outstanding Creativity
Superb Composition
Top Choice
Peer Award
All Star
Absolute Masterpiece
Top Ranks
Same photographer See allBehind The Lens
-
Share to Facebook

-
Share to X

-
 Share to WhatsApp
-
 Share via Email

-
Share to Facebook
-
Share to X
-
Share to WhatsApp
-
Share via Email

-
Share to Facebook
-
Share to X
-
Share to WhatsApp
-
Share via Email

-
Share to Facebook
-
Share to X
-
Share to WhatsApp
-
Share via Email

-
Share to Facebook
-
Share to X
-
Share to WhatsApp
-
Share via Email

-
Share to Facebook
-
Share to X
-
Share to WhatsApp
-
Share via Email

-
Share to Facebook
-
Share to X
-
Share to WhatsApp
-
Share via Email

-
Share to Facebook
-
Share to X
-
Share to WhatsApp
-
Share via Email

-
Share to Facebook
-
Share to X
-
Share to WhatsApp
-
Share via Email

-
Share to Facebook
-
Share to X
-
Share to WhatsApp
-
Share via Email

-
Share to Facebook
-
Share to X
-
Share to WhatsApp
-
Share via Email

-
Share to Facebook
-
Share to X
-
Share to WhatsApp
-
Share via Email

-
Share to Facebook
-
Share to X
-
Share to WhatsApp
-
Share via Email

-
Share to Facebook
-
Share to X
-
Share to WhatsApp
-
Share via Email

-
Share to Facebook
-
Share to X
-
Share to WhatsApp
-
Share via Email

-
Share to Facebook
-
Share to X
-
Share to WhatsApp
-
Share via Email

-
Share to Facebook
-
Share to X
-
Share to WhatsApp
-
Share via Email

Behind The Lens
Location
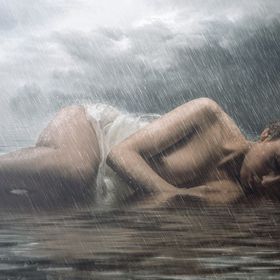
I took this photo in my studio in 2014, here in Turin.Time
I don't remember but I think it was 11.00 a.m. I love to shoot in the studio, becouse I can take pictures at 3 a.m or 2 a.m. too heheheLighting
I used 3 flash to have soft shadows on the dress and face. When I take photos in the studio I prefer to keep the original shadows on the floor only.Equipment
I used my Canon 40D with 24-70mm, 3 elinchrom flash with octaboxInspiration
I love historical dresses and paintings.Editing
Yes, I used photoshop CC, a background from Brownzart stock and flowers on the right. I used my Wacom small pen. I love to play with the blending mode and layer masks. first step : Camera RAW , use "clarity" to improve the details, lower the shadows and highlights 2nd duplicate the layer 3rd open the BG between original layer and copylayer 4- create a layer mask on the copy of the model now change the blend mode of the BG in Softlight 5- Dodge and burn with grey layer 6 -merge all layers and apply camera raw filter 7 improve the clarity about 70% lower the shadows and highlights DONE.In my camera bag
Canon 40D , 24-70mm f2.8, 70-200mm f4, 2 yongnuo 460 and 135mm f4 (Manual focus)Feedback
Remember : if you want to make a great digitalart , you should use a grey background, and 3 flash with octabox. Don't forget to use the pen when you work on Photoshop. And the most important tip is to use Overlay or Softlight blend mode to have a great result.