Symmetries
Berlin. Cityscapes. 2019.
Berlin. Cityscapes. 2019.
Read less
Read less
Views
290
Likes
Top Ranks
Categories
Same photographer See allBehind The Lens
-
Share to Facebook

-
Share to X

-
 Share to WhatsApp
-
 Share via Email

-
Share to Facebook
-
Share to X
-
Share to WhatsApp
-
Share via Email

-
Share to Facebook
-
Share to X
-
Share to WhatsApp
-
Share via Email

-
Share to Facebook
-
Share to X
-
Share to WhatsApp
-
Share via Email

-
Share to Facebook
-
Share to X
-
Share to WhatsApp
-
Share via Email

-
Share to Facebook
-
Share to X
-
Share to WhatsApp
-
Share via Email

-
Share to Facebook
-
Share to X
-
Share to WhatsApp
-
Share via Email

-
Share to Facebook
-
Share to X
-
Share to WhatsApp
-
Share via Email

-
Share to Facebook
-
Share to X
-
Share to WhatsApp
-
Share via Email

-
Share to Facebook
-
Share to X
-
Share to WhatsApp
-
Share via Email

-
Share to Facebook
-
Share to X
-
Share to WhatsApp
-
Share via Email

-
Share to Facebook
-
Share to X
-
Share to WhatsApp
-
Share via Email

-
Share to Facebook
-
Share to X
-
Share to WhatsApp
-
Share via Email

-
Share to Facebook
-
Share to X
-
Share to WhatsApp
-
Share via Email

-
Share to Facebook
-
Share to X
-
Share to WhatsApp
-
Share via Email

-
Share to Facebook
-
Share to X
-
Share to WhatsApp
-
Share via Email

-
Share to Facebook
-
Share to X
-
Share to WhatsApp
-
Share via Email

Discover more photos See all
-
Share to Facebook
-
Share to X
-
Share to WhatsApp
-
Share via Email

-
Share to Facebook
-
Share to X
-
Share to WhatsApp
-
Share via Email

-
Share to Facebook
-
Share to X
-
Share to WhatsApp
-
Share via Email

-
Share to Facebook
-
Share to X
-
Share to WhatsApp
-
Share via Email

-
Share to Facebook
-
Share to X
-
Share to WhatsApp
-
Share via Email

-
Share to Facebook
-
Share to X
-
Share to WhatsApp
-
Share via Email

-
Share to Facebook
-
Share to X
-
Share to WhatsApp
-
Share via Email

-
Share to Facebook
-
Share to X
-
Share to WhatsApp
-
Share via Email

-
Share to Facebook
-
Share to X
-
Share to WhatsApp
-
Share via Email

-
Share to Facebook
-
Share to X
-
Share to WhatsApp
-
Share via Email

-
Share to Facebook
-
Share to X
-
Share to WhatsApp
-
Share via Email

-
Share to Facebook
-
Share to X
-
Share to WhatsApp
-
Share via Email

-
Share to Facebook
-
Share to X
-
Share to WhatsApp
-
Share via Email

-
Share to Facebook
-
Share to X
-
Share to WhatsApp
-
Share via Email

-
Share to Facebook
-
Share to X
-
Share to WhatsApp
-
Share via Email

-
Share to Facebook
-
Share to X
-
Share to WhatsApp
-
Share via Email

-
Share to Facebook
-
Share to X
-
Share to WhatsApp
-
Share via Email

-
Share to Facebook
-
Share to X
-
Share to WhatsApp
-
Share via Email

Behind The Lens
Location
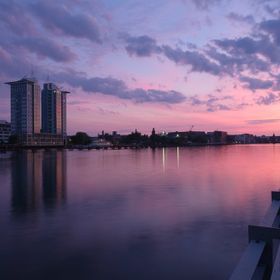
This Photograph was taken in the Government district of the German capital Berlin, where I was working as an Architecture and Cityscapes Photographer at the time. This particular image was composed together wit ha small group of students during a dedicated architecture workshop I gave.Time
We had spotted this location in the morning part of the workshop but did not like the light which was still a bit to diffuse and not directed nicely. So, the thing to do was to come back later. Around 3pm the scene looked perfect. Wait for it .... Sometimes the best advice.Lighting
When working in a studio, we are used to having full control over the light and any thinkable light-shadow, contrast scenario can be (easily) created and tested. When working on location like in the above example the only option is to take the time to see how the daylight is shaping the building (or part of the structure). It happens all the time that 'this one day' is just not going to work. The only option - if the goal is to create a nice architecture portrait of the building, as I call it - is to return another day.Equipment
The advantage of today's camera systems is, that one can work really light weight and get the shot without heavy gear. A FUJIFILM X-Pro3 with the XF10-24 lens was used here. No tripod or filters.Inspiration
As portraying architecture is my daily work and my passion all day long, the inspiration for this particular shot came from the idea to reduce the composition to two triangles with the oval windows BUT adding the shadow roof part to break up before mentioned symmetry in the same shot.Editing
The fantastic thing about the FUJIFILM camera system is, that 'in camera pre-production' is such a powerful tool. You can chose from several 'film simulations' (replicating analog slide or negative film) and then fine tune with a huge set of parameters like shadow and hight light adjustments, white balance, color density, color shifts, film grain, and a few more. So, this picture came straight out of camera using a FUJI VELVIA setting.In my camera bag
I use the FUJIFILM X-series cameras (X-T4, X-Pro3) with various lenses like the XF10-24/4, XF16-55/2.8, XF50-140/2.8 or primes like the XF16/1.4, XF23/1.4, XF35/1.4 sometimes the XF50/1.0 and the XF80/2.8 macro lens most of the time. In addition for high end production the medium format line with the GFX 50S mkii and GFX 100, with the GF23mm and GF32-64mm. Besides that, a sturdy tripod with a ball head as well as some (graduated) ND-filters, spare batteries, on location backup and a cereal bar&water is all I need.Feedback
Find the location that interests you most right in your neighbourhood. Circle around the building and get a feeling of how it changes character and appearance during the day. See and document how harsh light, and overcast day etc. is changing your photo. Come up with a clear visual concept before shooting. I tell my students always "Try to compose your shot as you would draw it". This means most of all, no unwanted objects should appear in your final image and lines are not supposed to be 'floating somehow around' but they should be precisely placed on your canvas. Take the time to carefully check what you see through your viewfinder or on your display. Only if you really like what you see, you press the shutter. That's the difference between a snapshot and a Photograph. Go out and shoot - A LOT !!