Milky Way Mayort Beach rc LR HDR
Sony raw editor imported to LR6 HDR merge and Nik Color Efex Pro PP. I was trying to get the noise down @ ISO 6400 with different HDR engines. This done with ra...
Read more
Sony raw editor imported to LR6 HDR merge and Nik Color Efex Pro PP. I was trying to get the noise down @ ISO 6400 with different HDR engines. This done with raw file corrected in Sony Raw editor. No PS Layers. A7s+FE 16-35mm F4
Read less
Read less
Views
1001
Likes
Awards
Featured
Curator's Choice
Peer Award
Superb Composition
Top Choice
Absolute Masterpiece
Outstanding Creativity
Superior Skill
All Star
Magnificent Capture
Emotions
Impressed
Top Ranks
Categories
Same photographer See allBehind The Lens
-
Share to Facebook

-
Share to X

-
 Share to WhatsApp
-
 Share via Email

-
Share to Facebook
-
Share to X
-
Share to WhatsApp
-
Share via Email

-
Share to Facebook
-
Share to X
-
Share to WhatsApp
-
Share via Email

-
Share to Facebook
-
Share to X
-
Share to WhatsApp
-
Share via Email

-
Share to Facebook
-
Share to X
-
Share to WhatsApp
-
Share via Email

-
Share to Facebook
-
Share to X
-
Share to WhatsApp
-
Share via Email

-
Share to Facebook
-
Share to X
-
Share to WhatsApp
-
Share via Email

-
Share to Facebook
-
Share to X
-
Share to WhatsApp
-
Share via Email

-
Share to Facebook
-
Share to X
-
Share to WhatsApp
-
Share via Email

-
Share to Facebook
-
Share to X
-
Share to WhatsApp
-
Share via Email

-
Share to Facebook
-
Share to X
-
Share to WhatsApp
-
Share via Email

-
Share to Facebook
-
Share to X
-
Share to WhatsApp
-
Share via Email

-
Share to Facebook
-
Share to X
-
Share to WhatsApp
-
Share via Email

-
Share to Facebook
-
Share to X
-
Share to WhatsApp
-
Share via Email

-
Share to Facebook
-
Share to X
-
Share to WhatsApp
-
Share via Email

-
Share to Facebook
-
Share to X
-
Share to WhatsApp
-
Share via Email

-
Share to Facebook
-
Share to X
-
Share to WhatsApp
-
Share via Email

Discover more photos See all
-
Share to Facebook
-
Share to X
-
Share to WhatsApp
-
Share via Email

-
Share to Facebook
-
Share to X
-
Share to WhatsApp
-
Share via Email

-
Share to Facebook
-
Share to X
-
Share to WhatsApp
-
Share via Email

-
Share to Facebook
-
Share to X
-
Share to WhatsApp
-
Share via Email

-
Share to Facebook
-
Share to X
-
Share to WhatsApp
-
Share via Email

-
Share to Facebook
-
Share to X
-
Share to WhatsApp
-
Share via Email

-
Share to Facebook
-
Share to X
-
Share to WhatsApp
-
Share via Email

-
Share to Facebook
-
Share to X
-
Share to WhatsApp
-
Share via Email

-
Share to Facebook
-
Share to X
-
Share to WhatsApp
-
Share via Email

-
Share to Facebook
-
Share to X
-
Share to WhatsApp
-
Share via Email

-
Share to Facebook
-
Share to X
-
Share to WhatsApp
-
Share via Email

-
Share to Facebook
-
Share to X
-
Share to WhatsApp
-
Share via Email

-
Share to Facebook
-
Share to X
-
Share to WhatsApp
-
Share via Email

-
Share to Facebook
-
Share to X
-
Share to WhatsApp
-
Share via Email

-
Share to Facebook
-
Share to X
-
Share to WhatsApp
-
Share via Email

-
Share to Facebook
-
Share to X
-
Share to WhatsApp
-
Share via Email

-
Share to Facebook
-
Share to X
-
Share to WhatsApp
-
Share via Email

-
Share to Facebook
-
Share to X
-
Share to WhatsApp
-
Share via Email

Behind The Lens
Location
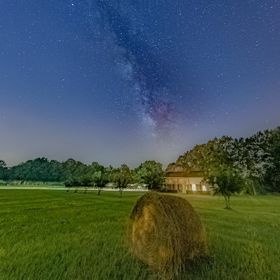
On Naval Station Mayport Beach, Naval Station Mayport, Jacksonville, Florida.Time
It was 10:30 pm during the new moon and the Milky Way was Rising in the east and high in the sky.Lighting
First let me say, this is just the first group of images I selected to process. This is kind of complicated, I went out to the beach that was dark but to my back was a base hotel using some orange halogen lights along with street lights the same color - like the highway lights at night for clarity during foggy conditions. The reason for this color is to not attract sea turtles or confuse them while they find their way back to the ocean and hatchlings to go to the water not toward land. But once your eyes adjust the lights they light up the beach pretty good and anything on it, like the Lifeguard stand. So getting the right color temperature in Hz can be difficult for beach color, sky color and the colors of the Milky Way. For the Milky Way 3890hz, the sky 3200hz and the sand and chair about 3500hz so you have to play with the slider a lot. The A7s lets you adjust your shot with a temperature slider and a creative mode night view that evens out the night sky in a nice light blue so when the camera finishes it's internal processing of its jpeg I have better idea how to post process the raw and get the right color temp for the lighting.Equipment
My Sony A7s (Manual focus and Steady Shot off) with a Sony SEL1635Z @ 16mm @ f/4 and a Tripod.Inspiration
I had been studying the Milky Way and how to capture for some months and to capture it I needed to go a long way or go out west. There are no real dark skies in Jacksonville, Florida – it is the largest city area wise in the United States and the closest place is the Okefenokee Swamp Park in Georgia. I read about Milky Way photography and how to do it on www.lonelyspeck.com and I downloaded the app PhotoPills to my iPad it tracks the Milky Way as well as the Sun and Moon. But in its VR Night Mode it shows where the heart (center) of the Milky Way is in the sky and height with a big red dot. I watched a video on www.lonyspeck.com on how to capture and process the Milky Way with bright city lights in the foreground and you just expose to the right to over expose a little but in post you bring exposure down 1 to 2 ev (to rid noise it dark areas). I like to do HDRI and was thinking that if you just bracketed your shots 1 or 2 ev at 3 frames or to be safe 5 frames at 1 ev you could get a dark shot with the foreground lights dimmer but have your longest shot (brightest) to see the Milky Way. The key I guess is the base of all captures is ISO 6400/widest aperture/30 seconds (appropriate lens time for mm used). When capturing light everything is experimentation and I have been capturing full moons with foregrounds using HDRI type settings 5 frames from 1/250 or 125 or 80 (for clear focus of the moon) to 30 seconds for clear foreground using a Promote Control with my Canon T2i and then picking an HDR engine that gave good results. Lonelyspeck.com did a review of the Sony A7s and found they could even capture as high as f/8 giving dramatic depth. I had the new SEL1635Z f/4 so why not give it a spin. During new moons this year all have been stormy until this month and due to a lot of violence in the city at night I had to go to someplace safe, so I picked the Naval Base beach area. It was extremely hot and humid, so humid you could see like a little cloud effect in the air and a sea breeze coming from the south, if you looked over the parking lot you could see a foggy cloud moving inland. But I had all my gear and curiosity to test it. There was only one thing on the beach to put in the foreground the Lifeguard Stand. Once set up looking southeastward I viewed on PhotoPills VR mode to get the location of the Milky Way (even after my eyes got used to the light I could barely see the whisper of light from the Milky Way). So at 16mm I framed the stand using a flashlight with a lot of sky. With my first test shot at ISO 6400/30s/f/4 it was there on the led display and I took another shot using my iPad tethered by Wi-Fi to see it bigger, then I saw I could do it. I captured using auto night scene, manual exposure ISO 6400/30s and then HDRI at 3and 5 frames 1 ev each and some 2 ev each. I moved around some getting different angles, I was out there sweating anyway so I went for it. For post processing I had just updated to LR6 and it had a HDR merge I wanted to checkout. But first to get the images as close to the jpeg image I saw on the camera led with the long exposure noise reduction the camera uses. I first put all images through Sony’s Image Data Converter. I found creative mode night view to even out the night sky best with the best color (and LR under camera calibration does not have that selection) and after scrolling through the light temps on the camera before capture I found the closest setting to what my eyes saw as far as sky and beach (this took a while). Also adjusting for noise, D-Range, sharpness all in camera settings not carried in raw to LR but if process settings are done to the raw file and saved in a separate raw file those settings will be set in the raw file imported to LR. So viewing the Jpeg camera image and adjusting the raw file getting as close to that great image I saw on the camera display I saved and imported to Lightroom my three images.Editing
For post processing I had just updated to LR6 and it had a HDR merge I wanted to checkout. But first to get the images as close to the jpeg image I saw on the camera led with the long exposure noise reduction the camera uses. I first put all images through Sony’s Image Data Converter. I found creative style “Night view” to even out the night sky best with the best color (and LR under camera calibration does not have that selection) and after scrolling through the light temps on the camera before capture I found the closest setting to what my eyes saw as far as sky and beach (this took a while). Also adjusting for noise, D-Range, sharpness all in camera settings not carried to LR but if process settings are done to the raw file and saved in a separate raw file those settings will be set in the raw file imported to LR. So viewing the Jpeg camera image and adjusting the raw file getting as close to that great image I saw on the camera display I saved and imported to Lightroom my three images. In Lightroom I took the longest exposure into develop mode and first did the lens calibration and color then looking at the jpeg selected the closest camera profile under camera calibration that matched. Then the sliders for highlights, shadows, whites, blacks, clarity, vibrance, saturation and noise reduction (50%) BUT no exposure/contrast. Then synced to the other two images, merged in LR6 HDR (that gives a DNG file). I then put that into Nik Color Efex Pro 4 which I used Polarization, Tonal Contrast (went too far and had the halo around the stand), Pro Contrast, Contrast Only and Graduated Neutral Density. The key was to bring the colors of the Milky Way out and not too bright a red in the stand and correct color of beach not the orange glow from the lights from behind me shining on the stand.In my camera bag
Sony A7s, SEL1635Z, SEL24240, SEL35F28Z, Rokinon 14mm f/2.8, Canon FD, EF, EF-S lens adapters and a bag of manual Canon film camera lenses I have had for years. Also at least two wired remote controls, 2 laser remotes and if you learn how an iPad Wi-Fi for remote app, iPad with all my photo apps (apps eat up phone juice), Lens cleaning cloths, three types of head lamps (with spare batteries), two spare batteries for the camera and fast SD Cards. A Canon T2i I use with a Promote Control. I went to the A7s vs. the A7r due to bracketing options for I do a lot of sunrises/sets and I do indoor with outdoor views in HDRI. Favorite apps TPE, PhotoPills, any and all Weather apps that will show clouds at night.Feedback
Yes, one do not be afraid of bright skies and know your light and how to capture it. Search all websites that have information on capturing the Milky Way and make a check off sheet of equipment and camera settings. Like www.lonelyspeck.com and others state you do not really need a fast lens or a full frame expensive camera, they have been using APS-C cameras and kit lenses for years for their captures (and making a lot of money selling images). The benefit of a full frame is if you use a 16mm lens or APC-S with 10 to 22mm (= to 16mm to 35mm on a Canon) is the time you can leave the shutter open without the stars trailing (little lines in the sky). The 500 rule 500/16mm = 31.25 seconds to leave the shutter open without trails (35mm =14.28 sec/50mm 10 sec). The hard part is getting enough light at a low enough ISO (lower noise). Now even with a kit lens at f/3.5 and a high ISO of 6400 or greater it can be done. But the capture is more dramatic or interesting with a well thought out foreground and to get that you need more light without a lot of noise in the shadows (sometimes you take a shot at dusk of the foreground then take a shot of the MW and blend in PS). So that is why the f/1.8, 2.8 fast (great light gathering) lenses. Nikon has the great AF-S Nikkor 14-24mm f/2.8g ED lens @ $2k but you can get a Rokinon 14mm f/2.8 (SS of 35 sec. @ full frame and Canon APS-C 21mm SS 24 sec) for your camera model for about $325 and yes only Manual Focus and no image stabilization but you turn all that off anyway! With that price even a novice can get the shot. And yes LR/PS/RAW do not have the lens profile for it so there can be some distortion in the foreground, just use the pin and pull trick in PS or select the Nikkon profile LR/PS/RAW. There are many ways to get the capture in bright skies I have given thought to 1. Use a Graduated Neutral Density filter upside down but you need an attachment so as to adjust where the line is in the photo, 2. Expose to the Right (ETTR) (.7 ev) and then reduce exposure in Post Processing, But the highlights are just too blown to be interesting, and 3. Bracketing and HDRI processing. Bracketing gives you a dark image with foreground lit like you see it with your eyes (dim and with structure seen) a camera normal exposure and an over exposed image to better see the Milky Way all bright and colorful. Capture RAW and Jpeg and if your camera lets you Tiff. The sites tell you not to use Noise reduction reason it takes longer to process BUT the in camera jpeg shown on the camera screen is going to use it anyway. Long exposure noise reduction is the only noise reduction that gets imbedded in to the final RAW file (that is any exposure 1 second or longer) (https://photographylife.com/how-to-get-accurate-sony-colors-in-lightroom) when taking a single image BUT when Bracketing in Manual Mode all is turned off and a captured image comes up faster. So when capturing you have another choice in Manual mode to bracket or to single image capture selecting Shutter Speeds for each. But another option bracket in aperture mode that leaves all noise reduction on BUT the Camera selects the center image Shutter Setting. Aperture mode is where you need to have a Shutter Chart/s (I printed and laminated one and have on a band on my wrist) that you have marked in ev tick marks for 1 and 2 evs so as to get that 30 second exposure, 1 ev a center exposure of 16 sec and a 2 ev a 4 second exposure (also use it for 5 images @ 1 ev), adjust ISO to get your settings set on center image so the long exposure does not go beyond the 30 seconds. You can also use bulb mode and use a intervalometer setting shutter speeds to go beyond the the 30 secs if you have a shorter mm lens, but you have to be fast changing the the Shutter Speeds so merge goes good (a lot of skill) when using a Voigtlander 12mm f/5.6 Full Frame Shutter Speed 41.6 sec that you could lower ISO really low. It is a lot to remember when out in the humid heat or dry cold so have a check off list for each capture. Do not just take one but many with all the options you want to use. Use a red/blue/green headlamp to see the camera buttons BUT remember to turn it off before capture. You will not always have time to sit in daylight to adjust you lens to infinity then wait for your time to capture so learn to use the in camera Live View magnification function to focus on a distant light or building and remember to select a good shutter setting for the focusing, like the moon a SS of 1/250 to 1/80 is needed to fine tune the focus. And far as focus verify your mm setting if you change on a zoom lens the focus will change also so a redo is in order. If shooting on a humid beach DO NOT CHANGE LENSES. Always use a camera rain coat. Carry clean lens cloths for wiping moisture off lens (and verify focus after). Study the Milky Way movement like you would the moon and sun. I just recently figured out that you do not need to wait for the New Moon, after a full moon it rises 56 minutes later every evening so if sunset is at 8:30 pm and the moon does not rise till midnight or beyond then you can even capture the Milky Way even slightly during/after the blue hour. The Milky Way is Low in the sky in February and rises in the east, just like the moon and sun and travels across the night sky the same as the moon and sun. As the months go on it gets higher in the Sky (northern hemisphere) till after July when it starts getting lower and more easterly when it sets. When you use the app PhotoPills and scroll through the days and months you get a better understanding of its movements and a trip to a planetarium and a request to see the Milky Way’s movements through a whole year that will really open your mind to capturing it. Again with elevation in the sky in mind pick your foregrounds, an old car, building or over a lit up city. Also do not rule out the panorama, some cameras do this inside, using a 35 or 50 mm f/1.8 can give you that rainbow like Milky Way. After watching Trey Ratcilff’s HDR tutorial and the use of layering images in Photoshop with a number of good images created different ways layered and brushed in it could be a great way for an awesome capture blending. I do not have Photoshop yet but may start renting just to do more experimenting in Post Processing. To see what happens when your foreground is lit from behind on a dark beach look at these (another experiment in Milky Way Capture), http://www.viewbug.com/photo/56580373 http://www.viewbug.com/photo/56473533 http://www.viewbug.com/photo/56381801 Knowing your light source can really help with foreground lighting, these were lit by the lights from St. Simons Island with the city lights bounced off of overhead clouds but still could not see the foreground image without a flashlight with the human eye (also the Lighthouse light beam would flash across the foreground during the 30 second exposure so you have to stand away and aim so your shadow and camera shadow are not in the frame. Whew! So much to think about!!!!!