If anyone is interested in the story behing the photograph: https:--www.geranraath.photography-portfolioprojects-and-works-pride-blur
Views
1217
Likes
Awards
Contest Finalist in Experimental Fun Photo Contest
Halfway22 Award
Curator's Choice
Peer Award
Outstanding Creativity
Absolute Masterpiece
Top Choice
Magnificent Capture
Superior Skill
All Star
Superb Composition
Genius
Emotions
Impressed
Top Ranks
Categories


Same photographer See allBehind The Lens


Discover more photos See all


Behind The Lens
Location
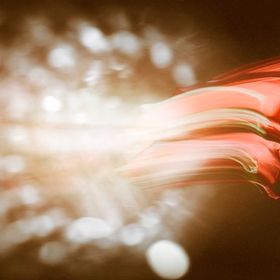
In our studio, Nelspruit, South Africa. My wife (MUA) and I create all our private works in the studio. While she is making prothetic masks and pieces on the one side I setup lights on the other.Time
This shot was taken around 22:00. Since we’re in studio I control all light. I like shooting this way because I can tweak as much as I like to get the lighting to what I had envisioned. The makeup took really long to apply. “Red” - Life, took 8 hours for the airbrushing, makeup and baldcap. Michelle, the MUA, applied this on herself!Lighting
After initial freehand drawings the scene is built in software to emulate the lighting setup. The shots were done with exposure times of 2.5 to 6 seconds. The space is dark so that there are no unwanted exposures created during the shot apart from the controlled continuous light source. The model moved under a continuous light source and their motion was frozen at the end of the exposure with Godox strobes. Timing the shot is critical. While the model cleans up the corresponding coloured cloth is thrown under the same exposure and lighting conditions to be digitally added to the photograph later.Equipment
The Sony A7Riii with Sigma 70mm ART lens is mounted on a tripod to keep the camera still during the long exposure. While the model moves around a Godox FV200 continues light casts light on her causing the blur. She is frozen at the end of the exposure by 2 Godox AD300’s. One for backlight and one for key from the right of camera.Inspiration
This shot is part of a 9 photo series done for PRIDE Month. LGBTQ is very close to our hearts, as we have very close friends who are part of the LGBTQ community. It has taken time and research to better understand it, but this is a social responsibility that no person can remain exempt from. After developing a better understanding of the LGBTQ community, we decided to express the meaning of LGBTQ through the colours of the flag. We chose a popular and generally well accepted version of the LGBTQ flag and then broke the colours down one by one, and interpreted the meanings of each colour with love, kindness and understanding. We have also spoken to many friends in the LGBTQ community, to see if our ideas were on track, and if they felt we were representing the community correctly. The support was there from the start and we proudly present our artworks as a true, loving and kind expression of Daniel Quasar’s “Progress Pride Flag”. It is widely accepted that the colour red on the LGBTQ+ flag represents “LIFE”. Being parents of two wonderful teenage girls, and having experienced the incredible experience of childbirth twice, we agreed that the female form is still an accurate representation for birth and in turn, life. The female form represents a vessel of life and love. “Life” is fairly nondescript but obviously female in form, and her heart conveys the love felt when giving life to another human being, and the overwhelming love that develops within for another human being. “Life” explodes with beauty and burns away the darkness with her light and passion.The heart on her chest signifies LOVE which we believe is the key to life.Editing
Loads! From the hundreds of photos a final shot is selected that we feel conveys the message the best. This is sent to a retoucher in Vietnam to be retouched according to industry standards. After receiving the image back I compose the picture combining the model and cloth, together with lighting effects in Photoshop to produce the final print. Each shot from taking it to final image takes about 40 hours.In my camera bag
Sony A7Riii, Sony A7c bodies. Sigma ART 24, 70 and 100-400mm and Sony 50mm and 200-600mm lenses. I always lug my strobes with as well so there are 2 Godox AD300’s and a TT350 with Parabolic foldup and white umbrella modifiers as well. Then there are the stands, sandbags, clamps etc. I pretty much cart the whole studio with me. Michelle then comes with her 4 makeup and SFX boxes too!Feedback
Give yourself enough time. Play with rear and front sync curtain flash. If your strobes have a time delay option you can have a beginning and end to the blur. Getting the perfect movement takes a few shots so don’t get discouraged. It’s a lot of fun doing this type of photography. Don’t be too ambitious the first time, keep the colour scheme and movement simple. Then build on that success until you have what you want.