Glass
First time using manual mode.
First time using manual mode.
Read less
Read less
Views
140
Likes
Awards
Action Award
Celebrity Award
Outstanding Creativity
Peer Award
Top Choice
All Star
Emotions
Impressed
Top Ranks
Same photographer See allBehind The Lens


Behind The Lens
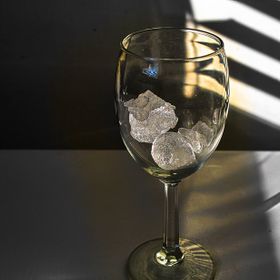
Location
The photo was taken at home in my studio here in Baltimore, Maryland. I had to set it up right for taken special effect pictures. This studio is a very low-cost studio and anyone can set it up.Time
This was a night shot, but you can take this picture at any time of the day. I think the greatest special effects are created in the studio. If you work outside the studio make sure you have enough light to get the effect you want.Lighting
To get the effect wanted I used a pulverizing filter. I made sure that the background was well lit. By the way, you don't need to spend a lot of money on lighting. I created many of the lights I use in my studio. I also created the reflectors used for this shot.Equipment
This is a plastic drinking glass shot using a pulverizing filter and a white backdrop. I placed my lights on the glass and adjust the filter to get the effect I wanted. Using my Canon EOS4000 D set on M, ISO 1600, yes you will need your tripod and flash.Inspiration
After looking at a few of my old Pentax notes and a youtube video on light, I began to look for things that would give me great special effects. I used many objects before coming up with this shot and had to play with the pulverizer until I got this effect. I also looked at a few other people work.Editing
With this shot, you will do very little post-processing. you might want to adjust the contrast. I will say that post-processing is sometimes needed with special effects pictures. You have to think about your shot and plan it carefully. Think of what you want people to see when they look at the picture.In my camera bag
The first thing I pack is my Canon EOS 4000 D with a 58 mm lens. yes this a great camera for a beginner, but because it is lightweight and holds up well I love using it. Note, it is not the camera that creates a great picture, but the person using the camera. I also take my 70 mm telephoto lens and a wide-angle lens. I time pass I also packed a 2x converter and a 200 mm lens. I hope to have a new 2x and 200 mm lens for this camera soon. Because I love to shoot pictures of duck and water I also make sure I have a few filters.Feedback
Before you start, test a few objects to see how the light is reflected off them. Lighting is very important for this shot or others like it. make sure you use clear plastic and not glass, light acts differently when using glass and you will not get the color of the rainbow coming of it. pulverizing filters are somewhat tricky so learn to use them well. you want your colors to stand out and cause people to ask questions