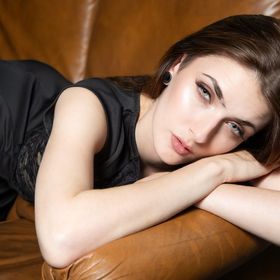
Its A Blue Thing
Views
454
Likes
Awards
Contest Finalist in Covers Photo Contest Volume8
Peer Award
Absolute Masterpiece
All Star
Top Choice
Superb Composition
Outstanding Creativity
Magnificent Capture
Virtuoso
Genius
Superior Skill
Emotions
Impressed
Top Ranks
Categories
Same photographer See allBehind The Lens


Discover more photos See all


Behind The Lens
Location
This photo was taken in my friend's studio in Erith, Kent. S.E. England. My friend has mentored me for a good few years now and this image is a product of that great training and tuition.Time
We always start early...about 7am. If it's a new model that I'm working with, I normally meet them for breakfast or do something in the morning (it's a good ice breaker) to get to know them before the shoot. If you work with a new model and don't have some sort of rapport before you start, most of the time the first set of images are useless as awkwardness shows before people start to relax and get into the swing of things. This image is one of a set from a shoot that lasted most of the day doing/trying different looks, poses and lighting set ups using one, two and sometimes even three lights towards the end of the shoot.Lighting
The studio light was a Bowens 400watt and octagonal Softbox as I prefer a more rounded catch light in the eyes. I was going to use two lights, one as a key (main) light and one positioned behind her pointing at the back of her head in order to get some separation between the voil and the background but as it turned out the one light did the job and gave me the look that I wanted.Equipment
The camera body used was a Nikon D7200 with 24-70mm Nikon lens at F8 and ISO200. The studio light was a Bowens 400watt and Octa Softbox.Inspiration
"Afghan Girl" which is a 1984 photographic portrait of Sharbat Gula, also known as Sharbat Bibi, taken by journalist Steve McCurry was kind of my inspiration for this shot. I am always fascinated by the look of people's eyes in good portraits, they are indeed windows to the soul. Although in this image the model is looking away, for the rest of the set she was looking straight down the lens. Having most of the head covered allowed me to focus more on the eyes. In most portraits, the idea is that the viewer is drawn to the eyes first.Editing
I use Lightroom for processing images from the Nikon D7200 as most other programs cannot support the complex RAW file type that is produced. I always shoot in RAW, it makes editing more flexible and so much easier. The images are then converted to JPEG and final edits done using Photoshop. Only slight blemish removal, minimal skin softening and shadow/highlight modification was done to this image in post.In my camera bag
I only ever carry what I need for a particular shoot and not being on a footballers wage, most of my equipment is borrowed from other photographers that are either family, friends or people that I know and socialise with. In my bag/s you will find a Nikon D7200 and D3200. All Nikon lenses, including 70-200mm, 24-70mm, 50mm and 18-105mm. A yongnuo flash/speedlight, and 64GB Class 10 Sandisk memory cards to cope with the size of the RAW files produced.Feedback
Use just one light as a main key light with an octagonal softbox (for a nice round catch light in the eyes) positioned to the model's front right hand side (just above the head) facing slightly downwards to give a nice soft and flattering light. Use voil wrapped around the head and shoulders as desired. It's difficult to work with so have some clamps and/or sticky tape handy.