Galactic Monuments
Camping next to Monument Valley, UT was like a dream. Amazing scenery with the backdrop of an amazing view of the stars.
Camping next to Monument Valley, UT was like a dream. Amazing scenery with the backdrop of an amazing view of the stars.
Read less
Read less
Views
8000
Likes
Awards
Contest Finalist in Night Time Photo Contest
Contest Finalist in Capture The Milky Way Photo Contest
Contest Finalist in Covers Photo Contest Vol 37
Contest Finalist in Our National Parks Photo Contest
Contest Finalist in Monthly Pro Vol 26 Photo Contest
Featured
Contest Finalist in Monthly Pro Vol 24 Photo Contest
Contest Finalist in Monthly Pro Vol 23 Photo Contest
Peer Award
Superb Composition
Absolute Masterpiece
Top Choice
Magnificent Capture
Outstanding Creativity
Superior Skill
All Star
Genius
Virtuoso
Emotions
Impressed
Top Ranks
Categories


 PRO+
PRO+


Daniel_A_Angulo
November 12, 2017
Monument Valley is amazing, right in the border of Utah and Arizona. I absolutely love that place and this photo is superb.
 PRO+
PRO+


 Ultimate
kurtsnyder
August 26, 2021
A rainbow of stars! I have never seen that before! Thanks for providing this great capture so we all can see and enjoy it! Kurt
Same photographer See allBehind The Lens


Discover more photos See all


Behind The Lens
Location
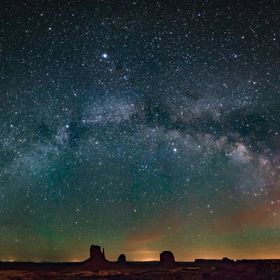
This panoramic shot was taken at Monument Valley, UT. Located in the Navajo Nation, there's a placed called "The View," which offers hotel, wilderness campground, RV, and cabin accommodations.Time
This was taken at around 2:30 AM, after a long day of intense hiking at the Grand Canyon. That morning, at around 4:00 AM, we drove from Phoenix, AZ to the Grand Canyon, which was a 4 hour drive. We then hiked the entire day until about sundown, and then after dinner, drove another 3 hours to Utah to get to our campsite. We rolled into Monument Valley past midnight and had to set up our tent in complete darkness. After settling in, we spent the next couple hours stargazing and photographing the Milky Way over the Monuments. The Monuments, the backdrop of the Milky Way, and some shooting stars, it was an experience to remember.Lighting
Thankfully, it was a new moon at the time, so we didn't run into any lunar light pollution. The glow you see on the horizon is from distant towns, and the lights on the right are from the hotel. I wanted to make sure to get the definition and fine details in the Milky Way, so it was shot at 30sec at ISO4000 to capture the small, faint stars.Equipment
This was shot on a Nikon D600, mounted with a Rokinon 14mm f/2.8 super wide angle lens, on a Manfrotto tripod and Gitzo ball head mount. I used an intervalometer strictly as a shutter release. I wasn't shooting a time lapse that night, but was panning the camera between shots to capture the panorama of the scene. I wanted to be hands off the camera as much as possible.Inspiration
I have always wanted to shoot a full panorama of the Milky Way ever since I discovered astrophotography, but living in the Chicago area makes it hard to photograph the Milky Way, much less get a panorama view of it! So when I planned my trip out west, I made sure to pick out a spot where I could get that full view. And what better place than Monument Valley, with some of the most interesting terrain coming straight out of the desert?Editing
Probably the biggest part of the post process for this shot was the stitching of the panorama. Thankfully, Adobe Lightroom does an amazing job in stitching, even with it being shot with a super wide angle lens. It is a stitch of 7 shots to get the full panorama of the Milky Way. After stitching, I had to adjust for distortion, and then brightness and contrast. Not much was done with the color balance or the hues, but I did increase saturation a little from the RAW to bring out the true colors more. My philosophy of editing is that I want to convey a feeling through my images and my editing. It is so hard to capture and convey to your viewer, what you felt inside at the time of the photo, so I try to do that with my post-processing. Convey what my mind saw and what I felt. And hopefully, the viewer will be able to experience even a little of that.In my camera bag
When I'm out in the field, you can usually find these items in my camera bag (some of it may vary, depending on what the purpose of my photography outing is). First, is the camera body. I use a Nikon D600, rugged, fast, and great in low light situations for action and night shots. I have been very happy with it's performance with astrophotography. Next, is my set of lenses. I use a wide range, depending on the purpose. I love landscape photography, so my go-to lenses for that is the Rokinon 14mm and Nikon 20mm super wide angle lenses. I really like the field of view of the Rokinon 14mm, and the clarity and contrast of the lens is just great, you can just see it by looking at the glass and construction. The only thing is that it is fully manual, which is great for setup shots, but is a little slower. That's when I turn to the Nikon 20mm, which although does not have the same field of view, has a fast auto focus, and is equally clear edge to edge. When I want to get closer to my subject, like in the case of wildlife or photo-journalistic shots, I'll use lenses such as the Nikon 24-70mm, 35mm, 50mm, 70-200mm, and Tamron 150-600mm. The Tamron is an overkill most of the time, but it is a great lens, with a huge focal length, and amazing image stabilization. I also use the Tamron for deep sky photography, like nebulas, galaxies, and the sort. All of these lenses put together allow me to capture anything from sweeping, scenic vistas, to battling elk in the Rocky Mountains, and everything in between. In addition to lenses, my standard equipment include: Manfrotto tripod, intervalometer, headlight for when photographing at night, and a Peak Design Capture Camera Clip to attach my camera to my backpack shoulder strap for quick and easy access and freedom of movement when I don't need the camera in hand. Oh, and I can't forget about the bag itself! I use a Mountain Smith Borealis camera backpack, which allows me to carry my camera body, up to 6 lenses, all my accessories, and still have room for things like my laptop, water bottle, a light jacket, and snacks.Feedback
When capturing the Milky Way, there are a few things to keep in mind. Location, timing, equipment, settings, execution. Pick a location that is far enough away from city lights to avoid light pollution. I would recommend an app like Dark Sky Finder to pick out a spot near you or along your route. Plan ahead for conditions such as the moon phases and weather. Pick a night when either the moon sets early (before midnight) or wait for a new moon to get the best results. Check the weather ahead of time to avoid clouds or fog. Pick the time of year that the core of the Milky Way is most visible. Late spring through summer months for the Northern Hemisphere. Check with a star finder app on your phone to see what time the Milky Way will be in the desired position. Bring the right equipment with you. A camera (full-frame reccommeded) that has good low light capabilities. Choose a wide angle lens (up to 35mm) that allows you to open up the aperture to at least f/3.5. A tripod is a must, coupled with a head that allows you to tilt your camera to frame vertically and pan while keeping the camera level. Settings for your shot are very important, and may vary depending on the conditions. First you need to start with focusing the lens properly. This can also vary from lens to lens. Don't trust the infinity marker on the lens, because sometimes it will focus up to infinity before you even reach the marker on the focus ring and then back off from it when you reach it. So get to know your lens. The best way to find the right focal point for your lens is to experiment during the day. Once you have found that "sweet spot" for your lens, I would recommend making a custom mark on your focus ring, so that you can find it every time. Next are the camera settings. When Photographing the Milky Way, it is usually best to use the Exposing To The Right (ETTR) technique by using the highest possible ISO that your camera is rated "low noise" to collect the maximum amount of light, which is necessary to capture those faint stars in the Milky way. To see if you are using ETTR correctly, simply put, look at the histogram of your shot, and see if the information oriented to the right of the chart without being clipped off. I usually start off at a shutter speed of 30sec. at ISO4000, and then adjust the ISO up or down from there, depending on the lighting conditions. Also, choose a specific white balance so that you have consistency across each frame. You can always correct it in post-process. Finally, execution of the shot. Once you have your camera set up with the correct settings, make sure you frame the camera vertically, and that you will be able to see the Milky Way in every frame as you pan across. Start at one end of the Milky way, and using your intervalometer, fire off your shots, panning between shots until you reach the other side of the Milky Way. The more the shots, the better. Once you have all your shots, import them into Adobe Lightroom, Adobe Photoshop, or other software that allows you to stitch panorama's. Using the built-in panorama generator worked well for me to create the full panorama. Make sure you remove the lens vignetting if that option is available. At that point, it was simply editing for colors, brightness, and contrast. That part is completely up to you and your creativity.