trainstation luik inside
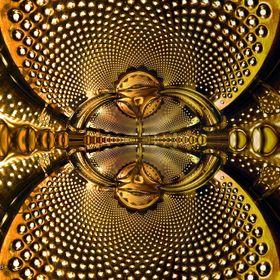
trainstation of luik-guillemins, belgium.
With this type of photography, you start to see so much more, even in ordinary places....
Read more
trainstation of luik-guillemins, belgium.
With this type of photography, you start to see so much more, even in ordinary places.
Read less
With this type of photography, you start to see so much more, even in ordinary places.
Read less
Views
1488
Likes
Awards
Zenith Award
Top Shot Award 21
Featured
Contest Finalist in Modern Architecture Photo Contest
Peer Award
Superb Composition
Outstanding Creativity
Absolute Masterpiece
Top Choice
Magnificent Capture
Superior Skill
All Star
Emotions
Impressed
Top Ranks
Categories

Same photographer See allBehind The Lens


Discover more photos See all


Behind The Lens
Location
This was taken in the trainstation of luik-guillemins, belgiumTime
I went there by train (it's a trainstation afterall) and it's a several hours journey, so it was well in the afternoon allready.Lighting
No extra lighting was needed here. If the "ribcage" area would have been dark, I would have lit that area with flashEquipment
Nikon D7000, a rather cheap and somewhat wobbly regular tripod (but it's still better than nothing), and a sigma 8-16.Inspiration
I like how this type of panorama's seem to add an extra layer to the world around you. Get a bit more of what is around you, without having to add anything. It's reality+Editing
The standard lightroom edits that I synchronise over all the individual images that will make up the panorama. If I used bracketing, I combine sets of 3 pictures into an hdr, then stitch everything together and edit some remaining errors if needed.In my camera bag
Always my D7000 and sigma 17-50, additional lenses when the situation requires, like nikkor 35mm, sigma 8-16 or tamron 70-300 with extention tubes. I always have a wired remote, 2 extra batteries and a small greycard with me. Always have several tripods in the trunk of the car, going from damn cheap and wobbly but very light to fairly expensive and heavy but very stable and versatile. The wobbly tripods are always usable to put a flash with flash-umbrella on.Feedback
Very important with this type of photography (and something that is often not being taught correctly by photography teachers either) is NOT to use a tripod, or if you must, to move the tripod after each shot, not just the camera. You need to find the center point of your lens first, and that is the point that should be rotated around. If you move it around any other point, like the bottom part of the body when on a tripod, you will have parallax errors, and that will result in alot of errors in the panorama or even not stitchable at all. It is usually much easier making a perfect fitting panorama by hand than using a tripod in the traditional way, but if your shuttertime has to be set too long, then use the tripod and move it with each next shot in such a way that the center of your lens is always at the same spot. You can buy specialized 360 panorama tripods. They can help you create a better fitting panorama, but prevent you from including the area right below the camera, leaving an ugly dark spot (and they are way too expensive anyway). This picture would not have been possible with a 360 panohead. An extra bonus of moving the entire tripod each time, is that the tripod legs are automaticly removed in the stitched panorama because they are always at a different spot in each of the individual pictures. Whatever does occasionally remain is easely shopped out. Settings: I decide what will be the important area in the panorama, and take measurements there. If the rest of the scene has much darker or brighter area's, I set the camera to bracketting. I always do this when taking these panoramas outside so I can compensate the much brighter sky. Always set camera to manual and autofocus off. lens: Using an ultra wide angle lens is advisable, you need much less pictures that way to complete a full panorama, so less chance of any errors that would complicate the stitching. procedure: I usually start with the lower half row of images with the camera in portrait orientation, and include the area directly under the camera in each shot of that row. At 8mm, that is enough to cover the complete lower section of that part of the panorama. Once the bottom row is completed (360 degree around the center point of the lens), I start with the top row, same procedure. It may sound difficult, but it's actually very easy once you know what to do and why. All my panorama's are made like this, often without the use of a tripod.