Cyborg Girl Fiona
Views
811
Likes
Awards
People's Choice in Painted Ladies Photo Challenge
Outstanding Creativity
Peer Award
Top Choice
Superb Composition
Superior Skill
Absolute Masterpiece
Top Ranks
Categories

Same photographer See allBehind The Lens


Discover more photos See all


Behind The Lens
Location
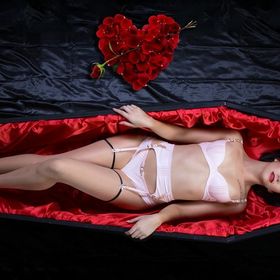
This photo was taken in my studio with a simple white background and a gorgeous model who was just fabulous to work with and keen to make this cyber girl photo work well.Time
It was an afternoon shoot, but being in studio with all artificial lights meant that we had full control over the lighting.Lighting
I used two studio flashes on the background set at f/16 to get a really good blown-out white and two studio flashes in soft boxes to light the model. One light was placed 45 degrees in front right set to f/8 and one at 45 degrees back left about a stop and a half dimmer. In this way I get good 3D separation and shadows, but still a bright "showroom" style shot as if the cyber girl was on display.Equipment
I love my Canon 5D Mark III and used this along with a simply stunning Canon L series f/1.2 85mm lens which I always use for portraits. The focus had to be tack sharp.Inspiration
I was inspired by robotic like photos I had seen elsewhere and I wanted to try out a few different techniques in photoshop to get the effect I wanted. I took quite a few different poses and photoshopped the best ones in this particular style. The result is quite an interesting photo in a real 21st century cyber girl style.Editing
I shot this in raw so I could have the best quality image to play with in lightroom and photoshop. In Lightroom I did the usual colour balancing, contrast enhancement, sharpening and tidying up. Then I imported into photoshop to smooth the skin and add the various lines, with shadows and slight embossing to give the paneled effect. For one panel (on her left arm) I deliberately separated it out as if it was a loose panel to make the look more realistic. I then added buttons, an on/off switch, an LED panel with her name on it, etc. All done to make it look a little more interesting, a little more realistic.In my camera bag
I always have my trusty Canon 5D Mark III, Canon 85mm f/1.2 L portrait lens, 24-70mm f/2.8 L lens, 70-200mm f/2.8 lens, 2 Canon 600EX RT flashes, plus triggers for off-camera work, heaps of spare batteries and memory cards (I stick to 32GB cards normally). That's my goto kit for portrait and fashion work. If doing landscapes, I'll add in my Canon 17-35mm f/2.8 L lens instead of the 85mm portrait lens plus a tripod and a polarising filter.Feedback
The key to this shot is the post-processing. I use frequency separation techniques to smooth the skin and get the uniform colour. The rest is a bit of artistry and quirky add-ons like the twin USB ports because its fun!