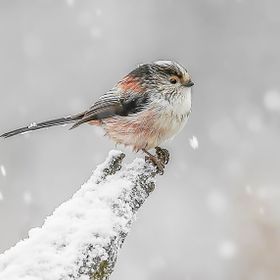
peregrine falcon
Views
632
Likes
Awards
Superb Composition
Top Choice
Absolute Masterpiece
Peer Award
Magnificent Capture
Superior Skill
All Star
Outstanding Creativity
Jaw Dropping
Genius
Love it
Great Find
Top Ranks


Same photographer See allBehind The Lens


Behind The Lens
Location
The photo was taken at Belper, Derbyshire the peregrines have nested on a building for the last few years and are resident all year roundTime
if i remember right i took this around 11.00 amLighting
the lighting was not the best has it was a quite overcast day so i had to shoot with a higher ISO and over expose by a stop to avoid a silhouette of the bird against the white skyEquipment
i used a canon 60D with a canon 300mm 2.8 lens with a 2x converter hand heldInspiration
i have lots of peregrine flight shots but i wanted to see if i could get something a bit different, i spotted the peregrine perched on top of a large building so i stud right below it and waited for it to take flight, luckily for me when he took flight he dived straight down towards me after a pigeon that had flown past allowing me to capture this imageEditing
due to the poor light and shooting against an overcast sky i had to highlight the shadows to bring out the detail and i would have sharpened very slightly and i think i altered the saturation slightlyIn my camera bag
i normally plan were I'm going so only take the equipment i will want for the type of photos I'm going to be taking, i can't be doing with carrying loads of equipment I'm getting to old lol... i always take a spare battery and lens cleaning equipment though and i will take a 1.4x and 2x converter to give me some flexibility as my main lens is a 300mm 2.8 primeFeedback
i would recommend a lens of at least 300mm, settings will depend on the conditions but when taking this type of image i will shoot in aperture priority, AI servo for tracking and have my camera set to its highest burst rate. I always set the white balance according to the conditions i.e. cloudy, sunny etc and i normally have my ISO set at around 400, even on a bright day as this will give me a faster shutter speed to help freeze the subject. i normally use the single centre point for focusing this prevents the camera refocusing on any other objects that may come into the frame whilst tracking the bird however if i am shooting against a clear blue sky i will sometimes switch to centre + surrounding points, this can be useful if you drift off the bird as the surrounding points will help keep the bird in focus. When I'm shooting against a white sky i will also over expose the image by 1 or 2 stops to prevent the bird being a silhouette and i will always try and do a few test shots on other birds flying past to check the image looks ok. i never use a tripod for BFI shots as i feel i can get on the subject much quicker but this is just my personal preference and if you are not use to tracking BIF a tripod can be very useful. a trip to your local pond were people feed the birds is also a great way to practice tracking BIF because at the end of the day even if your camera is setup correctly, if you can't track the bird you won't come away with the shots, when i comes to taking the picture i will try and track the bird from a distance and wait until the bird is quite close before pressing the shutter button, i will then fire off as many shots as possible and hopefully there will be a few shots i am pleased with. This seams to work for me but you may find other settings work better for you so the best advice i can give you is get out there and practice, practice, practice and if you are anything like me you will never be happy, no matter how good the picture LOL..........