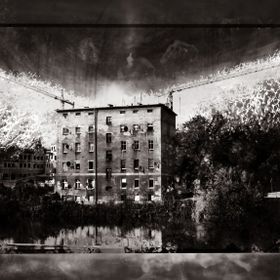
Ifrit
From "Nimbus" series.
Silver print from 24x36 negative. Developed with sponges and brushes, and partially solarized.
From "Nimbus" series.
Silver print from 24x36 negative. Developed with sponges and brushes, and partially solarized.
Read less
Silver print from 24x36 negative. Developed with sponges and brushes, and partially solarized.
Read less
Views
247
Likes
Awards
Great Shot
Top Ranks
Same photographer See allBehind The Lens
-
Share to Facebook

-
Share to X

-
 Share to WhatsApp
-
 Share via Email

-
Share to Facebook
-
Share to X
-
Share to WhatsApp
-
Share via Email

-
Share to Facebook
-
Share to X
-
Share to WhatsApp
-
Share via Email

-
Share to Facebook
-
Share to X
-
Share to WhatsApp
-
Share via Email

-
Share to Facebook
-
Share to X
-
Share to WhatsApp
-
Share via Email

-
Share to Facebook
-
Share to X
-
Share to WhatsApp
-
Share via Email

-
Share to Facebook
-
Share to X
-
Share to WhatsApp
-
Share via Email

-
Share to Facebook
-
Share to X
-
Share to WhatsApp
-
Share via Email

-
Share to Facebook
-
Share to X
-
Share to WhatsApp
-
Share via Email

-
Share to Facebook
-
Share to X
-
Share to WhatsApp
-
Share via Email

-
Share to Facebook
-
Share to X
-
Share to WhatsApp
-
Share via Email

-
Share to Facebook
-
Share to X
-
Share to WhatsApp
-
Share via Email

-
Share to Facebook
-
Share to X
-
Share to WhatsApp
-
Share via Email

-
Share to Facebook
-
Share to X
-
Share to WhatsApp
-
Share via Email

-
Share to Facebook
-
Share to X
-
Share to WhatsApp
-
Share via Email

-
Share to Facebook
-
Share to X
-
Share to WhatsApp
-
Share via Email

-
Share to Facebook
-
Share to X
-
Share to WhatsApp
-
Share via Email

Behind The Lens
Location
I took this picture in Berlin in the summer 2009.Time
If I remember well, the picture was taken at the beginning of the afternoon.Lighting
Not much, as most of the creative work on this picture was performed afterwards, in the darkroom.Equipment
For this picture I used my standard combination of camera, lens and film of the time : Camera: Olympus OM2 Lens: Zuiko 50mm 1.4 Film: Kodak Tri-X 400 developed in D-76 (1+1) Paper used for the print: Ilford RC Pearl 18x24cmInspiration
At the time I was collecting images of monolithical, totem-like shapes for my series "nimbus" (http://www.nicolasboria.com/nimbus/). This old gas pump fit perfectly the description, so I took a couple of shots. I believe most photographers wouldn't resist photographing it if they had the chance ;) For the specific style and needs of the series I shot it straight from the front, composing it like a portrait.Editing
Yes, tons of it, although very little photoshopping is involved ;) All the work was done directly the print, using an experimental process of my own, which involves partial developing, partial fixing, and solarization. The two "brush strokes" in the middle of the image were performed with some developer, even before the print was exposed under the enlarger. The black aura all around the image comes from solarizing the image after fixing only its central part.In my camera bag
I don't really have a "normal" gear set, as it depends on what my intentions are when I go out to take pictures. If I want to have fun and not really pay attention to the technical aspects, I would usually only bring a 6x9 brownie box loaded with Ilford FP4. If I want to travel light but still do some serious work, I would bring my OM-4 along with a variable set of lenses which would always include a 50mm f/1.4, and depending on my mood, a 28mm f/2.8 and/or a f/135mm 4.5. With this set I usually shoot on Kodak Tri-X 400. If I go out only to take pictures and don't mind the weight, I travel with a 5'x7' old wooden view camera, a carbon tripod, two film holders, and 3 lenses, a Zeiss Tessar 210mm f/4.5 (which behaves as a 50mm), a Lomo 450mm f/9 (really heavy, but beautiful lens) and an antique lens from the end of the 19th century which is probably a 140mm f/9. With this set, I shoot directly on Ilford RC photographic paper, which gives surprisingly good results, although it's trickier and much less sensitive than film.Feedback
Explore the outside world with your camera in hand, and explore the infinite possibilities of darkroom printing process ! Lose yourself in it, and don't be discouraged by ugly looking prints, it's part of the game (I won't tell you how many prints of this image went awfully bad before I finally came with this good one) ;)